
CP-6408-31-I-Quick-Install-Guide

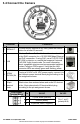

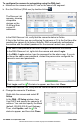

Table Of Contents

CP-6408-31-I QIG Rev 120
June 2021
This document does not contain any export-controlled information.
To configure the camera for networking using the DNA tool:
a. Make sure the camera and the PC are on the same LAN segment.
b. Run the DNA tool (DNA.exe) by double-clicking .
The Discover List
appears, showing
compatible
devices on the
VLAN and their
current IP
addresses.
In the DNA Discover List, verify that the camera's status is Online.
If this is the first time you are configuring the camera or if it is the first time after
resetting the camera to its factory defaults, DNA automatically authenticates
the camera with the default password for the camera's admin user (admin).
If the admin user password has been changed, authenticate the camera.
In the DNA Discover List, right-click the camera and select Login.
In the DNA - Login window, type the password for the admin user. If you do
not know the admin user password, contact the person who configured the
camera's users and passwords.
Click Login, wait for Ok status to appear, and then click Close.
In the DNA Discover List, verify that the camera's status is Authenticated.
d. Change the camera’s IP address.
Right-click the camera and select IP
Setup.
In the DNA - IP Setup window, clear
Use DHCP and specify the camera's IP
address. You can also specify the Mask
(default: 255.255.255.0) and Gateway.
Then, click Update, wait for Ok
status to appear, and then click Close.