
Instruction Manual


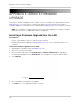
Table Of Contents
- Basic Setup
- Front Panel
- Rear Panel
- Getting Started
- Remote Control
- Using the System
- Setting the Time
- Recording
- Search (Playback)
- Backup
- Using the Main Menu
- FLIR SyncroIP NVR Central Management Software
- System Requirements
- Prerequisites
- Installing FLIR SyncroIP NVR CMS
- Adding a NVR from the local area network (LAN)
- Adding a NVR using a DDNS address
- Using Alarm Rec (Event Search)
- Using Playback Mode
- Configuring Monitoring Tasks and Projects
- Using E-Map
- Configuring the CMS
- Adding User Accounts to the CMS
- Multi-Monitor Support
- Remote Viewing on Internet Explorer
- Mobile Connectivity
- Appendix A: System Specifications
- Appendix B: Setting up Remote Viewing
- Appendix C: Auto Port Forwarding Wizard
- Appendix D: Setting Up DDNS Service
- Appendix E: Remote Firmware Upgrade
- Appendix F: Hard Drive Installation
- Appendix G: Connecting an External Monitor
- Troubleshooting

93
Appendix C: Auto Port Forwarding Wizard
2. Under Router IP, click the Detect Router IP button ( ).
• The router’s IP populates in the blank field. Click OK t
o exit the prompt.
3. Under Us
ername and Password, enter
the router’s
username and password.
• Option
al: Under HTTP Type (default http://) and HTTP Port (default, 80), you may have to
change the values depending on your router model. Consult your router manual for details.
4. Under IP, ent
er the IP address of your device.
NOTE: The IP
is usually found in the information window of your NVR.
5. Under Po
rt, enter the NVR’s HTTP Port (by default, port 80).
6. Under 2nd
Port, enter the NVR’s Client Port (by default, port 35000).
7. Click Ne
xt to continue.
Search and Auto detect
button
Router drop-down list
Router IP
Router user name &
password
Enter ports 80 and
35000
under Ports
Enable Silent Mode
35000
Enter your device’s IP
Enter port
numbers
35000