
User Guide
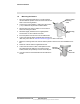

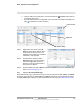
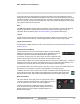
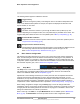
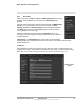
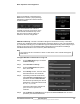
Table Of Contents
- Table of Contents
- Camera Installation
- Basic Operation and Configuration
- Advanced Configuration

427-1065-00-12 Revision 130 November 2019 15
This document does not contain any export-controlled information.
Basic Operation and Configuration
b Unzip the utility, then double-click to run the executable file ( DNA.exe). All the units on
the VLAN are discovered.
c For additional instructions on using DNA, refer to the DNA User’s Manual available in the
Help ( ) link while the software is running.
Step 4 Right-click on the camera, select IP
Setup to change the IP address. When
set to DHCP, If a DHCP server is not
available on the network, the IP address
will default to 192.168.0.250.
Step 5 Double-click the camera in DNA’s
Discovery List to open the camera’s
web server Login page in Internet
Explorer or point your web browser to
the camera’s IP address.
Step 6 Enter the default user name (admin) and password (admin) to open the Live Video page.
Refer to Live Video Page, pg. 16.
2.3.1 Log in to the Camera Web Page
With a web browser, log in to the camera using one of three User Names: user, expert, and admin.
By default, the passwords are: user, expert, and admin, respectively. Login passwords should be
changed (admin login required) to prevent unauthorized access (refer to Security Options, pg. 26).
Online manual
Select IP Setup
Right-click