
Data Sheet


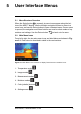

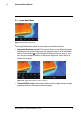
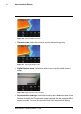

Table Of Contents
- 1 Advisories
- 2 Introduction
- 3 Safety
- 4 Descriptions
- 5 User Interface Menus
- 6 Powering the MR277
- 7 Moisture Measurement Operation
- 8 Thermal and Visible Camera Operation
- 9 Ambient Temperature and Humidity Measurements
- 10 Capturing and Working with Screen Captures
- 11 Bluetooth® Communication and FLIR Tools™
- 12 Field Firmware Updates
- 13 Maintenance
- 14 Specifications
- 15 Appendices
- 16 Limited 10–Year Warranty
- 17 Customer Support

User Interface Menus
5
5.1 Menu Structure Overview
When the Select button
is pressed, six menu icons appear along the bot-
tom of the MR277 display. Use the left/right navigation buttons to move to a
menu icon, and use the Select button to open a selected menu. Once a menu
is opened, the navigation and Select buttons are used to select modes of op-
erations and settings. Use the Return button
to back out of a menu.
5.2 Main Menu Icons
From left to right, the six main menu icons are listed below and shown in Fig-
ure 5–1. Each menu is described in detail in the next sections.
Figure 5.1 Main Menu icons at bottom of display. Press Select to reveal the icons.
1. Temperature scale
2. Image modes
3. Measurement modes
4. Moisture modes
5. Color (palette) choices
6. Settings menu
#NAS100005; r. AG/62027/62027; en-US
8