
User Manual
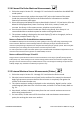


FLIR MR60 USER MANUAL Document Identifier: MR60-en-US_AB
12
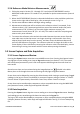
5.2.6 Reference Mode Moisture Measurements
1. Follow the steps in Section 5.2.1 through 5.2.3 and select SET REFERENCE from the
MOISTURE mode options. This mode is only available for pinless measurements (internal
sensor).
2. When the SET REFERENCE function is selected the Reference value and delta symbol are
shown on the right side of the display, refer to example screen in Fig. 5-1.
3. Exit the menu Moisture Menu and begin taking readings.
4. Measurements taken now will be relative to the reference value. For example, if the
reference value is ‘10’ (representing the driest area of the material under test) and a
measurement of ‘50’ is taken (in an area with higher moisture content), the
measurement line will show ‘40’ (50 – 10 = 40). This mode is useful for comparing wet
areas to a dry area reference.
5. To remove the reference value and exit the mode: Remove the meter sensor from the
area under test, so that the sensor is no longer touching a surface and is clear of any
objects (keep hands away from the sensor), and then access the Moisture Menu and
press the Set Reference icon again. The reference value will no longer be visible on the
meter display. If there is difficulty removing the reference value from the display, ensure
that nothing is coming into contact with the sensor when pressing the button.
5.3 Screen Capture and Data Acquisition
5.3.1 Screen Capture and Review
Pressing the Capture button saves the current MR60 screen shot. Pressing the Capture button
also logs the current reading to an internal log.csv document (see Section 5.3.2). The screen
will hold (freeze) momentarily until a file-name appears indicating that the screen shot has
been saved.
Stored screen shots can be reviewed using the Image Review icon available in the Main
Menu; then scroll through the screen shots using the left/right navigation buttons.
Screen shots can be deleted by pressing the Select button while viewing a stored image (logged
readings in the log.csv file are not deleted). A prompt will appear asking to ‘Delete’ or ‘Cancel’.
Choose ‘Delete’ to permanently discard the screen shot; choose ‘Cancel’ to keep it.
Screen shots can be transferred to computer or other compatible device using the MR60 USB
port (bottom of meter, under flap) and supplied USB cable.
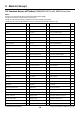
5.3.2 Data Acquisition
Pressing the Capture button logs the current reading to an internal log.csv document. Readings
and reading type are saved along with date-time stamp to the log.csv file.
The log.csv file can be downloaded to a computer or other compatible device using the MR60
USB port (bottom of meter, under flap) and supplied USB cable. See Fig. 5-3 for an example log
file.