
Instruction Manual
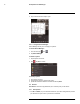


Table Of Contents
- 1 Overview
- 2 Web Configuration Setup
- 3 Live View
- 4 Playback (Cameras with microSD only)
- 5 Setup
- 6 Firmware Upgrade Tool
- 7 Connecting to Cameras with FLIR Cloud™ CMS
- 8 Using FLIR Cloud™ Client for PC or Mac
- 9 Smartphone and Tablet Apps
- 9.1 iPhone
- 9.1.1 Prerequisites
- 9.1.2 Connecting to your IP camera on an iPhone
- 9.1.3 Live View Interface
- 9.1.4 Controlling PTZ Cameras
- 9.1.5 Viewing Snapshots and Videos with Local Files
- 9.1.6 Using Playback Mode on iPhone
- 9.1.7 Enabling Push Notifications
- 9.1.8 Using the Event List
- 9.1.9 Using Favorites
- 9.1.10 Using the E-Map
- 9.1.11 Device Manager
- 9.2 iPad
- 9.2.1 Prerequisites
- 9.2.2 Connecting to your IP Camera on an iPad
- 9.2.3 Live View Interface
- 9.2.4 Controlling PTZ Cameras
- 9.2.5 Using Playback Mode on iPad
- 9.2.6 Using Local File to View Manual Recordings
- 9.2.7 Enabling Push Notifications
- 9.2.8 Using the Event List
- 9.2.9 Using Favorites
- 9.2.10 Using the E-Map
- 9.2.11 Using the Device Manager
- 9.3 Android
- 9.3.1 Prerequisites
- 9.3.2 Connecting to your IP camera on Android
- 9.3.3 Live View Interface
- 9.3.4 Controlling PTZ Cameras
- 9.3.5 Viewing Snapshots and Videos with Local Files
- 9.3.6 Using Playback Mode on iPhone
- 9.3.7 Enabling Push Notifications
- 9.3.8 Using the Event List
- 9.3.9 Using Favorites
- 9.3.10 Using the E-Map
- 9.3.11 Device Manager
- 9.1 iPhone
- 10 Appendix A — Camera Conditions (Select models only)

Smartphone and Tablet Apps
9
2. Tap
, and then tap to open the group.
9.3.10 Using the E-Map
E-Map allows you to place cameras over a still image. For example, you can use the E-
Map to create a virtual map of your cameras over a floor plan of your home or business.
To add an E-Map:
1. Tap
to access the Menu, and then tap E-Map.
2. Tap
.
3. Select a .jpg image on your mobile device.
#LX400038; r. 1.0/18537/18537; en-US
122