
User Guide


427-0075-01-12 Revision 140 October 2019 10
This document does not contain any export-controlled information.
PT-Series HD Camera Installation
• Once the mounting location has been selected, verify both sides of the mounting surface are
accessible and free of utility service lines or other obstructions.
• Use stainless steel hardware to fasten mounts to outdoor surfaces.
• Use a thread locking compound such as Loctite 242 or equivalent with all metal to metal
threaded connections.
• To prevent damage from water leakage when installing outdoors, apply sealant around the bolt
holes between the mount and the mounting surface.
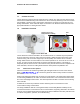
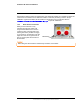
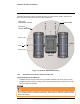
Step 1 Determine the correct positioning of the isolation plate (See ).
Step 2 Place the isolation plate and the camera on the mounting structure aligning the bolt holes
or studs.
Step 3 Install nylon shoulder washers (4x) or nylon flat washers (4x) onto camera base.
If using nylon flat washers, apply a generous coat of Tef-Gel filling all gaps and voids.
Step 4 Secure the camera using 5/16” or M8 fasteners (4x) with stainless steel flat washers and
split washers on top of the nylon washers.
Following this procedure is critical to maintaining the warranty on your PT-Series HD product.
Failure to follow these instructions can potentially void the camera warranty.
Table 1-1: Kit Contents
Description Qty
1
a. Use the alternate nylon flat washers and Tef-Gel lubricant on fasteners for PT-Series HD camera bases
with mounting holes that are too small to accept the shoulder washers. A syringe of Tef-Gel will be supplied
in the mounting kit when the nylon flat washer is required.
6
6
6
6
optional