
Manual
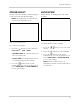
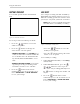


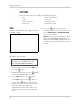
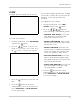
Table Of Contents
- 1. All warnings and instructions in this manual should be followed.
- 2. Remove the plug from the outlet before cleaning. Do not use liquid aerosol detergents. Use a water dampened cloth for cleaning.
- 3. Do not use this unit in humid or wet places.
- 4. Keep enough space around the unit for ventilation. Slots and openings in the storage cabinet should not be blocked.
- 5. During lightning storms, or when the unit is not used for a long time, disconnect the power supply, antenna, and cables to protect the unit from electrical surge.
- 1. Power Button: Press to turn the system ON/OFF†
- 2. Mini-Jack (2.5mm): Connect an IR extension cable.
- 3. LEDs: System power and Alarm LED indicators.
- 4. Channel Buttons: Press to view channels 1~9; press +10 then 0~6 to select channels 10~16*.
- 5. Spot Monitor Out/ESC: Press to view the Spot Monitor; In system menus, returns to previous menu.
- 6. Navigation Buttons:
- 7. Stop: Press to stop playback.
- 8. Play: Press to start playback.
- 9. ;/4: Press to pause playback; press again to resume playback.
- 10. FF: Press to increase playback speed: 1X, 2X, 4X, 16X, 32X, 64X, 128X.
- 11. Playback Direction: Press to switch between Reverse and Forward playback.
- 12. Record: Press to commence Recording.
- 13. LEDs: Record, HDD, and LAN LED indicators.
- 14. USB Port: Connect external USB hard drives or external CD-RW/DVD-RW drives for system backup; connect USB flash drive to install firmware updates; connect a USB mouse.
- 15. : Press to switch display modes: Single, Quad, 6, 7, 9, 10, 13, and 16-split screen.
- 16. Audio: Select audio channels.
- 17. SEQ: Start/stop Auto-Sequence mode; increases, decrease, or changes values of selected menu options.
- 18. Freeze: Press to start Freeze mode; press to focus control of PTZ; increases, decrease, or changes values of selected menu options.
- 19. Enter: Press to select menu options; opens the Settings menu.
- 20. Preset: Press to open the Copy menu.
- 21. Menu: Press to open the System Menu; enables Auto Focus
- 22. Bookmark (PTZ): Press to add a bookmark while video is paused during playback; open PTZ controller
- 23. Func: N/A
- 24. PS/2 Port: Connect a PS/2 mouse (optional).
- 1. Camera In: Camera input ports for camera octopus cables*.
- 2. Video: BNC port for a Spot Monitor.
- 3. Audio In: Two 3.5" RCA ports for audio input (Y-cables included); the left port is for audio channels 1 and 2, the right port for audio channels 3 and 4.
- 4. Audio Out: RCA port for audio output (mono).
- 5. DVI: DVI output for connecting to a DVI monitor: use a DVI-to-VGA adapter (not included) to connect to a VGA monitor.
- 6. USB Ports (x2): Connect external USB hard drives or external CD-RW/DVD-RW drives for system backup; connect USB flash drive for to install firmware updates
- NOTE: Only the top USB port supports a USB mouse. Do not connect a USB mouse to the bottom port.
- **PTZ cameras are not included with this system
- Control scheme for a USB or PS/2 mouse (optional).
- . Connect a USB mouse to the USB port on the front panel, or the top USB port on the rear panel-DO NOT connect the mouse to the bottom port on the rear panel. The bottom USB port is strictly intended for data transfer.
- . Connect a PS/2 mouse to the PS/2 port on the side panel.
- 1. Left-Button: While in a split-screen display mode, double-click an individual channel to view it in full-screen; double-click...
- 2. Right-Button: Right-click anywhere on the screen to open the System Menu; double-click anywhere on the screen to return to the previous menu.
- 3. Scroll-Wheel: Move the scroll wheel up or down to increase/decrease the value of a selected menu option.
- NOTE: Make sure all cameras and cables are properly connected prior to powering on the system
- Figure 2.0 Initial startup screens
- Figure 3.0 Main system display
- 1. HDD percentage: The percentage of free space remaining on the hard disk; other system functions, such as Freeze, Auto-Sequence, and Playback will display in this top-left corner.
- 2. Camera channels:
- . Yellow: Continuous recording for connected cameras
- . White: Disconnected/inactive camera
- . Red: Event recording: motion, alarm
- Single channel (full-screen)
- Figure 3.2 Auto-Sequence displays
- Figure 3.3 Picture-in-Picture display
- 1. Press channel buttons 1~16 on the remote control to view the channel in full screen.
- 2. Press the button on the remote control. The PIP window opens in the top-left corner.
- 3. Once in PIP mode, you have access to the following options:
- 4. Press the button to exit PIP mode.
- 1. Press the button to open the system menu. Select and press the button.
- 2. Select CLOCK and press the button.
- 3. From the CLOCK menu, select DATE&TIME and press the button.
- 4. Press the buttons to select the year, month, day, hour, minute, and seconds. Press the buttons to adjust the date and time.
- Figure 4.0 Clock menu
- Figure 5.0 Playback display view
- 1. Press the button on the remote control. The system will play the last 10 minutes of the most recently recorded video. You could also press to begin reverse playback.
- 2. Press the following buttons on the remote control to use playback functions:
- NOTE: To rewind, or reverse video during forward playback, press the button to begin reverse playback, then press the button to increase playback speed.
- Figure 6.0 Calendar search screen
- 1. From the SEARCH menu, select CALENDAR SEARCH and press the button.
- 2. Press the buttons to select a date on the calendar and press the button-only dates in yellow contain recorded data. The SEARCH RESULT screen opens.
- NOTE: To change the month, select the month and press the buttons; to change the year, select the year and press the buttons.
- NOTE: Green blocks contain video data; white blocks do not contain video data. If you attempt to play a white hour block, the system will playback the most recently recorded data.
- NOTE: These options are available during playback in all Search modes. Please allow for a brief pause when switching between single channels or between multi-screen display views.
- Figure 6.2 Search & Copy screen
- 1. Under SEARCH START TIME, press the buttons to select the year, month, day, hour, minute, and second, and then press the buttons to change the values.
- 2. Press the button to playback the recorded video. Press the button to return to the Search & Copy screen.
- 3. Under COPY MEDIA, press the buttons to select USB_FRONT, USB_REAR1, or USB_REAR2 (INTERNAL CD-RW/DVD-RW is not applicable).
- NOTE: The front panel USB port is typically used for a USB flash drive; the bottom USB port on the rear panel is used for USB external drives that remain connected to the system during normal use.
- NOTE: Copy progress may take several moments depending on the size of the file.
- NOTE: Most USB flash drives (up to 8GB) are compatible with the system. For details on compatible media, see “Appendix L: Compatible Recordable Media” on page 125.
- NOTE: Most external USB hard drives are also compatible with the system. Prior to using the external USB hard drive, make sure to format the hard drive using Media Format in the COPY menu. For more details on Formatting, see “MEDIA FORMAT” on page 50.
- Figure 6.3 Time Search screen
- 1. Under SEARCH TIME, press the buttons to select the year, month, day, hour, minute, and second, and then press the buttons to change the values.
- 2. Press the button to playback the recorded video.
- 3. Press the button to exit playback mode and return to live mode (If using a mouse: right-click or move the scroll wheel to exit playback).
- Figure 6.4 Event Search screen
- 1. Under HDD ID, select NORMAL, HDD 1, or HDD 0.
- NOTE: Normal is the default selection for the single hard drive included with the system.
- 2. Under CHANNEL, press the buttons to select channels 1~16 or ALL.
- 3. Under EVENT, select SENSOR, V-LOSS, MOTION, or ALL.
- 4. Under SEARCH TIME, press the buttons to select the year, month, day, hour, minute, and second, and then press the buttons to change the values.
- 5. Press the button to view the events for the selected date and time.
- 6. Press the buttons to select an event and then press the button to playback the video.
- 7. Press the button to exit playback mode and return to live mode (If using a mouse: right-click or move the scroll wheel to exit playback).
- NOTE: Block Search is recommended in case of a failure when using other search modes.
- Figure 6.5 Block Search screen
- 1. Under HDD ID, select NORMAL, HDD 1, or HDD 0.
- NOTE: Normal is the default selection for the single hard drive included with the system.
- 2. Under SEARCH TIME, press the buttons to select the year, month, day, hour, minute, and second, and then press the buttons to change the values.
- 3. Press the button to view the blocks for the selected date and time.
- 4. Press the buttons to select a block and then press the button to playback the video.
- 5. Press the button to exit playback mode and return to live mode (If using a mouse: right-click or move the scroll wheel to exit playback).
- Figure 6.6 File Search screen
- 1. If you already have an external USB drive connected to the system, proceed to step 2. If not, connect a USB flash drive (that contains saved video data) to the front panel of the system.
- 2. From the SEARCH menu, select FILE SEARCH and press the button.
- 3. Under MEDIA, press the buttons to select USB_FRONT, USB_REAR1, or USB_REAR2 and press the button. A list of .dvr files appears on the screen.
- 4. Press the buttons to select a file and press the button to begin playback.
- 5. Press the button to exit playback mode and return to live mode (If using a mouse: right-click or move the scroll wheel to exit playback).
- NOTE: You must have set bookmarks while in Playback mode in order to use Bookmark Search.
- Figure 6.7 Bookmark Search screen
- 1. During playback, press the button.
- 2. Press the button to set the bookmark. The bookmark is saved to the system.
- 3. Press the button again to resume playback.
- 1. From the SEARCH menu, select BOOKMARK SEARCH and press the button.
- 2. Under HDD ID, select NORMAL, HDD 1, or HDD 0.
- NOTE: Normal is the default selection for the single hard drive included with the system.
- 3. Press the button to view all the bookmarks on the system. Go to step 4.
- 4. Press the buttons to select a bookmark from the list and then press the button to begin playback.
- 5. Press the button to exit playback mode and return to live mode (If using a mouse: right-click or move the scroll wheel to exit playback).
- Figure 6.8 Text Search screen
- 1. From the SEARCH menu, select TEXT SEARCH and press the button.
- 2. Under HDD ID, select NORMAL, HDD 1, or HDD 0.
- NOTE: Normal is the default selection for the single hard drive included with the system.
- 3. Press the button to view all the Text marks on the system. Go step 4.
- 4. Press the buttons to select a Text mark from the list and then press the button to begin playback.
- 5. Press the button to exit playback mode and return to live mode (If using a mouse: right-click or move the scroll wheel to exit playback).
- NOTE: You must connect a USB drive to the system in order to view log files.
- Figure 6.9 Log File screen
- 1. If not already connected, connect a USB flash drive to the front panel of the system.
- 2. From the SEARCH menu, select LOG FILE and press the button.
- 3. Press the button to view log for the entire system.
- 4. Press the buttons to scroll down the list of files.
- 5. To save the log file, press the button to return to SEARCH FILE. Select SAVE LOG and press the button. The log file is saved to the connected USB drive as DvrLog.txt
- 1. QUICK: Opens up the Quick Setup menu.
- 2. SCREEN: Adjust display, camera title, multi-screen, covert, spot, and Camera.
- 3. RECORD: Adjust Record Setup, Program, Preview Quality, Audio Record, and Holiday.
- 4. EVENT: Adjust Motion Detection, Event options, and Sensor input.
- 5. SYSTEM: Adjust HDD options, set the system time, video standard, and language.
- 6. LINK: Adjust networking, PTZ, and Email notification options.
- 7. SEARCH: Opens Search menu. Search by calendar, time, event, and bookmark.
- 8. COPY: Opens Copy (backup) menu.
- 9. STATUS: Opens menu to view DVR Status, Network Status, and Recording Bitrate.
- 10. SAVE/EXIT: Opens menu to Save Only, Save and Exit, or Exit Without Saving.
- Figure 8.0 Quick Setup menu
- . IMAGE SIZE: 720x480, 720x240, 360x240
- . RECORD FRAME: Varies based on Image Size
- . IMAGE QUALITY: Low, Normal, Fine, and Best
- . EVENT: Alarm, V-Loss (Video loss), Motion, Alarm & Loss, Alarm & Motion, Loss & Motion, All, and Off
- . PRE RECORD TIME: The length of time the system records prior to an event. Set from 0~5 seconds
- . POST RECORD TIME: The length of time the system continues to record after an event. Set from 0~60 seconds
- . PREVIEW QUALITY: Select to open the Record Quality menu. Change the Record Quality to Low, Normal, Fine, or Best.
- NOTE: Note: You must have Record disabled to view the Record Quality screen.
- . AUDIO RECORD: Set to On/Off
- . REMOTE CONTROL ID: Designate an ID for the remote control to use with the system. Set from 11, 12, 13, 14, 21, 22, 23, 24, 31, 32, 34, 41, 42, 43, 44, and ALL
- . SAVE: Select to save your settings.
- . IMAGE SIZE: 720x480, 720x240, 360x240
- . IMAGE QUALITY: Low, Normal, Fine, and Best
- . RECORD TIME: Set from 1~999 days.
- . MAX RECORDABLE TIME: The system calculates the maximum recording time available on the hard drive based on changes to Image Size, Image Quality, and Record Time (non-selectable).
- . TOTAL RECORD FRAME: Based on the values you input for Record Time, Image Size, and Image Quality, the system calculates the ad...
- . PREVIEW QUALITY: Select to open the Record Quality menu. Change the Record Quality to Low, Normal, Fine, or Best.
- . AUDIO RECORD: Enable/disable audio recording
- NOTE: An audio capable camera (not included) or microphone (not included) are necessary is necessary for audio recording.
- . REMOTE CONTROL ID: Designate an ID for the remote control to use with the system. Set from 11, 12, 13, 14, 21, 22, 23, 24, 31, 32, 34, 41, 42, 43, 44, and ALL
- . SAVE: Select to save your settings.
- Figure 9.0 Auto-Split options
- . AUTO-SPLIT: Set the dwell time for each split-screen display while in Auto Sequence mode. Select the view and press he buttons to increase/decrease the value. Set from 0~60 seconds (by default, 3 seconds).
- . AUTO-SINGLE: Set the dwell time for each single channel (full-screen) while in Auto Sequence mode. Select the view and press the buttons to increase/ decrease the value. Set from 0~60 seconds (by default, 3 seconds).
- Figure 9.1 Auto-Single options
- Figure 9.2 Display menu
- Figure 9.3 Title menu
- 1. Press the buttons to select a channel and then press the button. Press the buttons to turn pages.
- 2. In the Character Table screen, use the buttons to select characters for the title and then press the button.
- NOTE: Titles can only be seven characters in length. Use blank spaces in the Character Table for spaces in your title.
- Figure 9.4 Multi Screen menu
- 1. Press the buttons to select MULTI 4E, MULTI 7, MULTI 9B, MULTI 10, or MULTI 13 and then press the button.
- 2. Under DISPLAY, press the buttons and select ON/OFF to enable/disable the specific multi-display. If set to OFF, the screen display will not appear when pressing the button.
- 3. Press the buttons to select a number in the layout. These numbers represent the channels being displayed on screen.
- 4. Press the buttons to change the selected channel.
- 5. Press the button on the remote control until you see the Save/Exit screen. Select SAVE ONLY or SAVE AND EXIT to save your settings.
- Figure 9.5 Covert menu
- 1. Press the buttons to select channels.
- 2. Press the buttons to select ON/OFF (by default, OFF). If ON, selected channel will display a black screen, as if no camera were connected.
- 3. Under SELECT, press the buttons and choose one of the following covert modes:
- . LIVE: Selected channels appear hidden during live mode
- . NETWORK: Selected channels appear hidden on network viewer screen
- . PLAY: Selected channels appear hidden during playback
- Figure 9.6 Spot menu
- 1. Press the buttons to select a menu option. Press the buttons to change the value of the selected option.
- . MANUAL: Manually select the channel for the Spot Monitor
- . SEQUENCE: Single channels (full screen) will be displayed in an alternating sequence
- . EVENT: The channel where an event (motion, alarm, sensor) has occurred will be displayed on the Spot Monitor
- Figure 9.7 Camera menu
- Figure 10.0 Record Setup menu
- 1. Press the buttons to select the day.
- 2. Press the buttons to select the hour (24-hour clock). The Record Setup grid is divided into 3-hour segments (0~3, 4~6, etc.,).
- 3. Press the buttons to change the predefined program (0~9). You can apply the predefined program to all hours of the day using the ALL column.
- 4. With an hour selected (highlighted in green), press the button to open the RECORD PROGRAM menu (using the mouse, double-click anywhere on the screen).
- Figure 10.1 Record Program menu
- Figure 10.2 Record Program menu
- 1. Under REC PROGRAM, press the buttons to select PROGRAM0~9.
- 2. Press the buttons to select program options; press the buttons to change the value of the following options for each channel:
- NOTE: Pre-Recording can only be set for all channels; Post-Recording can be set for individual channels.
- NOTE: If you have 0 frames in either the normal or Event columns, you will receive a warning message from the system:
- NOTE: Recording must be off in order to see the Preview Quality screen.
- Figure 10.3 Record Program menu
- Figure 10.4 Audio Record menu
- 1. Press the buttons to select the audio channel.
- 2. Press the buttons to select ON/OFF.
- 3. Press the button on the remote control until you see the Save/Exit screen. Select SAVE ONLY or SAVE AND EXIT to save your settings.
- NOTE: Audio capable cameras or microphones must be connected in order to record audio.
- Figure 10.5 Audio Record menu
- 1. Press the buttons to select the audio record options.
- 2. Press the buttons to change the values for the selected options.
- 3. Press the button on the remote control until you see the Save/Exit screen. Select SAVE ONLY or SAVE AND EXIT to save your settings.
- NOTE: The system records like the Sunday schedule when set to Holiday recording.
- Figure 10.6 Holiday Recording menu
- 1. Under HOLIDAY RECORD, select ON (by default, OFF).
- 2. Under HOLIDAY SETUP, press the buttons to select up to 40 dates for holiday recording (mm/dd). Press the buttons to change the months and days.
- 3. Press the button on the remote control until you see the Save/Exit screen. Select SAVE ONLY or SAVE AND EXIT to save your settings.
- Figure 10.7 Setting the Record Limit
- 1. Press the buttons to set the value for the record limit. Set from 1~6 days, 1~4 weeks, 1~11 months, 1 year, and OFF.
- 2. Press the button on the remote control until you see the Save/Exit screen. Select SAVE ONLY or SAVE AND EXIT to save your settings.
- NOTE: In order to use Event or Mirror backup, you must have at least one external USB hard drive connected to either of the USB ports on the rear panel of the system.
- Figure 10.8 Backup Mode: Event
- 1. Select BACKUP MODE.
- 2. Press the buttons and select EVENT.
- 3. Press the button on the remote control until you see the Save/Exit screen. Select SAVE ONLY or SAVE AND EXIT to save your settings.
- NOTE: Make sure you have connected an external USB hard drive to either of the USB ports on the rear panel of the system prior to enabling the disk mirror function.
- Figure 10.9 Backup Mode: Mirror
- Figure 11.0 Motion Detection grid
- 1. Under CHANNEL, press the buttons to select the channel for which to set motion detection.
- 2. Under SENSITIVITY, press the buttons to set the motion sensitivity from 1~5. The higher the sensitivity, the more sensitive the detection.
- 3. Under AREA SETUP, press the button to open the Area Setup Grid.
- 4. Press the buttons to select cells on the grid. Press the button to enable/disable the cell. When finished, press the button to exit the Area Setup Grid.
- NOTE: An enabled (active) cell is clear; a disabled (inactive) cell is green.
- Figure 11.1 Motion grid setup
- Figure 11.2 Event menu-Event Screen Mode
- Figure 11.3 Sensor input menu
- Figure 11.4 Relay Output menu
- 1. Select RELAY SELECT and press the buttons to set the type of relay:
- 2. Select RELAY OUTPUT TIME and press the buttons to set the length of the relay time: 1~30 seconds.
- 3. Press the button on the remote control until you see the Save/Exit screen. Select SAVE ONLY or SAVE AND EXIT to save your settings.
- NOTE: You can set the Relay Output for channels 1~4 by setting the relay to the following:
- Figure 12.0 HDD menu
- 1. From the System menu, select HDD and press the button.
- 2. From the HDD menu, press the button to open the HDD Initialize screen.
- 3. Select YES and press the button. [Select NO and press the button to cancel, or the button.] The system formats the hard disk,...
- 4. Press the button on the remote control until you see the Save/Exit screen. Select SAVE ONLY or SAVE AND EXIT to save your settings.
- NOTE: If you replace the internal 2.5" hard disk, you should always initialize the new disk. If you do not initialize (format) the new hard disk, it may not be properly read by the system.
- Figure 12.1 Clock menu
- Figure 12.2 Time Adjust menu
- 3. Press the button to save the date and time.
- 4. Press the button on the remote control until you see the Save/Exit screen. Select SAVE ONLY or SAVE AND EXIT to save your settings.
- 1. From the Clock menu, select TIME ADJUST and press the button.
- 2. Press the buttons to select and configure the following options:
- 3. Press the button on the remote control until you see the Save/Exit screen. Select SAVE ONLY or SAVE AND EXIT to save your settings.
- 1. From the System menu, select VIDEO STANDARD. Press the buttons to select NTSC, PAL, or AUTO.
- NOTE: If you select AUTO, the system will automatically detect NTSC or PAL.
- 2. Press the button on the remote control until you see the Save/Exit screen. Select SAVE ONLY or SAVE AND EXIT to save your settings.
- 1. From the System menu, select LANGUAGE. Press the buttons to select ENGLISH, FRENCH, SPANISH, GERMAN, JAPANESE, ITALIAN, PORTUNGESE, TURKISH, RUSSIAN, or POLISH.
- 2. Press the button on the remote control until you see the Save/Exit screen. Select SAVE ONLY or SAVE AND EXIT to save your settings.
- 1. From the System menu, select REMOTE CONTROL ID. Press the buttons to select 11,12, 13, 14, 21, 22, 23, 24, 31, 32, 33, 34, 41, 42, 43, 44, or ALL.
- 2. Press the button on the remote control until you see the Save/Exit screen. Select SAVE ONLY or SAVE AND EXIT to save your settings.
- 1. From the System menu, select KEY ECHO. Press the buttons to select ON or OFF.
- 2. Press the button on the remote control until you see the Save/Exit screen. Select SAVE ONLY or SAVE AND EXIT to save your settings.
- Figure 12.3 Advanced Setup menu
- Figure 11.4 Advanced Setup menu
- 1. From the Advanced Setup menu, select PASSWORD CHECK and press the buttons to set to ON/OFF.
- NOTE: If you leave Password Check set to OFF, you cannot edit passwords.
- 2. Select SET PASSWORD and press the button. The password screen opens.
- 3. Select ADMIN, or USER1~USER4 and press the button. The password input screen opens.
- 4. Under NEW PASSWORD, press channel buttons 1~9 on the remote control to enter an 8-digit password. Under RE-TYPE, enter the password again for verification.
- 5. Press the button on the remote control until you see the Save/Exit screen. Select SAVE ONLY or SAVE AND EXIT to save your settings.
- NOTE: You can only use channel buttons 1~9 to enter the password. The password must be 8 digits long. The default system passwords are the following:
- NOTE: The system supports a maximum of 16 simultaneous users. For example, one person logged in as ADMIN, five persons logged in as USER 1, four persons logged in as USER 2, three persons logged in as USER 4, and three persons logged in as USER 5.
- NOTE: The number of connected users can affect network performance. Please keep in mind bandwidth restrictions and LAN settings if allowing multiple users to log in to the system.
- Figure 12.5 Advanced Setup menu
- 1. From the Advanced Setup menu, select USER AUTHORITY and press the button.
- 2. Press the buttons to select from the following options:
- 3. Press the buttons to select a user (U1~U4). Press the buttons to set the authority ON/OFF.
- NOTE: If ON, the user password will be required to perform the desired function. By default, all authorities are set to OFF.
- 4. Press the button on the remote control until you see the Save/Exit screen. Select SAVE ONLY or SAVE AND EXIT to save your settings.
- 1. Insert a USB flash drive into the USB port on the front panel of the system.
- 2. From the Advanced setup menu, select SAVE MENU TO FILE and press the button.
- 3. Press the button on the remote control until you see the Save/Exit screen. Select SAVE ONLY or SAVE AND EXIT to save your settings.
- 1. Insert the USB flash drive with your previously saved system settings into the USB port on the front panel of the system.
- 2. From the Advanced setup menu, select LOAD MENU FROM FILE and press the button.
- 3. Press the button on the remote control until you see the Save/Exit screen. Select SAVE ONLY or SAVE AND EXIT to save your settings.
- 1. From the ADVANCED SETUP menu, select MENU INTIALIZE and press the button. The Menu Initialize screen opens.
- 2. Select YES to restore factory defaults and press the button. Select NO and press the button or press the button to cancel.
- 3. Press the button on the remote control until you see the Save/Exit screen. Select SAVE ONLY or SAVE AND EXIT to save your settings.
- 1. Insert a USB flash drive into the USB port on the front panel of the system.
- 2. From the ADVANCED SETUP menu, select FIRMWARE UPGRADE and press the button.
- 3. Select YES to perform a firmware upgrade from the USB port on the front panel and press the button. Select NO and press the button or press the button to cancel.
- Figure 13.0 Advanced Setup menu
- Figure 13.1 RS485 menu
- 1. Press the buttons to select options.
- 2. Press the buttons to change the values.
- NOTE: The system ID on the RS485 controller and the system must match in order for the controller to function properly.
- NOTE: Consult the owner’s manual of your PTZ camera for more information on configuring these settings.
- Figure 13.2 PTZ menu
- 1. Press the buttons to select channels. Press the buttons to select between MODEL, SPEED, and ID; press to change pages (16-channel model only).
- 2. Press the buttons to change the values.
- 3. Press the button on the remote control until you see the Save/Exit screen. Select SAVE ONLY or SAVE AND EXIT to save your settings.
- NOTE: To use email notification, you must use a DDNS service.
- Figure 13.3 PTZ menu
- 1. Select SEND E-MAIL and press the buttons to select 1MIN, 2MIN, 3MIN, 4MIN, or 5MIN. This is the frequency that an email will be set when an event occurs. Select OFF to disable email notification.
- 2. Select SMTP SERVER and press the button to open the character table. Press the and buttons to enter the IP address of the SMTP server.
- 3. Select DVR E-MAIL ADDR and press the button to open the character table. Press the and buttons to enter the email address to which you want to send the notifications.
- 4. Press the button on the remote control until you see the Save/Exit screen. Select SAVE ONLY or SAVE AND EXIT to save your settings.
- Figure 13.4 Character Table-DVR name
- 1. From the LINK menu, select DVR NAME and press the button. The character table opens.
- 2. Press the and buttons to enter a name for the system. The name can be alpha-numeric and have a maximum of nine characters.
- 3. Press the button on the remote control until you see the Save/Exit screen. Select SAVE ONLY or SAVE AND EXIT to save your settings.
- Figure 13.5 Character Table-DVR location
- 1. From the LINK menu, select DVR LOCATION and press the button. The character table opens.
- 2. Press the and buttons to enter a location for the system. The location can be alpha-numeric and have a maximum of nine characters.
- 3. Press the button on the remote control until you see the Save/Exit screen. Select SAVE ONLY or SAVE AND EXIT to save your settings.
- 1. From the LINK menu, select BANDWIDTH.
- 2. Press the buttons and select from 0MB~10MB.
- 3. Press the button on the remote control until you see the Save/Exit screen. Select SAVE ONLY or SAVE AND EXIT to save your settings.
- Figure 14.0 Copy screen
- 1. From the COPY menu, select COPY and press the button.
- 2. Under MEDIA, press the buttons to select USB_FRONT, USB_REAR1, or USB_REAR2 (INTERNAL CD-RW/DVD is not applicable).
- 3. Under HDD, select NORMAL, HDD 1, or HDD 0.
- NOTE: Normal is the default selection for the single hard drive included with the system. Select HDD 0 or HDD 1 only if you have added a second 2.5" hard disk to the system. See “Appendix H: Replacing the Hard Drive” on page 115.
- 4. Under CHANNEL, select the channels you want to include when copying. Press the buttons to select the channel and then press the button to add/remove the channel from the list.
- 5. Under COPY START TIME, press the e buttons to select the year, month, day, hour, minute, and second, and then press the buttons to change the values.
- 6. Under COPY END TIME, press the e ee buttons to select the year, month, day, hour, minute, and second, and then press the buttons to change the values.
- 7. Press the button to start copying.
- 8. Enter an 8-digit numeric password if you want to protect your file. If you do not want to protect the file, press the button ...
- NOTE: Copy progress may take several moments depending on the size of the file.
- NOTE: To ensure proper functionality, you should always format USB drives before using them with the system.
- NOTE: Most USB flash drives (up to 8GB) are compatible with the system.
- Figure 14.1 Media Format screen
- 1. From the COPY menu, select MEDIA FORMAT and press the button.
- 2. Under FORMAT MEDIA, press the buttons to select USB_FRONT, USB_REAR1, or USB_REAR2 (INTERNAL CD-RW/DVD is not applicable).
- NOTE: Once you select the media, you can view the following media information:
- NOTE: Formatting may take several moments depending on the size of the connected USB drive.
- NOTE: For more details on media compatible with the system, see “Appendix L: Compatible Recordable Media” on page 125.
- Figure 15.0 DVR Status screen
- Figure 15.1 DVR Status screen
- Figure 15.2 DVR Status screen
- Figure 1.0 Attach the mounting plate to the monitor
- a. Position the mounting plate on the back of the LCD monitor (with a VESA mount) until the mounting holes on the back of the mo...
- b. Carefully place the system (front panel facing up) over the hooks and slide down into place. The system should be flush against the mounting plate and sitting completely over all four hooks.
- a. Connect up to eight BNC cameras to the included octopus cable. Connect the VGA connector of the octopus cable to the Camera Input port on the rear panel of the Blade DVR.
- a. Connect a DVI cable (not included) from the DVI port on the rear panel of the Blade DVR to the DVI port on the back of your LCD monitor.
- a. Connect the included Ethernet cable to the LAN port on the rear panel of system; connect the other end of the Ethernet cable to an empty LAN port on your router (not included).
- a. Connect the IR extender to the port on the front panel of the system. Position the IR extender near the front of your monitor, or where it will receive a clear signal from the remote control.
- NOTE: You can use the Navigation Buttons to control movement of connected PTZ cameras (not included).
- . IRIS -/+: Press to open/close of a PTZ camera*; press for Frame-by-Frame (field by field) playback
- . Z -/+: Zoom in/out using PTZ camera*
- 3. ESC/SPOT: Press to return to the previous menu; press to open/close Spot mode.
- 4. ENTER/(HOME): Press to select a menu option; press to go home in the PTZ Menu.
- 5. p/MENU: Move cursor up when navigating menus; press to open the System Menu.
- 6. u/D-ZOOM: Mode cursor right when navigating menus; control zoom in/out.
- 7. t/ALARM RESET: Move cursor left when navigating menus; release the Event Signal.
- 8. q/PIP: Move cursor down when navigatign menus; enter Picture-in-Picture mode.
- 9. A AUTO/F-: Press to start Auto Sequence mode; press to decrease value of selected menu option; focus control of PTZ camera*
- 10. B FRZ/F+: Press to open/close Freeze Mode; press to increase value of selected menu option; focus control of PTZ camera*
- 11. SEARCH/COPY/BOOKMARK:
- . SEARCH (PRESET): Press to open the Search Menu; enter the preset while in PTZ mode.
- . COPY (AF): Press to open the Copy Menu; enable Auto-Focus while in PTZ mode.
- . BOOKMARK / (PTZ): Press to set Bookmark/ press to open PTZ mode (PTZ camera must be connected).
- . SLOW: Press to slow-down playback speed.
- . PLAY/PAUSE: Press to begin playback; press again to pause;
- . FAST: Press to increase playback speed.
- . LV/PB: Convert the screen into real display mode during playback
- . DIR: press to change the direction of playback.
- . RECORD: Press to start/stop recording.
- . MULTI: Change between display modes
- . AUDIO SELECT: Change audio channels
- . TEXT: Use when the DVR is connected to a P.O.S. system
- *The system may perform "Time Trimming" at startup. This is a normal function that the system uses to correct its internal clock.
- Figure 2.1 Passwords
- Figure 6.1 Search Result screen
- *Two octopus cables included in 16-channel model
- *Compatible P.O.S. system required.
- †If you have passwords enabled on the system, the system will prompt you for your password prior to shut-down.
- *Channels 9~16 only available on 16-channel models.
- *Live images simulated.
- Figure 16.0 DigiClient install window
- Figure 16.1 Installation progress
- Figure 16.2 Roxio© UDF Reader dialogue window
- Figure 16.3 Roxio© UDF Reader install window
- Figure 16.4 Installation progress
- Figure 17.0 DigiClient login
- Figure 17.1 DVR Search window
- Figure 17.2 DVR List window
- Figure 18.0 DigiClient main window
- 1. Main Window: Displays live camera images and recorded video images.
- 2. DVR List: Opens the DVR List window to connect to DVRs.
- 3. DVR Search: Opens the DVR Search window to search for connected DVRs on the network.
- 4. HDD Search: Opens the HDD search window.
- 5. File Search: Opens the File Search window to search for saved video files on your PC.
- 6. Arrange Windows: When you have multiple windows open, click to arrange the windows neatly on your desktop.
- 7. Viewer Options: Opens the configuration window for DigiClient.
- 8. Close/Separate Window: Close the connection/window to a DVR. Toggle between the Main Window and Separate Windows with Mini-Viewer.
- 9. HDD%/Channel Indicators: Displays the space remaining on the hard disk (%); Channel Indicators: Display the recording status ...
- 10. Playback Controls: Click buttons to Play (forward and reverse playback), pause, rewind, fast forward, and record.
- Figure 18.1 DigiClient main window
- 11. Time/Version: Displays the current time; displays the software version of DigiClient.
- 12. Channels: Click the channel buttons to view the selected channel in full-screen.
- 13. Multi/Auto: Click Multi to view various split-screen display views; click Auto enable/disable Auto-Sequence mode. Click the arrows to increase/decrease dwell time.
- 14. System Controls: Click the buttons to view the following:
- 15. Search options: Click the buttons to view the following:
- Figure 18.2 DigiClient main window
- Figure 19.0 DigiClient Live viewing
- Figure 19.1 Channel/display buttons
- 1. Click the Channel Buttons.
- 2. Click individual channels in the Channel Indicator to view single channels in full-screen.
- 3. Double-click a channel on a Multi-screen display to view that selected channel in full-screen.
- 1. While in Live Mode, click . Channel Indicator bar is highlighted in red. DigiClient will record live video data from connected cameras to the default save folder on your PC (C:\Program Files\DVR\Save).
- Figure 19.2 Live recording
- 2. Click to begin playback.
- 3. Click to stop recording.
- 1. While in Live Mode, Click . The oldest recorded video file begins playing in the DigiClient main window.
- 2. Use the playback controls to control the video:
- 3. Click to return to Live Mode.
- 1. Click .
- 2. Enter your username and password and click OK to log off.
- 1. Select a connection from the Connection List.
- 2. Click . The selected connection closes, and the next connection appears in the DigiClient main window.
- NOTE: If there is no connection, the DigiClient main window remain grey.
- Figure 20.0 Search buttons
- Figure 20.1 Time Search window
- 2. Select a file from the list.
- 3. Under HDD, select a hard drive from the drop-down menu (by default, NORMAL).
- 4. Under Channel, select ALL, or an individual channel.
- 5. Under Search Time, enter a time manually using your keyboard, or click to open the pop-up calendar. You can also use the Date and Time sliders at the bottom of the window to select the date and time.
- 6. Click Play. Playback begins in the DigiClient main window.
- 1. From the DigiClient main window, click . The Event Search window opens.
- Figure 20.2 Event Search window
- 2. Select a file from the list.
- 3. Click Play. Playback begins in the DigiClient main window.
- 3. Under Channel,select ALL, or an individual channel.
- 4. Under Event, check/uncheck the boxes for Alarm, Loss, or Motion.
- 5. Under Search Time, enter a time manually using your keyboard, or click to open the pop-up calendar. You can also use the Date and Time sliders at the bottom of the window to select the date and time.
- 6. Click Search.
- 7. Click Play. Playback begins in the DigiClient main window.
- 1. From the DigiClient main window, click . The Time Search window opens.
- Figure 20.3 Block Search window
- 2. Select a file from the list.
- 3. Click Play. Playback begins in the DigiClient main window.
- 3. Under Search Time, enter a time manually using your keyboard, or click to open the pop-up calendar.
- 4. Click Play. Playback begins in the DigiClient main window.
- 1. From the DigiClient main window, click . The Calendar Search window opens Dates with recorded data appear in yellow.
- Figure 20.4 Calendar Search window
- 2. Click to select the year and/or month. Click one of the dates highlighted in yellow. DigiClient searches for recorded data. The results appear in yellow hour blocks at the bottom of the window.
- 3. Click one of the yellow hour blocks and then click Play. Playback begins in the DigiClient main window.
- Note: A P.O.S. system (not included), along with additional components (not included), must be connected to your DVR in order for Text Search to function properly.
- Figure 20.5 Text Search window
- 2. Select a file from the list.
- 3. Click Play. Playback begins in the DigiClient main window.
- 3. Under Channel, select ALL or an individual channel.
- 4. In the Text field, enter text that you want to find in the search.
- 5. Under Search Time, enter a time manually using your keyboard, or click to open the pop-up calendar.
- 6. Click Play. Playback begins in the DigiClient main window.
- 1. From the DigiClient main window, click . The Log Search window opens.
- Figure 20.6 Log Search window
- 2. Select a file from the list. Go to step 5.
- 3. Select a date from the pop-up calendar and click OK.
- 4. From the Log Search window, click Search.
- 5. Click Save Log. The Save As window opens.
- 6. Select a save location; enter a file name with the extension .txt and click Save.
- NOTE: To view the file, open it using a text editor or word processing program on your PC.
- Figure 20.7 Search DVR HDD window
- 1. Connect a backup hard drive to your PC.
- NOTE: Make sure the drive is set to Slave mode.
- 2. Click to open HDD Search.
- 3. Select your hard drive from the list. If desired, use the drop-down menus to select an individual channel number and video mode (NTSC/PAL).
- 4. Click OK. The Time Search window opens.
- 5. Select a file from the list.
- 6. Under Channel,select ALL, or an individual channel.
- 7. Under Search Time, enter a time manually using your keyboard, or click to open the pop-up calendar. You can also use the Date and Time sliders at the bottom of the window to select the date and time.
- 8. Click Play. Playback begins in the DigiClient main window.
- Figure 20.8 File Search window
- 1. Click to open File Search.
- 2. Select the file you want to view, or click Folder Select to browse for the folder on your PC with saved video data from your DVR. Use the Search Time field, Date, and Time sliders to jump to specific dates and/or times.
- 3. Click Play. The file plays in the DigiClient main window as a separate connection.
- 4. Click the Playback Controls to control the video.
- 5. Click to close the file and return to live mode.
- 1. Once you have found a desired video clip, pause play back (rewind clip to beginning if necessary).
- 2. Click and then click to begin playback. As the video plays in DigiClient, it is also being saved to the default save location on your PC (C:\Program Files\DVR\Save).
- 3. Click to stop recording.
- Figure 21.0 Select a file for playback
- 1. Click to open File Search.
- 2. Select the file you want to view, or click Folder Select to browse for the folder on your PC with saved video data from your DVR. Use the Search Time field, Date, and Time sliders to jump to specific dates and/or times.
- 3. Click Play. The file plays in the DigiClient main window as a separate connection.
- 4. Click the Playback Controls to control the video.
- 5. Click to close the file and return to live mode.
- Figure 21.1 Covering to AVI
- Figure 21.2 AVI files after conversion
- 2. Double-click the file to open in your default media player, or right-click to open the file with a AVI-compatible media player.
- NOTE: Some of the functions of the DVR Controller may not work with all DVR makes and models.
- . Spot/ESC: Return to the previous menu; press to open/close Spot mode.
- . MENU/: Open the system main menu; move cursor up when navigating menus.
- . LV/PB: Switch between live view and playback modes.
- . ALARM RESET/: Release the Event buzzer; move cursor left when navigating menus.
- . STATUS/: Open system status menu; confirm selections, advance options when navigating menus.
- . D-ZOOM/: Control zoom +/-; move cursor right when navigating menus.
- . AUTO/(F-): Start Auto Sequence mode; decrease value of selected menu option; focus control of PTZ camera*
- . PIP/: Enter Picture-in-Picture mode; move cursor down when navigating menus.
- . FREEZE/(F+): Open/close Freeze Mode; press to increase value of selected menu option; focus control of PTZ camera*
- . REC: Click to start/stop recording.
- . SLOW: Click to slow down playback speed.
- . PB/PAUSE: Click to pause playback; press again to resume playback.
- . FAST: Click to increase playback speed: 1X, 2X, 4X, 16X, 32X, 64X, 128X.
- . DIR: Click to switch between Reverse and Forward playback.
- . SEARCH/PRESET: Click to open the Search Menu; enter the preset while in PTZ mode.
- . COPY/AF: Click to open the Copy Menu; enable Auto-Focus while in PTZ mode.
- . PTZ: Click to open PTZ mode (PTZ camera must be connected).
- NOTE: You must have a PTZ camera connected to your DVR in order to use the PTZ Controller.
- Figure 22.2 PTZ Controller
- 1. Click to open the PTZ Controller.
- 2. Click the drop-down menu and to select the channel with a connected PTZ camera.
- 3. Click the AF buttons to pan/tilt the camera.
- 4. Under Zoom / Focus, click + - to zoom in and adjust the focus.
- 5. Under Speed, click the radio buttons to select 1X, 2X, or 4X.
- 6. Click buttons 1~16 at the bottom of the window to enter presets for your PTZ camera.
- NOTE: Please refer to your camera’s instruction manual for a complete list of preset codes.
- Figure 22.3 Status Window
- Figure 22.4 DigiClient Print Window
- 1. Select a channel to view in full-screen.
- 2. Click button. If you click while in Multi-Screen, the Print function will take a snapshot of channel 1 by default.
- . Zoom: Click + / -
- NOTE: This does not increase the size of the image on the page, it only increase the size of the image on screen.
- . Paper Size: Click the drop-down menu to select from A3, A4, A5, B4, B5, legal, and letter
- . Memo: Add text to the page. By default, all text appears below the image on the page
- . Font: Change the font size, color, and appearance of the memo text
- . Date Print: Check/uncheck the box to apply/remove the date-stamp from the image
- NOTE: Only the image is saved as a JPEG or BMP (Bitmap). Any text you add to the page will not be saved.
- Figure 22.5 Memo appears below image
- 1. From the DigiClient Print window, click Memo.
- 2. Click inside the text box.
- 3. Type your desired text in the box. If desired, click Font to customize the font for the memo. You can also edit the font after you have written the memo.
- 4. When you are finished, click Memo to close the text box. The text appears below the image on the page.
- NOTE: Changes you make to the font will apply to all text in the memo.
- Figure 22.6 Copy From DVR Window:
- Use Copy Time, Copy Start/Copy End, and the slider to adjust the date and time you want to copy.
- 1. Click . The Copy From DVR window opens.
- 2. Select your DVR from the list or from the Hdd drop-down menu. The Start and End times appear in the list-these are the dates and times available to copy.
- NOTE: The default hard drive of your system is shown as Normal in the Hdd drop-down menu.
- NOTE: Copy Time lets you increase the time to a maximum of 60 minutes. To copy more than 60 minutes, manually type in the time in the Copy End field.
- NOTE: Copy files are saved with the extension .dvr
- NOTE: If no data is available, the following message box appears on-screen:
- NOTE: The USB drive should be formatted to work with your DVR (please refer to your DVR’s instruction manual for information on formatting USB drives). Also, ensure the drive is empty, or has sufficient free space for copying.
- 2. Enter the date and time you want copied using Copy Time, Copy Start/Copy End, or the slider at the bottom of the window (see Figure 1.0).
- 3. If necessary, enter your DVR’s password in the Password text field.
- 4. Under Channel, check/uncheck boxes for the channels you want copied.
- 5. Under File Name, click to change the save location and file name for the copy file.
- 6. Click the drop-down box at the bottom of the window and select USB FRONT.
- NOTE: INTERNAL CD-RW/DVD is not applicable.
- Figure 22.7 Copy progress from DVR to USB
- Figure 23.0 Remote Setup main window
- 1. Click .
- 2. Enter your DVR password and click OK. The Remote Setup window opens.
- . QUICK SETUP
- . SCREEN
- . RECORD
- . EVENT
- . SYSTEM
- . LINK
- . DOWNLOAD
- . READ FROM FILE: Load settings from your PC.
- . SAVE TO FILE: Save your settings to your PC.
- . LOAD FROM DVR: Load settings from the connected DVR.
- . UPDATE TO DVR: Load settings to the connected DVR.
- . CLOSE: Close Remote Setup window.
- . IMAGE SIZE: Select 720x480, 720x240, or 360x240
- . RECORD FRAME: Select frame rate-frame rate varies based on Image Size
- . IMAGE QUALITY: Select Low, Normal, Fine, or Best
- . EVENT: Select Alarm, V-Loss (Video loss), Motion, Alarm & Loss, Alarm & Motion, Loss & Motion, All, or Off
- . PRE RECORD TIME: Set the length of time the system records prior to an event. Set from 0~5 seconds
- . POST RECORD TIME: Set the length of time the system continues to record after an event. Set from 0~60 seconds
- . AUDIO RECORD: Set to ON/OFF
- Note: An audio capable camera (not included) or microphone (not included) are necessary is necessary for audio recording.
- . REMOTE CONTROL ID: Designate an ID for the remote control to use with the system. Set from 11, 12, 13, 14, 21, 22, 23, 24, 31, 32, 34, 41, 42, 43, 44, and ALL
- Figure 23.1 Quick Setup: Auto
- . IMAGE SIZE: Select 720x480, 720x240, or 360x240
- . IMAGE QUALITY: Select Low, Normal, Fine, or Best
- . RECORD TIME: Set from 1~999 days.
- . MAX RECORDABLE TIME: (Non-selectable) The system calculates the maximum recording time available on the hard drive based on changes to Image Size, Image Quality, and Record Time (non-selectable).
- . TOTAL RECORD FRAME: (Non-selectable) Based on the values you input for Record Time, Image Size, and Image Quality, the system ...
- . AUDIO RECORD: Set to ON/OFF
- . REMOTE CONTROL ID: Designate an ID for the remote control to use with the system. Set from 11, 12, 13, 14, 21, 22, 23, 24, 31, 32, 34, 41, 42, 43, 44, and ALL
- Figure 24.0 Screen: Auto Sequence
- . AUTO SEQUENCE
- . DISPLAY
- . TITLE
- . MULTI SCREEN
- . COVERT
- . SPOT
- . CAMERA
- 1. Under AUTO-SINGLE, click to increase/decrease for individual channels. The higher the dwell time, the longer the channel will remain displayed on screen.
- 2. Check VIDEO LOSS SKIP to remove disconnected channels from Auto Sequence.
- 3. Check ADD AUTO SINGLE to enable/ disable single channels from Auto Sequence. If disabled, all single (full-screen) channels will be skipped while in Auto Sequence.
- 4. Under AUTO-SPLIT, click to increase/decrease the dwell time for the various multi-screen displays.
- 5. To save your settings to the DVR, click Update to DVR.
- 1. Adjust the following options:
- . HDD FREE SPACE: Select ON/OFF to display the remaining capacity of the internal hard drive.
- . HDD FREE SPACE MODE: Select the display format for the remaining hard drive space as PERCENT or GIGABYTE.
- . RECORD STATUS: Select ON/OFF to display the recording status for each channel.
- . CLOCK DISPLAY: Select ON/OFF (by default, ON) to display the date and time on screen.
- . DATE & TIME MODE: Select the format for the date and time display.
- . TITLE DISPLAY: Select ON/OFF to display the channel title.
- . TITLE MODE: Select TEXT/BITMAP (by default, TEXT). See Title.
- . BORDER COLOR: Select WHITE/BLACK as the border color for each channel while in a split-screen display view.
- . REMOTE CONTROL ID: Select ON/OFF to display or hide the remote control ID in use with the system. By default, this option is set to OFF.
- . SPOT TITLE DISPLAY: Set to ON/OFF to display a title on the spot monitor.
- Figure 24.1 Bitmap title options
- NOTE: Make sure you have enabled Bitmap text in Screen>Display>TITLE MODE before editing bitmaps in the Title menu.
- NOTE: The text should not exceed the width of the bitmap grid. If the text is longer than what can fit on the grid, the text will not display properly on the system.
- NOTE: Thought you can select font color, only black can be displayed by the system.
- NOTE: Only one bitmap per channel can be saved on the system.
- Figure 24.2 Multi Screen options
- 1. Under LIVE 4E, LIVE 6, LIVE 7, LIVE9B, LIVE 10, AND LIVE 13, click to select the channel for use in each respective multi-screen display.
- 2. Check/uncheck the boxes for LIVE 4E, LIVE 6, LIVE 7, LIVE 9B, LIVE 10 to enable/disable the respective displays from the DVR.
- 3. To save your settings to your DVR, click Update to DVR.
- Figure 24.3 Covert options
- 1. Select ON/OFF for each respective channel.
- 2. Under SELECT, click the drop-down menu and select the following displays options for the covert channels:
- . LIVE: Selected channels appear hidden during live mode
- . PLAY: Selected channels appear hidden during playback
- . NETWORK: Selected channels appear hidden on network viewer screen
- . LV&PB (Live and Playback): Selected channels appear hidden during live mode and playback
- Figure 24.4 Spot options
- 1. Under SPOT MODE, select one of the following from the drop-down menu:
- . MANUAL: Manually select the channel for the Spot Monitor
- . SEQUENCE: Single channels (full screen) will be displayed in an alternating sequence
- . EVENT: The channel where an event (motion, alarm, sensor) has occurred will be displayed on the Spot Monitor
- 2. Under SPOT SEQUENCE TIME, click to increase/decrease the dwell time for the channels appearing on the spot monitor (from 1~60 seconds). The higher the dwell time, the longer the channel will be displayed on screen on the spot monitor.
- 3. Under ADD SPOT MULTI, select ON/OFF from the drop-down menu. If ON, this enables multi-screen displays on the spot monitor.
- NOTE: You must have a spot monitor connected to your DVR to configure this option.
- 4. Under VIDEO LOSS SKIP, select ON/OFF from the drop-down menu. If ON, you will omit channels with video loss from the sequence to the spot monitor.
- 5. To save your settings to your system, click Update to DVR.
- 1. Under BRIGHTNESS, CONTRAST, HUE, and SATURATION, click to adjust the respective values (from 0~100) for each channel.
- 2. To save your settings to your DVR, click Update to DVR.
- Figure 25.0 Record tab
- . RECORD
- . RECORD PROGRAM
- . AUDIO
- . HOLIDAY
- 1. Under MON~SUN, click the text boxes for hours 0~24 and type in 0~9.
- 1. Under ALL, click the text box and type in 0~9. This will apply the selected recording program to all hours of the day.
- 2. Click SCHEDULE RECORD ON/OFF. This enables the recording program for the selected hour or day (if ALL selected). The selected text field should turn green.
- NOTE: If you double-click a text field, you will jump to the RECORD PROGRAM tab, which allows you to customize the selected recording program. For more details on configuring recording programs, see Record Program.
- 3. Configure the remaining Record options:
- . REPEAT RECORD: Select ON/OFF. If set to ON, recorded data on the hard disk will be overwritten once the hard disk is full. By default, REPEAT RECORD is set to OFF.
- . REPEAT RECORD ALARM: Select 5%~10%, or OFF. If enabled, the system alarm will sound when there is 5%~10% free space remaining on the hard drive.
- . RECORD LIMIT: Select 1~6 days, 1~4 weeks, 1~11 months, 1 year, or OFF.
- . PLAY MODE: Select FIELD or FRAME.
- Figure 25.1 Record Program options
- 1. Under REC PROGRAM, click to select programs 0~9.
- 2. For each channel, configure the following options:
- . IMAGE SIZE: Set the actual resolution for each camera: 360x240, 720x240, and 720x480.
- . NORMAL IPS: Set the images (frames) per second (IPS) for normal continuous recording. Set from 0, 1, 2, 4, 5, 6, 8, 10, 15, an...
- Figure 25.2 Audio options
- Figure 25.3 Holiday options
- Figure 25.4 Event tab
- . EVENT
- . MOTION DETECTION
- . SENSOR INPUT
- . RELAY OUTPUT
- . SCREEN HOLD: The current screen remains displayed even if an event is triggered.
- . EVENT FULL: Display the channel for the triggered event in full-screen.
- . EVENT MULTI: Display the channel(s) for the triggered event in multi (split)-screen.
- . EVENT F_RTN: Display the channel for the triggered event in full-screen momentarily but then return to the previous screen.
- . EVENT M_RTN: Display the channel(s) for the triggered event in multi (split)-screen momentarily and then returns to the previous screen.
- 3. Under EVENT MESSAGE, select ON/OFF from the drop-down menu. If ON, a warning message will appear on-screen when an event occurs.
- 4. Under EVENT MESSAGE RESET, select from 1~30 from the drop-down menu. This is the time-in seconds-that the system will reset the Event Message after a detected event.
- 5. Under EVENT BUZZER, select ON/OFF from the drop-down menu. If ON, a buzzer will sound from the DVR when an event is detected.
- 6. To save your settings to your DVR, click Update to DVR.
- Figure 25.5 Motion Detection options
- Figure 25.6 Motion Area Setup
- 4. Click the radio button to select the size of cursor-1x1, 3x3, or 5x5.
- 5. Select cells in the grid to enable with motion detection. Enabled cells should turn from green to clear.
- 6. Click OK to save your grid configuration or click Cancel to exit without saving.
- 7. To save your settings to your DVR, click Update to DVR.
- Figure 25.7 Sensor Input options
- Figure 25.8 Relay Output options
- Figure 26.0 System tab
- . SYSTEM
- . CLOCK
- . ADVANCED SETUP
- NOTE: If you select AUTO, the system will automatically detect NTSC or PAL.
- 2. Under LANGUAGE, select English, Korean, Polish, Spanish, Russian, French, Turkish, German, Italian, or Portuguese.
- 3. Under REMOTE CONTROL ID, select 11,12, 13, 14, 21, 22, 23, 24, 31, 32, 33, 34, 41, 42, 43, 44, or ALL.
- 4. Under KEY ECHO, select ON or OFF. If ON, the DVR will beep when ever you press buttons on the remote control or front panel.
- 5. To save your settings to your DVR, click Update to DVR.
- NOTE: You cannot manually set the time from the Clock tab. [DATE&TIME] at the top of the tab is non-selectable.
- Figure 26.1 Clock options
- 1. Under TIME ADJUST, configure the following options:
- . INTERNET TIME ADJUST: Select ON/OFF to use an Internet time server to maintain the time on the DVR (network connection required).
- . SELECT TIME SERVER: In the text field, enter the IP address of the time server.
- . SELECT TIME ZONE: Select the time zone based on + / - GMT (Greenwich Mean Time). For example, New York is GMT -06:00, Los Angeles is GMT -08:00.
- . DAYLIGHT SAVINGS TIME: Select ON/OFF to enable/disable DST on the DVR.
- . START TIME / END TIME: Use the drop-down menus to select month, date, day-of-week, and time for DST.
- Figure 26.2 Advanced Setup options
- 1. Under PASSWORD CHECK, select ON/ OFF. If ON the DVR will ask you for a password when logging in and accessing certain menus.
- 2. Under ADMIN and USER1~USER4 enter an 8-digit password in the NEW PASWORD text field. Under RE-TYPE, enter the password again for verification.
- 1. Click the drop-down menus to enable/ disable the following authorities for USER1~4:
- Note: Some authority options may not be available on certain makes and models of DVRs.
- NOTE: Some networking knowledge is suggested when configuring options in the Link tab.
- Figure 27.0 Link tab
- NOTE: Make sure you have connected an Ethernet cable (not included) to the rear panel of the system to make use of the networking functions of your DVR.
- NOTE: DCHP Mode allows you to quickly connect the first time by obtaining an IP address from the router. After the initial setup...
- Figure 27.1 RS485 options
- 1. Use the drop-down menus to configure the following options:
- . SYSTEM ID: Set the system ID from 0~255.
- . BAUD RATE: Set the transmission rate for the RS485 controller: 1200, 2400, 4800, 9600, 19200, 57600.
- . DATA BIT: Set the size of each bit of data sent to the RS485 controller: 6, 7, or 8.
- . PARITY BIT: Set the error checking for the data to EVEN, ODD, or NONE.
- . STOP BIT: Set bit for ending a transmission to 1 or 2.
- Figure 27.2 PTZ options
- NOTE: Please refer to your PTZ camera’s instruction manual prior to changing setting.
- 1. Under MODEL, select the following for the channel(s) with a connected PTZ camera: SPD, SRX-100B, VC-C4R, SD-290, SCC-643, PEL...
- 2. Under SPEED, select one of the following for the channel(s) with a connected PTZ camera: 1200, 2400, 4800, 9600, 19200, 57600, and 115200.
- 3. Under ID, click to set the PTZ ID from 0~255.
- 4. To save your settings to your DVR, click Update to DVR.
- NOTE: Please refer to your PTZ camera’s instruction manual prior to changing setting.
- Figure 27.3 E-Mail options
- 1. Under Send Email, select ON/OFF.
- 2. Under SMTP Server, enter the SMTP server address for your email provider.
- 3. Under DVR Email Address, enter the email address of your DVR.
- 4. Under Email Address 1~10, enter the email address to send the email notifications.
- NOTE: OPTIONAL: You can enter the user ID and password for your email address.
- NOTE: Check the manufacturer’s website for the availability of firmware upgrades.
- Figure 28.0 Download tab
- Figure 28.1 Firmware upgrade progress
- Figure 29.0 Viewer Options window
- 1. Click to open the Viewer Option window.
- 2. Configure the following options as desired:
- . Display: Check/uncheck the boxes to enable/disable Channel Title, Date Time, Event, and Frame Rate.
- . Play Mode: From the drop-down menu, select Field Mode or Frame Mode. Field Mode provides smooth, natural playback; Frame Mode provides frame-by-frame playback.
- Figure 30.0 User window
- 1. Click to open the Viewer Option window.
- 2. Click User Management at the bottom of the window.
- 3. Log in with your username and password and click OK.
- 1. Open the User window.
- 2. Click Add. All User Information text fields and authorities boxes are cleared.
- 3. Under User Information, enter a username, description, and password; re-enter the password in the Confirm password field.
- NOTE: User must have a password.
- 4. Check/uncheck the boxes to grant/deny the new user permission to the following authorities:
- . Live
- . Search & Play
- . Copy
- . Live Audio
- . DVR Setup
- . DVR Control
- . PTZ Control
- . DVR Status
- 5. Click Save to save the user and settings, or click Close to exit without saving.
- 1. Open the User window.
- 2. Select a user from the list.
- 3. Under User Information, edit the username, description, and password.
- 4. Check/uncheck the boxes to grant/deny the user permission to authorities.
- 5. Click Change to save your settings or click Close to exit without saving.
- 1. Open the User window.
- 2. Select a user from the list.
- 3. Click Delete.
- NOTE: This action cannot be undone once you click Delete.
- 1. Open the User window.
- 2. Under Check Password, check/uncheck the box to enable/disable password check and click OK. If enabled, you will be required t...
- 1. Connect to a DVR(s).
- 2. Use multiple DigiClient functions, such as, playback, HDD search, or File search. These should appear in the Connection list.
- 3. From the DigiClient Main Window, click . DigiClient will separate the items in the Connection List into individual windows; DigiClient’s primary controls will appear in a mini-toolbar.
- Figure 31.0 Arrange windows
- 4. From the mini-toolbar, click . The windows will automatically arrange on the screen.
- 5. To expand the mini-toolbar, click to view the channel number buttons, search buttons, and playback controls; click again to view the Control List; click again to return to the mini-toolbar.
- 6. To return to the DigiClient main window, click .
- 1. With the system powered off, connect the system to the router using the included Ethernet cable.
- 2. Power the system on. You must connect the system to the router prior to turning on the system. This allows the system and router to communicate over the network.
- 3. Press and hold the Enter button on the front panel to find your system's IP address.
- 4. Enable Port Forwarding on your router. Refer to the included Router Guide and Basics of Remote Video Access Guide for further assistance with your specific network setup and hardware.
- 5. Setup an account at http://ddns.digimerge.net
- Figure 32.0 DVR Status screen
- 1. Press the button to open the Main Menu.
- 2. Select and press the button. Your IP address is near the top of the screen; your MAC address is near the bottom of the screen.
- 3. Press the button on the remote control until you see the Save/Exit screen. Select SAVE ONLY or SAVE AND EXIT to save your settings.
- 1. In your browser, go to http:// ddns.digimerge.net and click Create Account.
- Figure 33.0 Create a DDNS account
- 2. Complete the Account Information fields with your personal information. Complete the Warranty Information with your purchase details (optional).
- 3. Complete the System Information fields:
- 4. Once the information has been entered, click Create New Account.
- 5. Your Account information will be sent to you at the email Address you used in Step 2.
- Figure 33.2 System information
- Figure 33.3 DDNS menu
- Figure 33.4 Use the Character table to input your domain name, username, and password
- NOTE: Only the first part of the Domain Name is required for setup on the system. For example, if the full domain sent is tomsmith.ddns.digimerge.net, you only need to enter tomsmith on the system.
- 6. Press the button on the remote control until you see the Save/Exit screen. Select SAVE ONLY or SAVE AND EXIT to save your settings.
- 1. Connect the Transmit Cable to the TA port on the 485 port on the rear panel of the DVR.
- 2. Connect the Receive Cable to the TB port on the 485 port on the rear panel of the DVR.
- 3. Connect the camera to BNC Channel 1 on the octopus cable.
- 4. Configure PTZ Menu options. The PTZ Camera Settings will depend on the Type of Camera - refer to the specific Camera Manual for your brand and model of PTZ Camera.
- NOTE: A BNC-to-RCA adapter (not included) is required to connect a monitor with RCA inputs.
- NOTE: Make sure that the system is OFF and the power cable has been disconnected before changing the hard drive.
- NOTE: Only the first part of the Domain Name is required for setup on the system. For example, if the full domain sent is tomsmith.ddns.digimerge.net, you only need to enter tomsmith on the system.
- Figure 34.0 Lift the housing from the back and lay flat.
- Figure 34.1 Observe the raised contour
- 2. Place the mounting plate (with attached hard disk) on the four mounting posts of the circuit board. Observe that the mounting plate has an inset to allow for correct placement on the circuit board (see figure 34.2).
- 3. Secure the mounting plate (with attached hard disk) to the four mounting post with the four screws.
- 4. Reconnect the cables to the hard disk. Make sure the cables are connected firmly.
- 5. Carefully replace the housing and reattach the four screws-housing and screws holes should line up.
- Figure 34.3 Firmly reconnect the drive cables
- 6. Reconnect all cameras and cables. Re-mount the unit the back of your monitor if desired.
- 7. Power on the system. If you have installed a new hard disk, you must format the hard disk before using the system.
- 1. Press the button to open the Main Menu.
- 2. Select and press the button.
- 3. Select HDD and press the button.
- 4. From the HDD menu, press the button to open the HDD Initialize screen.
- Figure 34.4 Select YES to format the hard disk
- 5. Select YES and press the button. [Select NO and press the button to cancel, or the button.] The system formats the hard disk,...
- NOTE: Do not turn off the system while the HDD is formatting.
- NOTE: Each audio cable is for a single audio channel, not stereo left and right audio from a single source.
- 2. Connect audio RCA-male cables from your audio source (i.e. audio capable camera, microphone) to the RCA-female cables in the Y-adapter.
- 3. Press the button to open the Main Menu.
- 4. Select RECORD and press the button.
- 5. From the Record menu, select AUDIO RECORD and press the button.
- 6. Press the buttons and the buttons to set Audio Channels 1~4 ON/OFF.
- 7. Press the button on the remote control until you see the Save/Exit screen. Select SAVE ONLY or SAVE AND EXIT to save your settings.
- 8. Press the button on the remote control to switch between audio channels 1~4.
- NOTE: File Viewer is also transferred when copying data to a CD-RW/DVD-RW.
- Figure 36.0 File Viewer main window
- Figure 36.1 FileViewer folder
- Figure 36.2 Search Window
- Figure 36.3 Converting to AVI
- Figure 36.4 AVI files after conversion
- 250 GB INTERNAL HDD 0%
- 250 GB INTERNAL HDD 0%
- NOTE: The system supports ONLY DVD-RW drives and media.
- NOTE: Most DVD-R/W burners are compatible with the system.
- NOTE: Remote viewing is only compatible with Internet Explorer. Mozilla Firefox, Opera, Safari and other browsers are not supported.
- Figure 38.0 Select Trusted Sites in Internet Options
- 1. Open Internet Explorer.
- 2. From the main browser window, select Tools>Internet Options.
- 3. Click the Security tab.
- 4. Click Trusted Sites from the available zones and then click Sites.
- 5. In the text field, enter https://www.digimerge.com/ VB300 and click Add.
- 6. Click Close.
- 7. From the Internet Options window, click OK.
- 1. In the address bar, enter www.digimerge.com/VB300
- 2. When prompted, click the warning bar and select Install ActiveX (see figure 38.2).
- 3. In the new security window, click Install to Install ActiveX (see figure 38.3).
- Figure 38.2 Click the warning bar to install ActiveX.
- 1. In the IP address / Port text field, enter your system’s IP address or DDNS address; click to enter your system’s port number (by default, 5400).
- NOTE: The port number you enter on the site must match the port number on your DVR.
- NOTE: Split-screen layout depends on the number of channels available on your DVR.
- Figure 39.0 Live display and interface in Internet Explorer
- 1. IP Address/Port/MAC address: Enter your system’s IP address or DDNS address and port number. The display shows the MAC address of the connect DVR (non-selectable).
- 2. Primary Control buttons: Click the following to control remote viewing:
- . DVR Search: Scan for DVRs connected to your network
- . Connect: Connect to your DVR; you must enter your DVR password to log in.
- . Disconnect: Quit connection to your DVR.
- . Pan/Tilt: Open Pan/Tilt controls.
- NOTE: A PTZ camera must be connected to your DVR in order to use Pan/Tilt controls.
- . Full Screen: View display screen in full screen (browser window disappears). Press Esc on your keyboard to exit.
- . Auto: Enable/disable Auto Sequence mode. Click to increase/decrease dwell time from 1~60 seconds.
- NOTE: The higher the dwell time, the longer a channel will remain on-screen.
- . DVR Control: Non-selectable.
- 3. Main Display: During live viewing and playback, displays split-screen or full-screen images.
- 4. Channel Indicators: Shows status of active channels on your system-Yellow: continuous record; Red: motion recording.
- 5. IP Server: Check the box to use an IP server.
- 6. Live/Play/frames: Click Live to start live viewing; click Play to begin playback. The display shows the current frame rate (non-selectable; affected by bandwidth).
- 1. From split-screen, double-click any channel to view the channel in single channel
- 2. From single channel display, double-click to return to the split-screen display.
- 3. Click Full Screen to view the display (multi split-screen or single channel) in full-screen (browser window disappears). Press the Esc key on your keyboard to exit.
- NOTE: Auto Sequence occurs in single channel only.
- NOTE: The higher the dwell time, the longer a channel will remain on-screen.
- NOTE: Dates with recorded data are highlighted in yellow.
- NOTE: Frame rate appears in the main display window, but is non-selectable.

39
Using the Main Menu
CLOCK
Configure the date and time for the system.
To set the date and time:
1. From the Clock menu, select DATE&TIME
and press the button.
2. Press
the buttons to select the year,
month, day, hour, minute, and seconds. Press
the buttons to adjust the date and time.
3. Press the button to save the date and
time.
4. Press the button on the remote
control until you see the Save/Exit screen.
Select SAVE ONLY or SAVE AN
D EXIT
to save your settings.
You can also configure the time zone, daylight
savings time, and have t
he system to use the
Internet to set the time (network cable
required).
To configure the time settings:
1. From the Clock menu, select TIME
ADJUST and press the button.
2. Press the
buttons to
select and configure the following options:
• INTERNET TIME ADJUST: Set to ON/
OFF. If ON, the system time will be
updated b
y an Internet server.
• SELECT TIME SERVER: If you enable
Internet Time, enter the IP address for the
Internet time server.
• SELECT TIME ZONE: Select the time
zone based on + / - GMT (Greenwich Mean
Time). For example, New York is GMT
-06:00, Los Angeles is GMT -08:00.
• DAYLIGHT SAVING TIME: Set to ON/
OFF to enable/disable daylight savings
time (DST). If ON, you can enter the start
time and end time for DST.
• START TIME / END TIME: Start and end
times for daylight savings time. Only
selectable if DST is enabled.
3. Press the button on the remote
control until you see the Save/Exit screen.
Select SAVE ONLY or SAVE AND
EXIT
to save your settings.
Figure 12.1 Clock menu
Figure 12.2 Time Adjust menu