
Installation Guide

After the epoxy resin and/or the primer has dried up, the
floors can be glued. The glue must be used in accordance
with the instructions of the glue supplier. The glue must be
applied with the right glue comb. Do not apply glue to too
big of a floor surface but apply plank by plank or, if
necessary, row by row to prevent the glue from hardening.
Follow the same instructions as for installing a floating
floor but make sure that the parquet planks are pressed
into the glue with force.
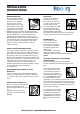
The next floor panels must be positioned in such a way
that they are connected to the panel already installed
while being slid towards that panel. Be careful not to spill
glue on the parquet.
It is recommendable to put a heavy weight on the glued
floor for at least 12 hours to press it into the glue bed
well. The freshly glued floor may
not be used for 24 hours or otherwise if the glue
instructions say differently.
Other requirements for gluing:
• The glue must touch at least 80% of the parquet
floor panel.
• The underlayment must at least meet the following
requirements:
• Flaking strength min. 1Mpa
• Pressure strength min. 25 Mpa
Only polyurethane glue and synthetic glue should be
used, especially intended for the installation of ready-
made parquet floor panels according to the supplier and
that can be used on top of floor heating. Dispersion glue
should not be used.
NOTE: The gluing does not reduce natural shrinkage or
expansion (warping of wood) so make sure
that there are sufficiently big expansion gaps. It is
important to use glues, epoxy resins and primers of the
same manufacturer and to use the same system to ensure
compatibility.
AFTER INSTALLATION
It is recommendable to put a heavy weight on the glued
floor for at least 12 hours so that it is pressed into the glue
bed well.
The freshly glued floor may not be used for 24 hours or
otherwise if the glue instructions say differently.
You cannot finish the floor with skirtings, or clean it or
apply oil on it afterwards until after the floor has dried for
24 hours.
Use oxidative oiled floor Hardwax oil if you want to apply oil
after installation.
Any guarantee on the floor will expire if the above
instructions are not followed or if the wrong glue is used,
and the floor may damage as a result.
INSTALLATION OF ENGINEERED PLANK FLOORING
WITH CLICK CONNECTIONS
For floors with a click connection you should use
an underlayment that is not thicker than 3 mm and is not
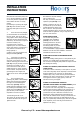
resilient. Install the first row of floor panels, starting with
the tongue toward the wall. Always work from left to right.
Saw off the tongue on the left cross-cut end (only the first
part) and long
end on the side of the wall of the parquet. Make sure that
all the cross-cut ends of the first row are accurately
connected to prevent that gaps will be created in the next
rows. Then slowly push down the floor panel until the
pieces are flat and firmly fixed in place. Tighten it by hand
or use a hammer and stop block.
In the second row, start with the remaining part of the first
row. This part must however be at least 40 cm in length, so
as to ensure that the floor has optimum stability and also
causes minimum loss of material. Make sure to keep the
same distance to the wall when installing the first panel of
each new row. Always saw off the tongue on the left side of
the panel.
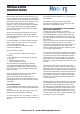
The floor panels will be fixed to each other at the top by
turning the tongue of the floor panel into the groove of the
installed floor panel at an angle of 20-30 ºC. Then slide the
panel below this corner accurately against the cross-cut end
of the already installed panel on the left. Slowly push down
the floor panel until the pieces are flat and firmly fixed in
place. Tighten it by hand or use a hammer and stop block.
Finish the row in the same way and repeat this procedure
for each following row.
While fitting the last row of floor panels, lay the floor panels
with the décor side down with the groove against the wall.
Now make the required markings and cut with the saw.
Also keep in mind the prescribed expansion joint of 15 mm.
If it is impossible to lay the last row, lay the panels one by
one as close as possible against the panels of the last row
but one. Then push them together lengthwise using a pull
iron and a hammer. The cross-cut ends are tightened using
a stop block or a pull iron and hammer.
Flooors by LTL- www.ltlhomeproducts.com
INSTALLATION
INSTRUCTIONS