
Installation Guide

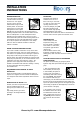


Now place the second floor panel, and
so on, until the installation of the first
row of floor panels is completed. Now
check whether the first row is fully
straight
by tensioning a rope along the length
(see 11). After the third row has
been laid, check again if the floor is
level.
3. If the wall is not fully straight,
you should transfer the unevenness to
the floor panels. This may be done
using a spacer with a lead pencil (see
12). After the floor panels have been
marked out, saw the same as required
so that the recesses, etc.,
fit together. Keep in mind the
expansion joint. Use a fine-toothed
saw for this purpose. If a hand saw is
used, make sure the décor side is
facing upwards; if
a jigsaw is used, keep the décor side
facing downwards (see 13).
4. Lay the first row of panels by
gluing each subsequent panel on the
short side. In the second row, start
with the remaining part of the first row
(see 14). This part, however, must be
at least 40 cm in length, so as to
ensure that the floor has optimum
stability and also to ensure minimum
loss of material. The panels should be
glued along the entire length and
width. Do not use too much glue!(see
15).
5. Use a stop block when
tightening the panels to avoid damage.
Always place the stop block against
the tongue to avoid damaging the
surface layer (see 16). After the
panels have been tightened, remove
any residual glue immediately with a
slightly moist cloth (see 17). After the
glue has dried, it will be almost
impossible to remove any residue.
6. While fitting the last row of
floor panels, lay the floor panels with
the décor side down with the groove
against the wall.
AFTER INSTALLATION
You can start using the floor
immediately after installation
(see 19). You can now start
finishing operations on the floor.
You may also start installing
the skirting boards. If you have
installed oxidative oiled floors,
it is recommendable to apply Solidfloor™ Ultimate
Hardwax oil to the floor after installation. Consult the
maintenance instructions for this.
GLUED INSTALLATION OF ENGINEERED PLANK
FLOORING
Apart from installing floating floors it is also possible to glue
the floors. It is actually highly recommended to glue the
floor to achieve the highest yield possible in respect of under
floor heating and cooling.
GLUING ON CONCRETE, SAND CEMENT FLOORS OR
TILED FLOORS
If the floor is above a basement, a crawl space or any other
room where rising damp can be expected, a moisture barrier
should be placed on top of the floor (a special damp-
resistant epoxy resin). In this case the glue should also be
adjusted to the epoxy moisture barrier. A primer may have
to be applied to the floor (apply primer). Follow the
instructions of the glue supplier.
GLUING ON AN ADHESIVE SUBFLOOR
(WOODEN FLOOR PANELS OR UNDERLAYMENT) If the
floor is above a basement, a crawl space
or any other room where rising damp can be expected, a
moisture barrier should be placed on top of the floor. It is
also an option to place damp-resistant polyethylene foil
(construction foil) with a thickness of at least 0.2 mm
between the wooden underlayment and chipboard, the
tracks must be installed with an overlap of at least 200 mm
and after that the joints must be made damp-proof with
tape. (or a special damp-resistant epoxy resin can be applied
to the chipboard; in this case the glue should also be
adjusted to the epoxy)
Now make the required markings
and cut with the saw.
Also keep in mind the prescribed
expansion joint (see 18). If it is
C
B
difficult to reach the last row, lay
the panels one by one as close as
possible against the panels of the
A
last row but one. Then push them
together lengthwise using a pull iron and a hammer. The
cross-cut ends are tightened using a stop block or a
pull iron and hammer.
18
Flooors by LTL- www.ltlhomeproducts.com
11
15
16
17
12
13
MIN
40 cm
14
19
INSTALLATION
INSTRUCTIONS