
Instructions / Assembly


Instructions for Use | 14
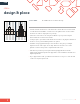
STEP 4:
attach & cut
• Each tile has adhesive applied to the back during the manufacturing process. The
adhesive has a protective liner that has to be removed prior to installing the carpet tile.
• Once you have your design finalized and the tiles are ready to install, simply peel the
liner from the back and position snugly to the adjacent tile.
• Tiles must fit snugly, but not be compressed.
• We recommend cutting your tiles first before you remove the film from the adhesive.
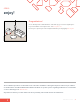
SIMPLE CUT?
• Measure and cut tiles from the back using a metal straight edge. Ensure arrows are
pointing in the correct direction.
• Be sure to cut your tiles on a protected hard surface.
TRICKY CUT?
• We have plenty of helpful tips on floorigami.com if you are stuck. You can also call us
anytime at 1.844.742.7429.
• Looking for a little tip to skip tricky cuts altogether? Feel free to leave some of your
hard floor peaking out for a modern, trendy look to eliminate the need to go right up
against the wall.
• To finish up, just vacuum any loose fibers.
For post installation care and protection, visit floorigami.com
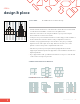
YOU’LL NEED: Metal straight edge
Sharp carpet knife
Safety gloves
Vacuum
These installation procedures are intended to assist in the indoor installation of the Floorigami Carpet Tile under most job
conditions. See Shaw Industries and CRI 105 Residential Installation Guidelines for specific questions regarding installation
not covered within or refer to Shaw Technical Support at 1.844.742.7429. Any variance from these procedures will become the
responsibility of the installer and not the manufacturer.
PRO