
Instructions / Assembly


Instructions for Use | 6
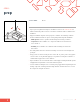
STEP 3:
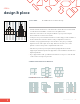
design & place
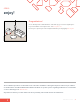
• Each tile has directional arrows on the back. These arrows allow for one-directional
or multi-directional installation. See below for some pattern ideas.
• Start in the center of the room, along the chalk line. Lay out your tiles using the
directional arrows on the back of each tile.
• For larger rooms, peel and stick the first tile, but continue laying out the remainder of
the tiles with the liner still on the adhesive until your full pattern is achieved.
• Install tiles using a pyramid technique as shown above. This gives you multiple
alignment checks. If the edges do not align, find and correct the source of the
problem. Continue until you have completed half of the room.
• Slide tiles into position to prevent yarn from being trapped between the tiles.
Trapped yarn will adversely affect the appearance of the installation and will cause
alignment problems.
• As you approach the walls, you will have tiles that are too long or too short. We will
cut those in the next step for a perfect fit.
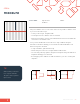
SQUARE TILE INSTALLATION METHODS
PLANK TILE INSTALLATION METHODS
YOU’LL NEED: No additional tools needed for this step.
monolithic
monolithic
ashlar
herringbone
brick
basketweave three-color stagger