
Warranty


© 2008 OJ Electronics A/S © 2008 OJ Electronics A/S
C
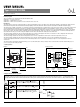
hecking GFCI
I
t is important that the GFCI has been checked for correct installation and function.
To check the GFCI: Testing can only be performed if the thermostat has a heating demand. Adjust the set point until the heating symbol (SSS) appears, use the
(
), to increase the heating demand. Wait 10 secs. to let the thermostat work according to the new set point. Press the button "TEST". The test is conclusive if
t
he red light on the thermostat lightens, and the display signs disappear. If this does not occur, check the installation. Press on RESET button to reset the GFCI.
The red light should disappear and the display will return to normal appearance. Push ok accept button ( ) to cancel the previously set temperature. If the test
fails, check your heating cable and the thermostat. The GFCI test should be carried out monthly.
I
f the GFCI trips in normal operation, without pressing the TEST button, there could be a ground fault! To check whether it is a ground fault or a nuisance
tripping, press RESET. If this cause the red light to shot off and not comes on again, it was a nuisance tripping and the system is functioning. If this cannot be
done there is a ground fault! Check your heating cable, the sensor cable and the thermostat.
E
xchange the defective part.
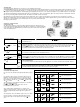
2. Daily use of the thermostat
4
-event clock mode
T
he day has been split into 4 events describing a typical day. When the thermostat is in 4-
event mode it will automatically adjust the temperature according to the required temperature
to the required time. As standard the thermostat has 5 days with 4 events, and 2 days with 2
e
vents. Programming see 3.
4-event clock mode:
Comfort mode:
☞
6
☞
Manual mode:
☞
6
☞
Temporary override: To temporarily override the temperature in the 4-event schedule program, press the UP ( ) or
DOWN ( ) button once, to show the temperature, and press again to increase or decrease the temperature.
The display will flash for 5 seconds, and will then revert to the time. The override will operate until the next
programmed event when the unit will resume the automatic program.
The clock function symbol ( ) and one of the 4-event symbols ( ) will be indicated.
Programming see 3.
Cancel comfort mode:
To cancel the override state, press the OK ( ) button twice.
Permanent override:
During holidays, the scheduled 4-event program can be overridden. Press the OK ( ) button, and then the UP ( ) or
DOWN ( ) button until the override temperature is set. The unit will now operate to this temperature permanently.
Cancel manual mode:
To cancel the permanent override state press the OK ()button once, and the unit will resume automatic function.
5 secs.
5 secs.
☞
☞
☞
☞
☞
☞
☞
☞
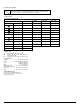
Press OK ( ) button for 3 secs. to begin programming
: Time and temperature
: Time and temperature
: Time and temperature
: Time and temperature
Day 1 - 5
Day 6 - 7
☞
☞
: Time and temperature
☞
☞
: Time and temperature
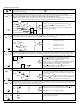
3. Programming
4-event time and temperature
For each event, the start time and required temperature must be
set.
For example, in the morning you wish the heating to start at
07:00 a.m. and the temperature to rise to 77˚F. Press OK ( )
button for 3 seconds and the start time is displayed. Change
this to 07:00 a.m. with the UP ( ) or DOWN ( ) button. Press
OK ( ) to confirm.
The temperature is now displayed. Change this to 77˚F with the
UP ( ) or DOWN ( ) button.
Press OK ( ) button to confirm. This action can now
be repeated for the second event.
These settings will be valid with days 1-5 showing on the
display. To program the days 6 and 7, repeat the above. Days 6
and 7 are usually Saturday and Sunday, and only have two
events.
The temperature can be set within the range of +41°F to +104˚F.
It is also possible to select the heating OFF at that event by
reducing the setting to 41˚F, and then pressing the ( ) once
more.
To turn the thermostat OFF, press DOWN
()
until OFF appears in the display.
DO NOT USE THE TEST BUTTON ON THE GFCI TO SWITCH OFF THE HEATING INSTALLATION.
The GFCI will automatically be reset after a disconnection of the mains supply
OFF
2