
Warranty


© 2008 OJ Electronics A/S
M
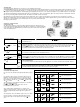
onitoring of energy consumption. The thermostat calculates average time it has been switched on allowing you to monitor your energy
consumption. In the thermostat you can read out:. Total switch-on time in percentage in the latest 2 days, 30 days or 365 days.
C
alculation of operational costs per day: (switch-on time:100) x kW x kWh-price x 24 h per day
E
xample: Read-out: 30 % in the latest 365 days
Size of heating system: 1.2 kW (ask the installer)
Cost of power: 0.2 USD/ kWh - Calculation: (30:100) x 1.2 kW x 0.2 USD/ kWh x 24 h = 1.7 USDper day
4
. Advanced settings and read-out
4
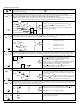
-event sequence. The present event sequence flashes: Days 1-5, followed by days 6-7. To change, press the UP ( ) button until you
have days 1-6 and then day 7 flashing, or all 7 days are flashing. Select the required sequence with the OK ( ) button.
☞
✚
☞
☞
5-2: 4 events in 5 days +
2 events in 2 days.
6-1: 4 events in 6 days +
2 events in 1 day
7-0: 4 events in 7 days
☞
☞
}
2
days
3
0 days
365 days
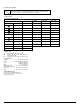
S
oftware version
Control sensor
Limit sensor (for UCDG)
}
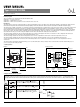
Max and min allowed temperature range. The temperature setting range of 41˚ to 104˚F can be limited to prevent a too high or too low
temperature being selected. For example, a wood floor covering should not be allowed to exceed a maximum of 81˚F. Low limitation is
used where the temperature of the floor is required never to fall below the minimum set temperature.
Time and temperature scale selection
Adaptive function: This function enables the thermostat to calculate when it needs to switch ON so that the required temperature is
reached at the set time. With a start time of 07:00 a.m. therefore, the thermostat may switch ON as early as 06:00 a.m. so that the desired
temperature of 77˚F is achieved by 07:00 a.m. Without this function set, the thermostat will start to heat at the time you set.
☞
☞
☞
☞
Maximum allowed temperature setting. Use the UP ( ) or
DOWN ( ) button to increase or reduce, and OK ( ) button to
accept.
Next is displayed LoLi. Press OK ( ) button to continue.
Minimum allowed temperature setting. Use the UP ( ) or
DOWN ( ) button to increase or reduce and OK ( ) button to
accept.
You can select either ˚C or ˚F scale, and 12 or 24 hour clock as
follows:
Press UP ( ) or DOWN ( ) button to change settings.
Confirm the required scale with the OK button ( ) button.
☞
☞
☞
}
}
☞
☞
☞
☞
Press the DOWN ( ) button to switch between on and off.
Press OK ( ) button to confirm.
Press OK ( ) button to end programming and to return to
scheduled programme.
☞
☞
☞
☞
P
ress both UP ( ) and DOWN ( ) buttons together for 3 seconds. INFO is displayed.
P
ress UP ( ) button until you reach the desired sub menu. Select the sub menu with the OK ( ) button.
Press UP ( ) or DOWN ( ) button to show the different readouts.
N
o changes can be made here. Use the OK ( ) button to end.
3