
User Manual


Warning!Duringoperation,this
electrictoolgeneratesanelectro-
magneticeldwhich,undercertain
circumstances,mayimpairthefunc-
tionalityofactiveorpassivemedical
implants.Toreducetheriskofseri-
ousorlethalinjuries,werecommend
thatpersonswithmedicalimplants
consulttheirdoctorandthemanufac-
tureroftheirmedicalimplantbefore
operatingthemachine.
Charging the battery
Onlyusetheoriginalchargerfrom
thepackagetochargethebattery.
Mindnottochargetheappliance
formorethan5hoursatatime.If
youdo,thebatteryandtheappli-
ancemaybedamagedandlonger
chargingtimeswouldbeawaste
ofenergy.Excessivechargingwill
voidthewarranty.
• Chargethebatterybeforethersttime
ofuse.Donotbrieychargethebat-
teryseveraltimeinarow.
• Rechargethebatterywhenyounotice
thattheapplianceisbecomingslower.
• Ifafullyrechargedbatterylastsforcon-
siderablyshorteroperatingtimes,the
batteryisusedupandneedstobere-
placed.OnlyuseanOEMsparebattery
availablefromourCustomerService.
• Alwaystakeheedoftheapplicable
safetyinstructionsaswellastheenvi-
ronmentalprotectionregulationsand
information.
• Thewarrantyexcludesalldefects
causedbyimproperhandling.
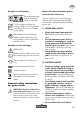
Removing / inserting the
battery
1. Toremovethebattery(9)fromthe
appliance,pressthereleasebut-
ton(10)onthebatteryandpull
outthebattery.
2. Toinsertthebattery(9),placeit
ontheguidetrack(14)andpush
itbackintotheappliance.Itwill
audiblysnapin.
Recharging the battery
Rechargethebatterywhenthelast
chargestateindicatorLED(
11)
changesfromgreentoorange/red.
Whenstartingtochargeandwhile
charging,thebatterychargeindica-
tor(
12)lightsupred.
Whenchargingisover,thelight
changestogreen.
1. Removethebattery(9)fromthe
appliance,asnecessary.
2. Inserthebattery(9)inthecharging
compartmentofthebatterycharger
(12).Itwillaudiblysnapin.
3. Plugthebatterycharger(12)into
amainsoutlet.