Above Gound Pool Filter & Pump Manual VER.
A. Safety Warnings Read all Warnings and Cautions noted below. Failure to do so could result in serious or fatal injury. Prior to installation of this unit, carefully read and adhere to all CAUTION, ATTENTION, and ADVICE notices located throughout this manual. Failure to comply with these instructions can cause serious injury, death, or damage to the unit. RISK OF SUCTION ENTRAPMENT HAZARD, WHICH, IF NOT AVOIDED CAN RESULT IN SERIOUS INJURY OR DEATH.
specifications for the pH- and chlorine value). It is equipped with a tank drainage system. The filter tank comes ready to attach with an approved filter pump with hair and lint basket, and a plastic base for ready on- site mounting. Read this manual carefully before installation. The filtration system and pump must be installed in accordance with all federal and local codes and standards in effect for the area of installation.
F. Resultant Damages We cannot be responsible for damages to the product if the product is not used in accordance with the instructions provided. G.
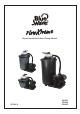
K. Filter-Pump Assembly (Figures 1-3) 1. Filter pump & Base Plate assembly a. Secure water pump to the base plate with the provided pump mounting hardware. Orient as shown. (Figure1) b. Place the base plate and pump in the location where the Pump Filter System will be located for normal operation and within reach of the pool filter and return hoses but with a sufficient safety margin from the edge of the pool. Attach the filter tank to the base plate as shown.
you may need to purchase an adapter at your local pool supply store or hardware retailer. Before you begin to connect hoses to the filter and pump, make certain that no water can flow through the intake or return hoses connected to the pool. Some pools have shut off valves in their intake and return ports, others do not. If you do not have a shut off valve, block the ports with a removable plug to prevent water from passing into and through the hoses.
M. Filter Valve Position Operation Setting Filter Position 1 Picture 19 Rinse Position 2 Picture 20 Circulation Position 3 Picture 21 Backwash Position 4 Picture 22 Closed Position 5 Complete water flow/function Function: Regular pool filter action & vacuuming. This is the setting the filter will be set to most of the time. In this position, water is directed through the top of the filter where it compresses and flattens down the sand.
N. Manual Vacuuming the Pool 1. For Above Ground Pools Vacuuming is done in valve position #1, Filter, on the valve. The pool vacuum is connected by use of a pool vacuum hose and vacuum plate directly into the skimmer. Do not turn on the pump until the pool vacuum is connected and ready for operation. Important: The pool vacuum hose must be fully filled with water so that the pump does not lose prime and fill the tank with air. P.
R.
S.
T.
Page 12
U. FX PRIME SINGLE SPEED NE4523, NEP4268, NEP4269 PUMP SERIES PARTS BREAKDOWN K ey Part Name Qty 1 2 3 Water Pump/ Motor Transparent Hair & Lint Strainer 1 1/4"- 1 1/2" Hose Connector 1 2 4 O-ring "A"- 2 1/4" 1 M anf. No. B.W. No. For M odel# SPS1A250, 450,550 NE4523, NEP4268- NEP4269 NE4523, NEP4268- NEP4269 P00131 NEP4245 All P00132 NEP4246 All P00182 NEP4265 All 5 O-ring "B"- 3" 1 P00183 NEP4266 All 6 O-ring "C"- 1.
V.
Page 15
W. FX PRIME SINGLE SPEED NE4524, NEP4271 PUMP SERIES PARTS BREAKDOWN Key K ey 1 2 3 4 5 6 7 8 9 10 11 12 Par t Name WATER PUMP VALUE BODY CONNECTOR O-RING PUMP CONNECTOR PUMP CONNECTOR NUT STRAINER BASKET O-SEALING RING TRANSPARENT COVER CIRCUMGYRATE COVER DRAIN VALVE O-RING PUMP DRAIN VALVE TRANSPARENT COVER CLOSING TOOL Qty M anf. No. 1 SPS31600 1 3029S3 1 3030S3 2 3031S3 2 3032S3 1 3033S3 1 3034S3 1 3035S3 1 3036S3 2 3037S3 2 3038S3 1 3039S3 12 9 8 7 6 5 B.W. No.