
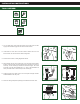
Install Instructions

DO NOT USE:DO NOT USE:
STEP 1
9 10
11
STEP 2
STEP 3
STEP 5
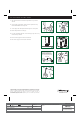
1"
"C.L."
MARK
STEP 4
STEP 6
INSTALLATION INSTRUCTIONS
:DEDEEN SLOOT
1. Turn off water supply. Flush toilet and remove excess water from tank with
sponge. Remove water supply line from bottom of toilet fill valve.
2. Unbolt tank from bowl, then lift off tank. Remove washers and nuts from
bottom of tank, then remove old bolts. Remove old gasket.
3. Remove old flush valve, including flapper/tank ball unit.
4. When installed, the top of the overflow pipe on the new flush valve should be
at least 1" below the hole in the tank where the
tank flush lever is mounted. If
necessary, cut the overflow pipe with saw to achieve this height. The critical
level mark on the fill valve (identified by a C.L. mark on the Fluidmaster Fill
Valve) should be at least 1" above the top of the overflow pipe.
5. Install new flush valve. Tighten lock nut 1/2 turn beyond hand-tight. DO NOT
OVERTIGHTEN or tank may crack.
6. Slide new rubber gasket (sold separately) onto threaded end of flush valve.