
Installation Guide

1"
"C.L."
MARK
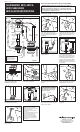
Diagram 1
FLOAT
CUP
TANK
LEVER
LOCKNUT
WATER LEVEL
ADJUSTMENT
CLIP
ADJUSTABLE
HEIGHT
OVER-
FLOW
PIPE
SHANK
WASHER
VALVE
BODY
THREADED SHANK
LINK
TOP
NIPPLE
REFILL
TUBE
CAP
FLAPPER
FILL
VALVE
ARM
RUBBER
GASKET
BRASS
WASHER
HEX NUT
BOLT
RUBBER
WASHER
30800 Rancho Viejo Road
San Juan Capistrano, CA 92675
(949) 728-2000, (800) 631-2011
www.fluidmaster.com
®
9 10
11
OVERFLOW
PIPE
CAP
REFILL TUBE
NIPPLE
CRITICAL
LEVEL
MARK("C.L.")
MUST BE
1" ABOVE
OVERFLOW
PIPE.
FLUSH
VALVE
PART #5-276 REV. 8 2/08
NOTE: SAVE INSTRUCTION SHEET FOR FUTURE REFERENCE.
IMPORTANT: DO NOT use plumber’s putty to seal this fitting.
FLUIDMASTER
®
507A, 507C &
507D FLUSH VALVE
INSTALLATION INSTRUCTIONS
WARNING: Fluidmaster shall not be responsible or liable for any failure of, or
damage to,this plumbing product caused by use of chlorine (bleach) cleaners or
related products added to the tank water. Use of such products will void the
warranty and may result in product failure, possibly causing property damage. Do
not overtighten nuts or tank/bowl may crack.
Tank-to-bowl gasket, bolts,
washers and nuts not
included. Use Fluidmaster
Model #6102 or #6106.
1.Turn off water supply. Flush toilet and
remove excess water from tank with sponge.
Remove water supply line from bottom of
toilet fill valve.
3. Remove old flush valve, including
flapper/tank ball unit.
4. When installed, the top of the overflow pipe
on the new flush valve should be at
least 1" below the hole in the tank where the
tank flush lever is mounted. If necessary, cut
the overflow pipe with saw to achieve this
height. The critical level mark on the fill valve
(identified by a C.L. mark on the Fluidmaster
Fill Valve) should be at least 1" above the top of
the overflow pipe.
2. Unbolt tank from bowl, then lift off tank.
Remove washers and nuts from bottom of
tank, then remove old bolts. Remove old
gasket.
5. Install new flush valve. Tighten lock nut 1/2
turn beyound hand tight. DO NOT
OVERTIGHTEN or tank may crack.
6. Slide new rubber gasket (sold separately)
onto threaded end of flush valve.
7. Place tank back on bowl so that
tank-to-bowl gasket fits evenly. Level tank
and bowl.
8. Reconnect tank to bowl with bolts,
washers and nuts. Tighten bolts evenly, DO
NOT OVERTIGHTEN or bowl may crack.
9. Connect flapper chain. Allow slight slack
when flapper is in closed position.
10. Attach existing refill tube to overflow
pipe.
11. If you have a Fluidmaster Fill Valve,
remove overflow pipe ring. Then use cap to
attach directly to refill tube.
12. Reconnect water supply line to bottom of
toilet fill valve.
13. Turn on water supply, check for leaks,
then check flush.
GUARANTEE: This Fluidmaster product is
guaranteed to be free from defective
materials and workmanship for a period of
one year. Units returned to
Fluidmaster, California, will be replaced
without charge.
Always use quality Fluidmaster repair parts
when maintaining your Fluidmaster
products. Fluidmaster shall not be
responsible or liable for any damages
caused by products used in Fluidmaster
valves that were not manufactured by
Fluidmaster, Inc.
NOTE: Flow from refill tube must be
positioned just above the overflow pipe.
Do not insert refill tube into overflow pipe.
This will siphon water down overflow
pipe causing valve to turn on and off,
trying to keep tank full.