
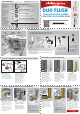
Install Instructions

Step 10: Wipe down the
BRASS FLUSH VALVE SEAT
before installing to check
for mineral build-up. If
the OVERFLOW PIPE is
threaded on (some are,
some aren’t) make sure
it’s tight by twisting
clockwise before
installing the BRASS SEAT
ADAPTER.
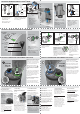
Step 3A: Identify the
type of FLUSH VALVE
SEAT you have in your
tank. If your plastic
OVERFLOW PIPE has a
FLAT SEAT as pictured
above, proceed to Section
4 on the back side of this
instruction guide.
Step 3B: If your plastic
OVERFLOW PIPE has an
ANGLED SEAT, locate and
remove the ANGLED SEAT
ADAPTER from the yellow
bag labeled “B.” Follow
the installation
instructions below for
SECTION 2.
Step 3C: If your
OVERFLOW PIPE is brass,
locate and remove the
BRASS SEAT ADAPTER
from the orange bag
labeled “C.” Follow the
installation instructions
below for SECTION 3.
DUO FLUSH
TM
VALVE OVERVIEW INCOMPATIBILITIES / SPECIAL NOTES
IDENTIFYING YOUR FLUSH VALVE SEAT
BRASS SEAT
FLAT SEAT
ANGLED SEAT
SECTION 2: INSTALLING THE ANGLED SEAT ADAPTER
Step 4: Prior to installing the
ANGELED SEAT ADAPTER
make sure the bottom of the
tank and flush valve seat are
dry.
Step 5: Remove paper from
sealant ring located on the
bottom of the ANGLED SEAT
ADAPTER. Do not remove
SEALANT RING.
Step 9: Check for flat
surface on seat. Any
damage to seat will
require replacement of
the entire brass seat with
Fluidmaster’s 507 Flush
Valve.
Step 6: Locate yellow
arrow on the back of the
ANGLED SEAT ADAPTER.
Step 7: Align yellow
arrow on ANGLED SEAT
ADAPTER directly toward
the plastic OVERFLOW
PIPE.
Step 8: Firmly press the
ANGLED SEAT ADAPTER
onto the flush valve seat
as shown above.
Proceed to Section 4.
Step 11: Remove the FILL VALVE
REFILL TUBE from the top of the
OVERFLOW PIPE. Slide the BRASS
SEAT ADAPTER down the pipe
and snap it to the FLUSH VALVE
SEAT as shown. Re-attach the
FILL VALVE REFILL TUBE to the top
of the OVERFLOW PIPE. Proceed
to Section 4.
SEATED
ANGLED FLUSH
VALVE SEAT
OVERFLOW
PIPE
REMOVE PAPER
SECTION 3: INSTALLING THE BRASS SEAT ADAPTER
PARTS OVERVIEW Items Needed: Sponge or Towel
DUAL FLUSH VALVE, HANDLE
& ADAPTER INSTALLATION GUIDE
DUO FLUSH
TM
Visit www.duoflush.com for
easy-to-follow installation videos
and additional troubleshooting tips.
30800 Rancho Viejo Rd.,
San Juan Capistrano, CA 92675
www.fluidmaster.com
800.631.2011
N
O
B
L
E
A
C
H
D
R
O
P
-
I
N
S
N
O
B
L
E
A
C
H
D
R
O
P
-
I
N
S
WARNING
DO NOT USE IN-TANK DROP-IN TOILET BOWL CLEANERS
CONTAINING BLEACH OR CHLORINE. Use of such products
will: (1) RESULT IN DAMAGE to tank components and MAY
CAUSE FLOODING and PROPERTY DAMAGE and (2) VOID
FLUIDMASTER WARRANTY. DO NOT overtighten nuts or
tank/ bowl may crack.
SECTION 1: PREPARING TO INSTALL THE DUO FLUSH
TM
VALVE
Step 1: Shut off the
water supply to your
toilet.Flush your toilet to
drain the water from the
tank. If necessary, sponge
out any remaining water.
CLOCKWISE
Step 2: Remove the
existing flapper, chain and
flush handle assembly
from your tank. When
removing the FLUSH
HANDLE, note that the
LOCK NUT may be
reverse-threaded, so you
may need to turn it
clockwise to loosen it.
CLOCKWISE
TO LOOSEN
LOCK NUT
REMOVE
FLUSH HANDLE
AND FLAPPER
PART# 25-0183, Grev. 3, 12/11
ALIGNMENT
ARROW
ALIGNMENT
ARROW
SEATED
Adjustment
Dials
Overflow Hose
and Clip
Dual
Action
Handle
Flush
Cable
Flush
Handle
Actuator
Fill
Valve
Fill Valve
Refill Tube
Overflow
Pipe
Snap-On
Mount
Flush
Valve
Seat
Water
Saving
Refill
Module
There are 4 main
components
included in this
box. Each of
these
components are
contained within
color-coded bags
with a
corresponding
letter.
To identify a part
within the box,
look for the
letter and color
on each bag that
corresponds with
the parts listed
to the right.
Dual Action Handle (Handle)
The DUAL ACTION HANDLE will allow you to flush
UP for a half flush and DOWN for a full flush.
D
PART
Brass Seat Adapter
The BRASS SEAT ADAPTER is only necessary
if you have a BRASS FLUSH VALVE SEAT.
C
PART
DUO FLUSH
TM
Valve
The DUO FLUSH
TM
Valve saves water by
allowing you to choose between half and full
flushes.
A
PART
Angled Seat Adapter
The ANGLED SEAT ADAPTER is only necessary if
you have a plastic ANGLED FLUSH VALVE SEAT.
B
PART
Overflow Hose and Clip
For use when upgrading to the complete DUO FLUSH
TM
System. (Contents and instructions included in clear bag.)
CLEAR
BAG
The systems and components shown here are not
compatible with the Fluidmaster DUO FLUSH
TM
Valve.
3”
Flush
Valves
3”
Kohler
Side-Mount
Valves
Mansfield
Flush Valves
Requires installation
of 2" flapper flush
valve (not included).
Can be replaced with
Fluidmaster’s 507
Flush Valve.
Ballcock
Fill Valves
Can be replaced with
Fluidmaster’s PerforMAX
TM
FILL VALVE 400ARHR.
SEAT
SURFACE
MUST BE
FLAT
TURN OVER INSTRUCTIONS
FOR NEXT STEPS
SEALANT
RING
This device is not intended to be used as a retrofit device for
1.28 gpf water closet.
Performance may vary since product was not tested on all
models of water closets.
Certain 1-piece toilets
with Low-Boy tanks
(less than 8” in height)