
User Guide

Step 35A: If your water
supply line has METAL
FLANGED TUBING as
shown above, use existing
hardware to reconnect
the water supply as
indicated.
Step 35B: If your water
supply line has METAL
SPIRAL TUBING as shown
above, use existing
hardware to reconnect
the water supply as
indicated.
Step 35C: If your water
supply line has VINYL OR
BRAIDED TUBING as
shown above, use existing
hardware to reconnect
the water supply as
indicated.
Step 35D: If your water
supply line has
metal/copper flared
tubing, use the included
Fluidmaster coupling nut
and cone washer to
replace existing hardware.
The water supply tube
must extend 1/2-inch
inside the threaded FILL
VALVE SHANK.
Step 35E: If your water
supply line has plastic or
metal compression ball
tubing, do not use
Fluidmaster’s coupling
nut and the cone washer
on this type of plastic or
metal tubing shown
above.
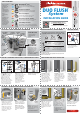
SECTION 9: RECONNECTING THE WATER SUPPLY: CONNECTION TYPES
FLAT
WASHER
LOCK NUT
METAL FLANGED TUBING METAL SPIRAL TUBING VINYL / BRAIDED TUBING METAL/COPPER FLARED TUBING
PLASTIC OR METAL
COMPRESSION BALL TUBING
COUPLING
NUT
WATER
SHUT OFF
SPIRAL CONE
WASHER
LOCK NUT
COUPLING
NUT
WATER
SHUT OFF
COUPLING
NUT
WATER
SHUT OFF
CONE
WASHER
LOCK NUT
COUPLING
NUT
WATER
SHUT OFF
Warning
Plastic nut. HAND
TIGHTEN ONLY.
DO NOT over-tighten.
DO NOT use plumber’s
putty to seal fittings
(The use of Teflon tape
is optional).
DO NOT use thread
lubricants.
Use of thread sealants
or lubricants can
damage plastic nut and
result in flooding and
property damage.
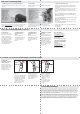
SECTION 10: ADJUSTING THE PerforMAX
TM
FILL VALVE
Step 42: Start by adding
a gallon of water to the
existing bowl water.
Step 43: Wait 3 minutes,
allowing the water to
settle and mark the water
level.
Step 44: Flush the toilet.
If the water reaches your
mark in the bowl and the
FILL VALVE is still running,
push down on the roller
and adjust it to the next
lowest number.
3 Min.
0
2
4
6
8
less water
Step 45: If the FILL
VALVE shuts off before
the water has reached
your mark in the bowl,
push down on the roller
and adjust it to the next
highest number.
Step 46: Repeat steps
in SECTION 11 and
SECTION 12 until the
water reaches your
mark at the same time
the FILL VALVE stops
running.
0
2
4
6
8
more water
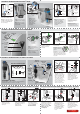
SECTION 13: CHECK WATER LEVEL IN THE BOWL
Step 36: Once
connected, turn on the
water supply and check
for leaks.
LINE MARKED IN STEP 2
Step 37: Compare the
water level after the tank
has filled with the existing
water level line you
marked in Step 2.
Step 38: Turn the
ADJUSTMENT SCREW
clockwise to increase water
level, and counter-clockwise
to decrease water level until
you’re back at the mark.
NOTE: Empty tank
water before adjusting
float cup.
PROCEED TO BACK PAGE
FOR NEXT STEPS
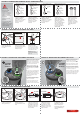
SECTION 11: WATER LEVEL ADJUSTMENT: HALF FLUSH SECTION 12: WATER LEVEL ADJUSTMENT: FULL FLUSH
Step 39: Ensure that the half flush
and full flush are both set to MAX
settings before you start adjusting
your settings. To adjust the settings,
push the knob down and turn.
Step 40: THE ADJUSTMENT DIAL
with GREEN DISC (look for the
symbol) controls your half flush.
Press down and turn to “MAX” to
start.
A. Drop 3 pieces of toilet paper into
the bowl and ROTATE the HANDLE
upward (half flush). If the flush is
successful, adjust the setting to the
next lower numbered setting.
Repeat step A.
B. Continue to adjust the setting to
the next lowest number until the
flush is not successful.
C. Adjust your setting back to the
last successful flush setting that
provided you with a successful flush.
Step 41: The ADJUSTMENT DIAL
with BLUE DISC (look for the
symbol) controls your full flush.
A. Start the full flush dial 1 setting
higher than the half flush setting.
B. Drop 3 pieces of toilet paper into
the bowl and ROTATE the HANDLE
downward (full flush). If the flush is
successful keep setting as is.
C. If the contents in your toilet bowl
do not successfully flush down after
use, adjust setting up to the next
highest number. Repeat step B.
PUSH DOWN
AND TURN
TO ADJUST
PUSH DOWN
AND TURN
TO ADJUST