
User Guide

PerforMAX
TM
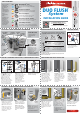
FILL VALVE TROUBLESHOOTING: FLUSHING OUT DEBRIS
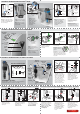
Step 2: FLUSHING OUT
DEBRIS: Hold a cup over
the uncapped valve to
prevent splashing. Turn
water supply full on and
off a few times. Leave
water supply off.
Step 1: Turn off water and
flush toilet.
Push float up with right hand
(see picture). Grip and hold
shaft under float with right
hand. With left hand, twist
cap and lever counter
clockwise 1/8th of a turn to
unlock. Let cap assembly
hang on float cup
Step 3: REPLACING
VALVE CAP ASSEMBLY
A.) Place cap assembly on
top of valve body by
aligning cap arm and
adjustment rod next to
refill hose).
B.) Press down on top
cap rotating top & arm
clockwise to locked
position.
Problem: The
PerforMAX
TM
Fill Valve
will not turn off.
Solution: Sand and rust
move through water pipes.
Always clear debris from
water lines. Refer to the
following steps for
“Flushing Out Debris.”
5 YEAR LIMITED WARRANTY
Subject to the “Exclusions” set forth below, Fluidmaster Inc. promises to the consumer to repair, or at the option of Fluidmaster Inc.
to replace any part of this plumbing product which proves to be defective in workmanship or materials under normal use for five
years from the date of purchase. All costs of removal, transportation and reinstallation to obtain warranty service shall be paid by the
consumer. During this “Limited Five Year Express Warranty,” Fluidmaster Inc. will provide, subject to the “Exclusions” section set
forth below, all replacement parts free of charge, necessary to correct such defects. This “Limited Five Year Warranty” is null and
void if this plumbing product has not been installed and maintained in accordance with all written instructions accompanying the
product, and if non-Fluidmaster Inc. parts are used in installation.
EXCLUSIONS: FLUIDMASTER INC. SHALL NOT BE LIABLE FOR INCIDENTAL OR CONSEQUENTIAL DAMAGES, INCLUDING COSTS
OF INSTALLATION, WATER DAMAGE, PERSONAL INJURY OR FOR ANY DAMAGES RESULTING FROM ABUSE OR MISUSE OF THE
PRODUCT, FROM OVERTIGHTENING OR FROM FAILURE TO INSTALL OR MAINTAIN THIS PLUMBING PRODUCT IN ACCORDANCE
WITH THE WRITTEN INSTRUCTIONS, INCLUDING USE OF NON-FLUIDMASTER PARTS. DO NOT USE IN-TANK DROP-IN TOILET
BOWL CLEANERS CONTAINING BLEACH OR CHLORINE. USE OF SUCH PRODUCTS WILL RESULT IN DAMAGE TO TANK
COMPONENTS AND MAY CAUSE FLOODING AND PROPERTY DAMAGE. USE OF SUCH PRODUCTS WILL VOID THIS WARRANTY.
DUO FLUSH
TM
TROUBLESHOOTING
DUO FLUSH
TM
TROUBLESHOOTING (continued)
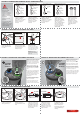
3. Water Level in Bowl is Low
Problem: Toilet bowl water level is not filling up high
enough even after adjusting both adjustment dials on
DUO FLUSH
TM
.
Solution: If adjustments made per Sections 11 & 12 still
do not allow for adequate water levels in your bowl
(even after several attempts), follow steps A through G
below:
A. Unclip OVERFLOW HOSE CLIP from OVERFLOW PIPE
B. Remove OVERFLOW HOSE from WATER SAVING
REFILL MODULE nipple.
C. Locate FILL VALVE REFILL CLIP from fill valve assembly
parts in RED BAG labeled E
D. Attach FILL VALVE REFILL CLIP to end of FILL VALVE
REFILL TUBE
E. Connect FILL VALVE REFILL TUBE with clip directly to
top of the OVERFLOW PIPE.
F. Slide HOSE CLAMP to end of FILL VALVE REFILL TUBE
to hold in place.
G. Retry flush.
2. Seal Leaking
Problem: The tank continues to leak water causing water
loss in the tank.
Solution: First remove the
handle actuator by
holding the top end of the
actuator and pull away
from dual action handle
collar. Grab the top of the
DUO FLUSH
TM
and gently
rock (away from fill valve)
and pull up on DUO
FLUSH
TM
.
Once released clean seat and inspect piston seal at bottom
ensuring the seal is centered on piston. Reattach DUO
FLUSH
TM
and handle actuator. Turn on water and recheck
water level for leaking.
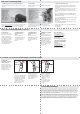
6. Full flush will not
adequately remove
waste
Move the FULL FLUSH
ADJUSTMENT DIAL (Blue)
to a higher number to
allow more water to be
flushed.
5. Half flush will not
adequately remove
waste
Move the HALF FLUSH
ADJUSTMENT DIAL (Green)
to a higher number to
allow more water to be
flushed.
7. Angled Seat Adapter
Removal
If you need to remove the
ANGLED SEAT ADAPTER
from your system, pull the
adapter upward firmly to
release it from the FLUSH
VALVE SEAT. For further
assistance, call Fluidmaster
Technical Support at (800)
631-2011 M-F 7:30 am -
4:30 pm PST.
More Information
Please visit our website at
www.fluidmaster.com for
more solutions to common
toilet problems.
Do not return to the store.
Call technical support first
if you have an installation
problem.
For further help visit
www.duoflush.com or call
Fluidmaster Technical Support
at (800) 631-2011
M-F 7:30 am – 4:30 pm PST.
4. Unused Parts
Problem: Why do I have
parts left over from my kit?
Solution: Depending on
the type of flush valve you
have identified, you may
have additional parts left
which may include an
angled seat adaptor, brass
seat adaptor, and extra fill
valve assembly parts.
1. Tank Lid Interference on Half (Upward) Flush
Problem: Tank lever hits tank lid forcing the user to hold the
handle
Solution: Remove
handle actuator by
holding the top
end of actuator
and pull away from
dual action handle
collar. DO NOT pull
on FLUSH CABLE
when removing the
handle actuator.
Rotate handle downward 15° and reinsert actuator into handle.
If tank lever does not fit properly on your toilet tank, for further
help visit www.duoflush.com or call Fluidmaster Technical
Support at (800) 631-2011) M-F 7:30 am – 4:30 pm PST.
.