
Quick Start Guide


3.
Clean and Inspect All Connectors
Caution
Use proper cleaning procedures to clean all fiber
connectors before every use. Neglecting this step or using
improper procedures can cause unreliable test results and
may permanently damage the connectors. See the Users
Manual for instructions.
4.
Set the Reference and Verify Your Test Reference
Cords
The reference procedure for fiber cable sets a baseline power
level for loss measurements. It is important to set the reference
frequently. You must also make sure your test reference cords
are in good condition. See the Users Manual.
4-1 Turn on the tester and remote and let them sit for a
minimum of 5 minutes. Let them sit longer if they are
above or below ambient temperature.
4-2 Make sure that the home screen shows the correct settings
4-3 Clean and inspect the connectors on the tester, remote,
and test reference cords.
4-4 On the home screen tap SET REF.
4-5 On the SET REFERENCE screen, tap RUN WIZARD.
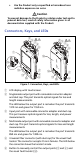
4-6 Make the connections shown on the screen, then tap
NEXT to see the completed connections (Reference in
Figure 3).
Note
When you set the reference, align the testers as
shown in Figure 3 to keep the fibers as straight
as possible.
4-7 To enter the length of the test reference cords you will
add to connect to the link, tap TRC LENGTH on the SET
REFERENCE screen. The length you enter does not change
the test results. The tester saves the length with the results
to meet TIA reporting requirements.
4-8 Tap SET REFERENCE, tap NEXT, then make the
connections shown on the screen (TRC Verification in
Figure 3)
4-9 Tap TRC VERIFICATION. The tester measures and saves the
loss of the test reference cords you added.
5.
Make Connections and Do a Test
5-1 Tap NEXT. Connect the testers to the link as shown on
the screen (Fiber Link Test in Figure 3).
5-2 Press on the main or remote tester.