CableIQ Qualification Tester Getting Started Guide PN 2113427 January 2005, Rev. 1 3/07 © 2005, 2007 Fluke Corporation. All rights reserved. Printed in China. All product names are trademarks of their respective companies.
LIMITED WARRANTY AND LIMITATION OF LIABILITY Fluke Networks mainframe products will be free from defects in material and workmanship for one year from the date of purchase. Parts, accessories, product repairs and services are warranted for 90 days, unless otherwise stated. Ni-Cad, Ni-MH and Li-Ion batteries, cables or other peripherals are all considered parts or accessories.
CableIQ Qualification Tester Accessing the Users Manual This guide provides basic information to help you quickly get started using the tester. The CableIQ™ Qualification Tester Users Manual on the Product CD provides additional information. Safety XWWarning The tester is not intended to be connected to active telephone inputs, systems, or equipment, including ISDN devices. Prolonged exposure to the voltages applied by these interfaces may damage the tester.
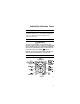
CableIQ Getting Started Guide Setting User Preferences Turn the rotary switch to SETUP; then use AD and H to select a setting. • User Information: Three lines of text are stored with saved Autotests. • Language / ft⋅m: Select a language for the display. Select feet or meters for length measurements. • Time / Date: Timestamp saved Autotests. • Auto Shutoff: The tester stays on indefinitely or turns off after 15 minutes of inactivity.
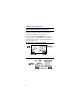
Connecting for Cabling Tests Connecting for Cabling Tests Notes A wiremap adapter or remote ID locator must be connected to the end of the cabling for the wiremap to be completely verified. If you use patch cords at the near or far end during an Autotest, Fluke Networks recommends patch cords at least 2 m long.
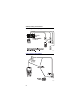
CableIQ Getting Started Guide Connecting to a Star Topology axy12 Connecting to Coaxial Cabling axy34 4
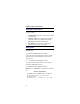
Results Icons Results Icons The icons below appear on Autotest and Discover screens. F The cabling qualifies for the application. f The cabling does not qualify for the application. i Results are for informational purposes only, not for qualification. The cabling cannot be completely qualified for the application because the wiremap results are incomplete (wiremap adapter not used). O Pair is open. N Pair is shorted. W R Wiremap adapter or remote ID locator at far end, with its number.
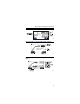
CableIQ Getting Started Guide Discovering Cabling Characteristics Discover mode lets you quickly check wiremaps, measure length, and determine if cabling is connected to a network port, video device, or telephone. Turn the rotary switch to DISCOVER, then connect to twisted pair or 75 Ω coaxial cabling with or without a wiremap adapter at the far end. Results from Discover mode cannot be saved.
Discovering Cabling Characteristics Discover Mode on a Port axy48 Discover Mode on Coaxial Cabling with Adapter axy50 Discover Mode on Coaxial Cabling Connected to a Device axy35 7
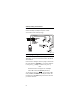
CableIQ Getting Started Guide Discover Mode with MultiMap Verifies wiremaps of multiple telephone outlets connected in a star or bus topology. axy07 Qualifying Cabling with the Autotest The Autotest tells you if cabling will support a selected application. You can save Autotest results to document an installation. Connect to the cabling as shown on pages 3 and 4. Turn the rotary switch to AUTOTEST. To select tests and pairs to test, press J Setup. To start the test, press P.
Using the Toner Autotest Results for Twisted Pair Cabling axy14 Using the Toner Turn the rotary switch to TONE; then select a tone function. The two IntelliTone™ functions work with a Fluke Networks IntelliTone probe. The other four analog tones can be detected by most tone probes.
CableIQ Getting Started Guide Blinking a Port Light The Blink Port Light function helps you determine which cable is connected to which port on a network hub or switch. The tester’s analog toner is also active when the port light function is active. Turn the rotary switch to DIAG; then select Blink Port Light. Look for the blinking activity LED on the hub or switch.
Testing for Continuity Testing for Continuity The continuity function lets you test for opens and shorts on the 8-pin modular jack or the coaxial connector. Turn the rotary switch to DIAG. Use D to highlight Continuity; then press H, J, or P. The tester’s beeper is silent for resistances above about 5000 Ω. The beeper’s tone and rhythm increase as resistance decreases.
CableIQ Getting Started Guide Using the Continuity Toner Turn the rotary switch to DIAG; then select Continuity. The beeper’s tone and rhythm increase as resistance decreases. axy38 Locating Crosstalk and Impedance Faults The Find Crosstalk Fault and Find Impedance Fault functions let you quickly check cable pairs for crosstalk and impedance faults on twisted pair cabling. Turn the rotary switch to DIAG, select Find Crosstalk Fault or Find Impedance Fault; then press H or J.
Testing Speaker Cabling Testing Speaker Cabling The Speaker Test generates audible tones for testing the wiring and phase of installed twisted pair speaker cabling. Turn the rotary switch to Diag; then select Speaker Test.
CableIQ Getting Started Guide Replacing the Batteries Remove yellow boot to access battery door. 4 AA batteries (alkaline recommended) 20 hours typical battery life. axy53 Contacting Fluke Networks www.flukenetworks.com support@flukenetworks.