
User's Manual


R e m o t e C o n t r o l a n d P r o g r a m m i n g R e f e r e n c e f o r t h e F L U K E 1 9 0 f a m i l y o f S c o p e M e t e r ® t e s t t o o l s
p a g e 6 1
Appendix C Installing USB-drivers for 190-series-II
Introduction
The Fluke 190-series-II ScopeMeter testtool is equipped s with a USB interface (connector type: USB mini-B)
for communications with a computer. In order for communications to be handled by this interface, also
dedicated drivers need to be installed onto the computer.
This Appendix describes how to install the drivers for the 190-series-II on a Windows XP computer. Installing
on other (newer) Windows platforms will be similar, yet individual screens may look slightly different.
Drivers for Windows XP, Vista and Win 7 are available from the Windows Driver Distribution Center, and can
be downloaded automatically if your computer is connected to the internet.
The drivers have passed Windows Logo Verification and are signed by Microsoft Windows Hardware
Compatibility Publisher. This is a requirement for installation within Windows-7.
Note:
The Fluke 190-series-II instrument requires two drivers to be loaded in sequence:
* first - it requires installation of the Fluke 190-II ScopeMeter USB driver
* next it requires installation of the Fluke USB Serial port driver.
Both of these drivers need to be installed in order to be able to get communications going between the
ScopeMeter 190-series-II and the computer.
A USB-cable with USB-A connector on one side and a mini-USB-B connector on the other side, is included
with each instrument of this family as a standard.
Installing the USB Drivers
To install the USB drivers, do the following:
Connect the Fluke 190-series-II instrument to the PC.
The USB cable can be plugged in and out even when both the
computer and the instrument are switched on (‘hot-
swapped’). It is not required to power down either of these.
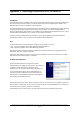
In case the appropriate drivers for the Fluke 190 Series II
instrument are not already found on the PC, Windows will
show that there is New Hardware detected, and the Wizard
for installing new hardware will open.
Depending on your PC settings, Windows may ask for permission to search the Windows Update website on
the internet for the latest revision. When you have an internet connection active, it is advised to select ‘Yes’
and click ‘Next’. Alternatively, you may choose to install the drivers from the CD-ROM or from a location on
the hard drive, if so preferred, select ’No, not this time’.
Downloading from the internet assures you will install the latest version available of the drivers.