® 71X Series Process Calibrators Calibration Manual PN 686540 January 1998 Rev. 11, 3/12 © 1998-2012 Fluke Corporation, All rights reserved. Printed in U.S.A. Specifications are subject to change without notice. All product names are trademarks of their respective companies.
LIMITED WARRANTY & LIMITATION OF LIABILITY Each Fluke product is warranted to be free from defects in material and workmanship under normal use and service. The warranty period for the 712, 714, 715, 717 1G, 717 30G, 717 100G, 717 300G, 717 500G, 717 1000G, 717 1500G, 717 3000G , 717 5000G, 718 1G, 718 30G, 718 100G, 718 300G, and 718Ex Calibrators is three years and begins on the date of shipment. The warranty period for the 718 Pump assembly is one year and begins on the date of shipment.
Table of Contents Title Page Introduction........................................................................................................ How to Contact Fluke ........................................................................................ Precautions and Safety Information ................................................................... Explanation of International Symbols ............................................................... Specifications ..................................
71X Series Calibration Manual Thermocouple Source Verification ........................................................... Keypad Test .............................................................................................. Display Verification .................................................................................. 714 Verification (V2.0 and Later) ................................................................. Thermocouple Measure Verification ...........................................
Contents (continued) mV INPUT ................................................................................................ CJC ............................................................................................................ 715 Calibration (Earlier than V2.0) ............................................................... mA/Volts Measure .................................................................................... mA/Volts Source Measure .............................................
71X Series Calibration Manual vi
List of Tables Table 1. 2. 3. 4. 5. 6. 7. 8. 9. 10. 11. 12. 13. 14. 15. 16. 17. 18. 19. 20. 21. 22. 23. 24. 25. 26. 27. 28. 29. 30. 31. 32. 33. 34. 35. Title Page International Symbols ............................................................................................ General Specifications............................................................................................ 712 Supported RTD Types.....................................................................................
71X Series Calibration Manual 36. 37. 38. 39. 40. 41. 42. 43. 44. 45. 46. 47. 48. 49. 50. 51. 52. 53. 54. 55. 56. 57. 58. 59. 60. 61. 62. 63. 64. 64. 64. 65. 66. 67. 68. 69. 70. 71. 712 Verification RTD Values ................................................................................ 712 Verification Resistance Values ....................................................................... 712 Verification Outputs .......................................................................................
List of Figures Figure 1. 2. 3. 4. 5. 6. Title Page Proper Use of Tools (717, 718, and 718Ex Models) .............................................. Replacing the Battery ............................................................................................. Replacing the Battery (718 and 719 only) ............................................................. 718Ex Battery Replacement ...................................................................................
71X Series Calibration Manual x
Introduction XW Warning The information provided in this document is for the use of qualified personnel only. Do not perform the verification tests or calibration procedures described in this manual unless you are qualified to do so. The information in this manual deals with the 71X Series Process Calibrators (hereafter referred to as “the Calibrator” or the “71X Calibrator”).
71X Series Calibration Manual Precautions and Safety Information Use the Calibrator only as specified in this manual. Otherwise, the protection provided by the Calibrator may be impaired. A Warning statement identifies conditions and actions that pose hazard(s) to the user; a Caution statement identifies conditions and actions that may damage the calibrator.
Process Calibrators Precautions and Safety Information • Remove test leads from the Calibrator before opening the battery door. • When servicing the Calibrator, use only specified replacement parts. • Do not allow water inside the case. • When using the Calibrator’s internal pressure sensor, do not connect a pressure module at the Calibrator to avoid misleading readings.
71X Series Calibration Manual • To avoid overpressure damage, do not apply pressure that exceeds limits listed in the Users Manual for the specific product. • 717, 718, and 719 only: To avoid corrosion in the pressure sensor, use the calibrator only with media compatible with glass, ceramic, silicon, RTV, nitrile, (Buna -N) type 303 stainless steel, and nickel. • 718, 719 and 718Ex only: To avoid damage to the pump, use with dry air and non-corrosive gases only.
Process Calibrators Explanation of International Symbols Explanation of International Symbols The following symbols are used on the calibrator or in this calibration manual. Table 1 explains their meaning. Table 1. International Symbols Symbol Meaning + Power ON/OFF J Earth ground I Fuse M Battery X Hazardous Voltage W Refer to the instrument instruction sheet or Users Manual for information about this feature T Double insulated ) Conforms to relevant Canadian and US Standards.
71X Series Calibration Manual Specifications Specifications for the 71X Calibrators are based on a one-year calibration cycle and apply for ambient temperatures from + 18 °C to + 28 °C unless stated otherwise. “Counts” are the number of increments or decrements of the least significant digit. General specifications for all models are in Table 2. Table 2.
Process Calibrators Specifications 712 Specifications 712 Calibrator specifications vary based on the version of the instrument. To display the firmware version for your instrument, start with the 712 off, push and hold, then push the power button. Find the section heading below for the displayed version and use the specification tables in that section to test and calibrate the instrument. Firmware V1.1 and Earlier Table 3.
71X Series Calibration Manual Table 5. 712 RTD and Ohms Measurement Ohms Range Accuracy, Four-Wire ±Ω 15 Ω to 400 Ω 0.1 400 Ω to 1.5 kΩ 0.5 1.5 kΩ to 3.2 kΩ 1 Maximum input voltage: 30 V Excitation current from 712: 0.3 mA Firmware V1.2 through V1.9 Table 6. RTD Specifications Accuracy (˚C) RTD Type Range ˚C (˚F) Input Output 4-Wire Allowable Excitation (mA) 2-Wire & 3-Wire Ni 120 -80.0 to 260.0 (-112.0 to 500.0) 0.2 0.3 0.2 0.1 to 3.0 Pt 100 385 -200.0 to 800.0 (-328.0 to 1472.0) 0.
Process Calibrators Specifications Table 7. Ohms Specifications Ohms Range Output Accuracy ±Ω Input Accuracy 4-Wire ±Ω 0 Ω to 400 Ω 0.1 Allowable Excitation (mA) 0.15 0.1 to 0.5 0.1 0.5 to 3.0 400 Ω to 1.5 kΩ 0.5 0.5 0.05 to 0.8 1.5 kΩ to 3.2 kΩ 1 1 0.05 to 0.4 Allowable Excitation is for Output mode only. It shows the allowable excitation current from an ohmmeter or RTD measurement device connected to the calibrator. Excitation current from 712: 0.2 mA.
71X Series Calibration Manual Table 8. RTD Specifications (cont.) Accuracy (˚C) * RTD Type Range ˚C Input Source 4-Wire Pt 1000 385 Pt 100 392 (3926) Pt 100 JIS 3916 Allowable Excitation (mA) 2-Wire & 3-Wire -200.0 to 100.0 0.20 0.25 0.2 100.0 to 300.0 0.30 0.40 0.3 300.0 to 630.0 0.40 0.52 0.4 -200.0 to 100.0 0.20 0.28 0.2 100.0 to 300.0 0.30 0.40 0.3 300.0 TO 630.0 0.40 0.52 0.4 -200.0 to 100.0 0.20 0.28 0.2 100.0 to 300.0 0.30 0.40 0.3 300.0 to 630.0 0.40 0.
Process Calibrators Specifications Temperature Coefficient 0.005 % of ohms range per °C for temperature ranges –10 °C to 18 °C and 28 °C to 55 °C. Ohms ranges are 400 Ω, 1.5 kΩ, and 4.0 kΩ. 714 Specifications 714 Calibrator specifications vary based on the version of the instrument. To display the firmware version for your instrument, start with the 714 off, push and hold , then push the power button.
71X Series Calibration Manual Firmware V2.0 and Later Table 13. 714 Temperature Measure and Thermocouple Simulate TC Type Range °C -210.0 to 0.0 0.0 to 800.0 800.0 to 1200.0 -200.0 to 0.0 0.0 to 1000.0 1000.0 to 1372.0 -250.0 to 0.0 0.0 to 400.0 -250.0 to -100.0 -100.0 to 1000.0 -20.0 to 0.0 0.0 to 1787.0 -20.0 to 0.0 0.0 to 1767.0 600.0 to 800.0 800.0 to 1000.0 1000.0 to 1820.0 -200.0 to 0.0 0.0 to 900.0 -200.0 to 0.0 0.0 to 600.0 J K T E R S B L U Accuracy °C * 0.6 0.4 0.5 0.8 0.5 0.7 0.8 0.4 0.
Process Calibrators Specifications 715 Specifications 715 Calibrator specifications vary based on the version of the instrument. To display the firmware version for your instrument, start with the 715 off, push and hold , then push the power button. Find the section heading below for the displayed version and use the specification tables in that section to test and calibrate the instrument. Firmware Earlier than V2.0 Table 15.
71X Series Calibration Manual Firmware 2.0 and Later Table 17. 715 DC V Input and Output Range 200 mV 20 V output 25 V input Resolution Accuracy, ±(% of Reading + Counts) 0.01 mV 0.015 % + 2 0.001 V 0.01 % + 2 Input impedance: 1 MΩ (nominal), < 100 pF Overvoltage protection: fuseless Voltage drive capability: 1 mA Table 18. 715 DC mA Input and Output Range 24 mA Resolution 0.001 mA Accuracy, ±(% of Reading + Counts) 0.01 % + 2 Overload protection: fuseless Temperature Coefficient 0.
Process Calibrators Specifications 717 Specifications Accuracy is specified for 1 year after calibration at operation temperatures of -10 °C to + 55 °C. To show the firmware version, start with the unit off and push and hold the lower center button, it will be or , then push . Pressure Table 19. 717 Pressure Specifications Version 1.2 or Lower Model Range SI 717-30 G (0 to 30) PSI Range Metric 0 to 206.85 kPa Max SI Max Metric 90 PSI 620 kPa Version 1.3 to 3.
71X Series Calibration Manual Table 19. 717 Pressure Specifications (cont.) Model Range Accuracy [1] Max 6 month 717 1000G 717 1500G 717 3000G 717 5000G 717 10000G 0 to 1000 PSI 2000 PSI 0 to 6.9 mPa 13.8 mPa 0 to 1500 PSI 3000 PSI 0 to 10.3 mPa 20.7 mPa 0 to 3000 PSI 6000 PSI 0 to 20.7 mPa 41.4 mPa 0 to 5000 PSI 10000 PSI 0 to 34.5 mPa 69 mPa 0 to 10000 PSI 15000 PSI 0 to 69 mPa 103.4 mPa 1 year 0.025 % 0.035 % 0.025 % 0.035 % 0.025 % 0.035 % 0.025 % 0.035 % 0.035 % 0.
Process Calibrators Specifications Table 22. 717 Range and Resolution 1 Range -1 to 1 15 30 100 300 500 1000 1500 3000 5000 10000 -12 to -12 to -12 to -12 to 0 to 0 to 0 to 0 to 0 to 0 to 15 30 100 300 500 1000 1500 3000 5000 10000 PSI 1.0000 15.000 30.000 100.00 300.00 500.00 1000.0 1500.0 3000.0 5000.0 10000 bar 0.0689 1.0342 2.0684 6.8947 20.684 34.474 68.947 103.42 206.84 344.74 689.48 mbar 68.948 1034.2 2068.4 6894.
71X Series Calibration Manual 718 and 718Ex Specifications Accuracy is specified for 1 year after calibration at operating temperatures of -10 °C to + 55 °C. To display firmware version, start with the unit off, push and hold or then push . Table 23. Pressure Specifications 718 Version 1.3 to 3.9 718 Ex Versions Under 1.9 Model Range SI Range Metric Max SI Max Metric 718-1G (-1 to 1) PSI (-7 to 7) kPa 5 PSI 34.
Process Calibrators Specifications Table 25. DC mA Input Range Accuracy, ±( % of Reading + Counts) Resolution 718: Version 2.9 and lower 24 mA 0.001 mA 0.025 + 1 718: Version 3.0 and higher 24 mA 0.001 mA 0.015 + 2 718 EX 24 mA 0.001 mA 0.02 + 2 Table 26. 718 Range and Resolution 1 30 100 300 Range -1 to 1 -12 to 30 -12 to 100 -12 to 300 PSI 1.0000 30.000 100.00 300.00 bar 0.0689 2.0684 6.8947 20.684 mbar 68.948 2068.4 6894.8 20684 kPa 6.8948 206.84 689.48 2068.
71X Series Calibration Manual 719 Specifications Specifications are based on a one year calibration cycle and apply for ambient temperature from +18 °C to +28 °C unless stated otherwise. Counts are the number of increments or decrements of the least significant digit. Table 27. 719 Pressure Sensor Input Model Range 30G -12 to 30.0 PSI 100G -12 to 100.0 PSI Resolution 0.001 0.01 Accuracy [1] Max Non- destructive Pressure ±0.025 % of positive Range (6 month calibration) 60 PSI ±0.
static awareness A Message From Fluke Corporation Some semiconductors and custom IC's can be damaged by electrostatic discharge during handling. This notice explains how you can minimize the chances of destroying such devices by: 1. Knowing that there is a problem. 2. Learning the guidelines for handling them. 3. Using the procedures, packaging, and bench techniques that are recommended. The following practices should be followed to minimize damage to S.S. (static sensitive) devices. 1.
5. USE STATIC SHIELDING CONTAINERS FOR HANDLING AND TRANSPORT. 8. WHEN REMOVING PLUG-IN ASSEMBLIES HANDLE ONLY BY NON-CONDUCTIVE EDGES AND NEVER TOUCH OPEN EDGE CONNECTOR EXCEPT AT STATIC-FREE WORK STATION. PLACING SHORTING STRIPS ON EDGE CONNECTOR HELPS PROTECT INSTALLED S.S. DEVICES. 6. DO NOT SLIDE S.S. DEVICES OVER ANY SURFACE. 9. HANDLE S.S. DEVICES ONLY AT A STATIC-FREE WORK STATION. 10. ONLY ANTI-STATIC TYPE SOLDERSUCKERS SHOULD BE USED. 11. ONLY GROUNDED-TIP SOLDERING IRONS SHOULD BE USED. 7.
Process Calibrators Basic Maintenance Basic Maintenance For maintenance procedures not described in this manual, contact an authorized service center. Cleaning Periodically wipe the case with a damp cloth and mild detergent. Do not use abrasives or solvents. Replacing the Battery XWWarning To avoid false readings, which could lead to possible electric shock or personal injury, replace the battery as soon as the battery indicator () appears.
71X Series Calibration Manual Wh008f.eps Figure 3. Replacing the Battery (718 and 719 only) Hex Head Wrench wh009f.eps Figure 4.
Process Calibrators Basic Maintenance 718Ex Approved Batteries For a list of 718Ex approved batteries, refer to Table 31. Table 31. 718Ex Approved Batteries Battery Manufacturer Alkaline, 9 volt Alkaline Ultra, 9 volt Alkaline Energizer, 9 volt Alkaline Power Line Industrial Battery, 9 volt Duracell Duracell Eveready Panasonic Type 6LR61/MN1604 6LR61/MX1604 6LR61/522 6LR61.9V Replacing the Fuse XW Warning To avoid personal injury or damage to the calibrator, use only a 0.
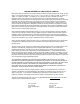
71X Series Calibration Manual Replace the fuse(s) as follows, refer to Figures 5 and 6: 1. Remove the test leads and turn the calibrator off. 2. Remove the battery door. 3. Remove the three Phillips-head screws from the case bottom and turn the case over. 4. Gently lift the top cover from the end nearest the input jacks until it unsnaps from the bottom cover. 5. Replace the fuse(s) with a 0.125 A 250 V fast fuse, Littelfuse type 2AG. F1 and F2 are the same type on the 715 and 712 V1.2. 6.
Process Calibrators Required Equipment F1 Snaps Wh003f.eps Figure 6. Replacing the Fuse (718 shown) Required Equipment The equipment required to perform the verification and calibration procedures in this manual is identified in Table 33. Table 33. Required Calibration Equipment Calibrator Model 712 Equipment Minimum Specifications Recommended Model DC Calibrator 5 to 3000 Ω Accuracy: 70 ppm + 0.025 Ω Fluke 5520A Reference Multimeter 5 to 3000 Ω Accuracy: 70 ppm + 0.
71X Series Calibration Manual Table 33. Required Calibration Equipment (cont.) Calibrator Model 714 Equipment Minimum Specifications DC Calibrator -10 to 75 mV Accuracy: 0.006 % + 0.25 mV Fluke 5520A Reference Multimeter -10 to 75 mV Accuracy: 0.006 % + 0.25 mV Fluke 8508A TC to Banana Test Leads Copper Mini-Jack to Copper Wire Type J TC Test Lead 715 Recommended Model 5500A/LEADS DC Calibrator 0 to 10 Volts Accuracy: 0.005 % + 0.
Process Calibrators Verification Verification The following verification tests check the accuracy of each calibrator function against the calibrator’s specifications. If the calibrator fails any of these tests, calibration adjustment or repair is required. Fluke recommends that you calibrate your 71X Calibrator once a year to ensure that it performs according to its specifications. To perform the verification tests, it is not necessary to open the case or adjust the calibrator.
71X Series Calibration Manual 4. Disconnect the test leads. Resistance Source Verification 1. Using four test leads, connect the four jacks of Fluke 8508A (Ω Sense 'Hi & Lo' and Input 'Hi & Lo') to the two middle jacks of the 712 Calibrator (black to black; red to red). This puts the Fluke 8508A in a 4-wire configuration. 2. On the Fluke 8508A , select four-wire ohms measurement and up-range to the 1 kΩ range.
Process Calibrators Verification 712 Verification (V1.2 through V1.9) 1. Push button until Input comes up on the display. 2. Push until PT100 392 JIS is on the display. 3. Push until 4W is on the display. Set temperature standard to C. 4. Set the 5520A to 2-wire output with 2-wire compensation turned off; then make 2wire connections on the 5520A to 4-wire connections on the 712. Set the 5520A to PT 3916 (ITS-90) mode. 5. Set the 5520A to output the RTD (resistance) values in Table 36.
71X Series Calibration Manual Table 38. 712 Verification Outputs 712 Outputs (Ohms) Fluke 8508A Readings (Ohms) 5.00 4.90 to 5.10 300.00 299.90 to 300.10 1500.0 1499.5 to 1500.5 3000.0 2999.0 to 3001.0 14. Disconnect all connections to the 712. The 712 verification test is complete. 712 Verification (V2.0 and Later) 1. Push button until Input comes up on the display. 2. Push until PT100 392 JIS is on the display. 3. Push until 4W is on the display. Set temperature standard to C. 4.
Process Calibrators Verification Table 40. 712 Verification Resistance Values 5520A Outputs (Ω) 4-wire 712 Readings (Ω) 5.00 4.899 to 5.101 300.00 299.825 to 300.175 1500.0 1499.525 to 1500.475 30000.0 2999.15 to 3000.85 11. Make 2-wire connections on the 712 to 4-wire connections on the Fluke 8508A. Set the Fluke 8508A to measure 4-wire resistance. 12. Push until OUTPUT is displayed. 13. Set the 712 to output the resistance values in Table 41.
71X Series Calibration Manual 4. Disconnect the Type J thermocouple test lead and install the two-wire copper test lead from the Fluke 5520A NORMAL jacks to the 714 Calibrator TC jack, observing correct polarity. 5. On the 714 push the key until "mV" is shown on the display. 6. Set the Fluke 5520A to the settings in Table 43, and verify the display readings on the 714 Calibrator. Table 43. 714 Thermocouple Measure Verification (mA) Fluke 5520A Fluke 714 -10.0000 mV -10.03 to -9.97 mV 30.0000 mV 29.
Process Calibrators Verification Keypad Test 1. On the 714 Calibrator, push the large scroll key to 800.0 °C. 2. Push and hold the small scroll key, verifying that the numbers scrolling on the display change in 0.1 increments, then change in 1.0 increments, then change in 10.0 increments. 3. Push and hold the scroll key, verifying that the numbers scrolling on the display change in 0.1 decrements, then change in 1.0 decrements, then change in 10.0 decrements. 4. Scroll to 800.0 °C. 5.
71X Series Calibration Manual 8. On the 714 push the key until "mV" is shown on the display. 9. Set the Fluke 5520A to the settings in Table 47, and verify the display readings on the 714 Calibrator. Table 47. 714 Thermocouple Measure Verification (mA) Fluke 5520A Fluke 714 -10.0000 mV -10.012 to -9.988 mV 30.0000 mV 29.985 to 30.025 mV 75.0000 mV 74.979 to 75.021 mV 10. Disconnect the copper test lead from the Fluke 5520A. Thermocouple Source Verification 1.
Process Calibrators Verification 715 Verification (Earlier than V2.0) DC Voltage Source Verification 1. On the 715 Calibrator turn the green key on. 2. Push the and the key so that the display indicates: OUTPUT 0.000 V 3. Connect test leads from the Fluke 8508A input HI & LO jacks to the voltage jacks on the 715 Calibrator (black to COM and red to V). 4.
71X Series Calibration Manual Keypad Test 1. Using the large scroll key, push to step down to 12.000 mA. 2. Using the small scroll key, push to verify that the numbers scrolling on the display change in .001 increments; then change in .01 increments; then change in 0.1 increments. 3. Using the small scroll key, push to verify that the numbers scrolling on the display change in .001 decrements; then change in .01 decrements; then change in 0.1 decrements. 4. Scroll to 12.000 mA. 5.
Process Calibrators Verification DC Voltage Measure Verification 1. Push the key on the 715 Calibrator. Display should change to: INPUT 0.000 V 2. Connect test leads from the output NORMAL jacks of the Fluke 5520A to the voltage jacks on the 715 Calibrator (black to COM jack and red to the V jack). 3. Set the Fluke 5520A for the voltage settings in Table 54, and verify the display readings on the 715 Calibrator. Table 54. 715 DC Voltage Measure Verification (10.0000 to 0.
71X Series Calibration Manual 715 Verification (V2.0 and Later) DC Voltage Source Verification 1. On the 715 Calibrator turn the green key on. 2. Push the and the key so that the display indicates: OUTPUT 0.000 V 3. Connect test leads from the Fluke 8508A input HI & LO jacks to the voltage jacks on the 715 Calibrator (black to COM and red to V). 4. Using the large scroll button of the 715 Calibrator, push to step to the voltages in Table 56, verifying the output on the Fluke 8508A: Table 56.
Process Calibrators Verification DC Current Measure Verification 1. Push key on the 715 Calibrator. Display should indicate closely to: INPUT -25.00 mA % 2. Push the key and the display should change to: INPUT 0.000 mA 3. Connect a test lead from Red AUX terminal of the 5520A to the Fluke 8508A I+ terminal. 4. Connect a test lead from Black AUX terminal of the 5520A to the 715 Calibrator Com terminal. 5. Connect a test lead from I- terminal of the Fluke 8508A to the 715 Calibrator mA terminal. 6.
71X Series Calibration Manual Table 61. 715 DC Voltage Measure Verification (0.0000 mV to 200.0000 mV) Fluke 5520A Fluke 715 0.0000 mV -0.02 mV to + 0.02 mV 50.0000 mV 49.98 mV to 50.02 mV 150.0000 mV 149.96 mV to 150.04 mV 6. Disconnect the test leads from 715 Calibrator and turn the green key off. The 715 verification test is complete. 717 Verification Pressure Verification 1. Carefully attach the pressure fitting of the deadweight tester to the pressure port of the 717 30G Calibrator.
Process Calibrators Verification Table 62. 717 Pressure Verification Version 3.9 or Below 717 1G Input Pressure 717 30G Display Reading Input Pressure Display Reading 0 PSI 0.0005 to -0.0005 0 PSI -0.015 to 0.015 0.1 PSI 0.1005 to 0.0995 6 PSI 5.985 to 6.015 0.2 PSI 0.2005 to 0.1995 12 PSI 11.985 to 12.015 0.3 PSI 0.3005 to 0.2995 18 PSI 17.985 to 18.015 0.4 PSI 0.4005 to 0.3995 24 PSI 23.985 to 24.015 0.5 PSI 0.5005 to 0.4995 30 PSI 29.985 to 30.015 0.6 PSI 0.6005 to 0.
71X Series Calibration Manual Table 62. 717 Pressure Verification (cont.) Version 3.9 or Below *717 500G Input Pressure Display Reading 717 1000G Input Pressure 0 PSI 0.25 to -0.25 0 PSI 0.5 to -0.5 100 PSI 100.25 to 99.75 200 PSI 200.5 to 199.5 200 PSI 200.25 to 199.75 400 PSI 400.5 to 399.5 300 PSI 300.25 to 299.75 600 PSI 600.5 to 599.5 400 PSI 400.25 to 399.75 800 PSI 800.5 to 799.5 500 PSI 500.25 to 499.75 1000 PSI 1000.5 to 999.5 400 PSI 400.25 to 399.75 800 PSI 800.
Process Calibrators Verification Table 62. 717 Pressure Verification (cont.) 717 5000G Input Pressure Display Reading 0 PSI 2.5 to -2.5 1000 PSI 1002.5 to 997.5 2000 PSI 2002.5 to 1997.5 3000 PSI 3002.5 to 2997.5 4000 PSI 4002.5 to 3997.5 5000 PSI 5002.5 to 4997.5 4000 PSI 4002.5 to 3997.5 3000 PSI 3002.5 to 2997.5 2000 PSI 2002.5 to 1997.5 1000 PSI 1002.5 to 997.5 *Vacuum is only specified for V1.3 and later.
71X Series Calibration Manual Table 62. 717 Pressure Verification (cont.) Version 4.0 or Higher 717 1G Input Pressure 44 6-Month Display Reading 717 15G 1-Year Display Reading Input Pressure 0 PSI 0.0005 to -0.0005 0.0005 to -0.0005 0 PSI 0.1 PSI 0.1005 to 0.0995 0.1005 to 0.0995 3 PSI 0.2 PSI 0.2005 to 0.1995 0.2005 to 0.1995 6 PSI 0.3 PSI 0.3005 to 0.2995 0.3005 to 0.2995 9 PSI 0.4 PSI 0.4005 to 0.3995 0.4005 to 0.3995 0.5 PSI 0.5005 to 0.4995 0.
Process Calibrators Verification Table 62. 717 Pressure Verification (cont.) Version 4.0 or Higher 717 30G 717 100G 6-Month Display Reading 1-Year Display Reading 6-Month Display Reading 1-Year Display Reading 0 PSI -0.008 to 0.008 -0.011 to 0.011 0 PSI -0.03 to -0.03 -0.04 to -0.04 6 PSI 5.992 to 6.008 5.989 to 6.011 20 PSI 19.97 to 20.03 19.96 to 20.04 12 PSI 11.992 to 12.008 11.988 to 12.011 40 PSI 39.97 to 40.03 39.96 to 40.04 18 PSI 17.992 to 18.008 17.989 to 18.
71X Series Calibration Manual Table 62. 717 Pressure Verification (cont.) Version 4.0 or Higher 717 300G Input Pressure 46 6-Month Display Reading *717 500G 1-Year Display Reading Input Pressure 6-Month Display Reading 1-Year Display Reading 0 PSI -0.11 to 0.11 -0.15 to 0.15 0 PSI -0.13 to 0.13 -0.18 to 0.18 60 PSI 59.89 to 60.11 59.85 to 60.15 100 PSI 99.87 to 100.13 99.82 to 100.18 120 PSI 119.89 to 120.11 119.85 to 120.15 200 PSI 199.87 to 200.13 199.82 to 200.18 180 PSI 179.
Process Calibrators Verification Table 62. 717 Pressure Verification (cont.) Version 4.0 or Higher 717 1000G Input Pressure 6-Month Display Reading 717 1500G 1-Year Display Reading Input Pressure 6-Month Display Reading 1-Year Display Reading 0 PSI -0.3 to 0.3 -0.4 to 0.4 0 PSI -0.4 to 0.4 -0.5 to 0.5 200 PSI 199.7 to 200.3 199.6 to 200.4 300 PSI 299.6 to 300.4 299.5 to 300.5 400 PSI 399.7 to 400.3 399.6 to 400.4 600 PSI 599.6 to 600.4 599.5 to 600.5 600 PSI 599.7 to 600.3 599.
71X Series Calibration Manual Table 62. 717 Pressure Verification (cont.) Version 4.
Process Calibrators Verification 7. Disconnect the test leads and push to turn the power off. mA Loop Power Verification 1. Hold down both LOOP POWER keys ( and ) at the same until the screen reads: ---------- LOOP mA then release the keys. 2. Apply 1 kΩ to the mA jacks from the decade box or other resistor sources. The display should read over 19 mA but less than OL. 3. Push to turn the power off. Sensor Jack Verification 1. Make sure nothing is connected to the sensor port of the Fluke 717. 2.
71X Series Calibration Manual Note When verifying vacuum pressure make sure the pressure/vacuum switch is in the vacuum position. Forward (clockwise) is for pressure and backward (counter-clockwise) is for vacuum. Table 64. 718 and 718Ex Pressure Verification 718 Version 3.9 or Below 718Ex V1.9 and Below 718 1G Input Pressure 718 and 718Ex 30G Display Reading Input Pressure Display Reading 0 PSI 0.0005 to -0.0005 0 PSI -0.015 to 0.015 0.1 PSI 0.1005 to 0.0995 6 PSI 5.985 to 6.015 0.2 PSI 0.
Process Calibrators Verification Table 64. 718 and 718Ex Pressure Verification (cont.) 718 Version 4.0 or Higher 718Ex Version 2.0 and Higher 718 1G Version 4.0 or greater Input Pressure 6-Month Display Reading 1-Year Display Reading 718 and 718Ex 30G Input Pressure 6-Month Display Reading 1-Year Display Reading 0 PSI 0.0005 to -0.0005 0.0005 to -0.0005 0 PSI -0.008 to 0.008 -0.011 to 0.011 0.1 PSI 0.1005 to 0.0995 0.1005 to 0.0995 6 PSI 5.992 to 6.008 5.989 to 6.011 0.2 PSI 0.2005 to 0.
71X Series Calibration Manual Table 64. 718 and 718Ex Pressure Verification (cont.) 718 and 718Ex 100G 52 718 and 718Ex 300G 0 PSI -0.03 to -0.03 -0.04 to -0.04 0 PSI -0.11 to 0.11 -0.15 to 0.15 20 PSI 19.97 to 20.03 19.96 to 20.04 60 PSI 59.89 to 60.11 59.85 to 60.15 40 PSI 39.97 to 40.03 39.96 to 40.04 120 PSI 119.89 to 120.11 119.85 to 120.15 60 PSI 59.97 to 60.03 59.96 to 60.04 180 PSI 179.89 to 180.11 179.85 to 180.15 80 PSI 79.97 to 80.03 79.96 to 80.04 240 PSI 239.
Process Calibrators Verification Leak Test Verification 1. Seal off the pressure sensor input port. 2. Using the fine adjust knob, pressure-vacuum switch and internal pump, set the calibrator to (approximately) the values in Table 65. Let the unit sit for one minute, then record the displayed value. 3. Wait for one more minute, then record a second reading. The difference between the first and the second reading is the leak rate. Table 65.
71X Series Calibration Manual mA Loop Power Verification (718 Only) 1. Hold down both LOOP POWER keys ( and ) at the same time until the screen reads: ---------- LOOP mA then release the keys. 2. Apply 1 kΩ to the mA jacks from the decade box or other resistor source. The display should read over 19 mA but less than OL. 3. Push to turn the calibrator off. Sensor Jack Verification 1. Make sure nothing is connected to the sensor port of the calibrator. Push to turn the calibrator on.
Process Calibrators Verification 2. Push to turn the Calibrator on. 3. The display should read 0 PSI for the 30G and 0.00 PSI for the 100G with the deadweight tester opened up to ambient air. If not, push until display reads 0.00 PSI or 0.000 PSI. Note The 719 vent should be closed and the pressure/vacuum switch should be in the Pressure position for pressure measurements. When verifying vacuum measurement, make sure the pressure/vacuum switch is in the Vacuum position.
71X Series Calibration Manual Leak Test Verification 1. Seal off the pressure sensor input port. 2. Using the fine adjust knob, pressure-vacuum switch and internal pump, set the Calibrator to the values in Table 68. Let the unit sit for one minute, then record the displayed value. 3. Wait for one more minute, then record a second reading. The difference between the first and the second reading is the leak rate. Table 68. 719 Leak Test Verification 719 30G Adjusted Pressure -10.
Process Calibrators Verification mA Source Verification 1. Turn ON the 719 Calibrator. When the display indicates a pressure and current value, for example: 0.00 PSI 0.000mA 2. Push three times, The lower display should read: Source 4.000mA The lower display will flash 4.000mA / OL until the circuit is complete. 3. Connect a test lead from Red Calibrator mA terminal to the Fluke 8508A I+ terminal. 4. Connect a test lead from the I-terminal of the Fluke 8508A to the Calibrator COM terminal. 5.
71X Series Calibration Manual mA Loop Power Verification 1. While turning the Calibrator on, hold down both LOOP POWER keys (and ). The screen reads: --------- LOOP mA 2. Release the keys. 3. Apply 1.2 kΩ to the mA jacks from the decade box or other resistor source. The lower display should read over 19 mA but less than OL. 4. Push to turn the calibrator off. Sensor Jack Verification 1. Make sure nothing is connected to the sensor port of the calibrator. Push to turn the calibrator on.
Process Calibrators Calibration 712 Calibration (V1.1 and Earlier) Millivolts Measure 1. Hold down the and the key at the same time, then push and release the key. 2. When the display momentarily shows CAL , release both the and the keys. This puts the 712 into Cal Mode. The 712 should display: INPUT 0.00 mV 3. Connect the test lead from the NORMAL jacks of the Fluke 5520A to the INPUT jacks (two middle jacks) on the 712 Calibrator (black to black, red to red). 4. Set the Fluke 5520A to 0.
71X Series Calibration Manual Resistance Measure 1. Connect two additional test leads from the NORMAL jacks of the 5520A to the 712 Calibrator (black wire to the 712 red jack labeled [3W NC] and red wire to the red jack labeled [4W NC]. All four input jacks of the 712 should now be in a 4-wire ohms measurement configuration. 2. Set the Fluke 5520A to 400.00 Ω and push O. 3. Push any key on the 712 Calibrator. The display should read: INPUT ----- R 4W then change to: INPUT ----- mA Measure 1.
Process Calibrators Calibration 712 Calibration (V1.2 through V1.9) 1. Hold down and while turning the power on. 2. Hold the two keys until CAL is displayed, then release the two keys. The display should read: INPUT 15 Ω 3. Connect the two test leads from the NORMAL jacks of the 5520A to the INPUT jacks (two middle jacks) on the 712 Calibrator (black to black, red to red). 4.
71X Series Calibration Manual 18. Push . The display should read: OUTPUT ----- Ω then change to: OUTPUT 126.00 Ω 19. Put the Fluke 8508A in the 10 kΩ range. 20. Push and until the 712 display matches the Fluke 8508A. 21. Push . The display should read: OUTPUT ----- Ω then change to: OUTPUT 2535.0 Ω 22. Push and until the 712 display matches the Fluke 8508A. 23. Push . The display should read: OUTPUT ----- Ω then the unit will reset. 24.
Process Calibrators Calibration OHMS INPUT 1. In OHMS INPUT mode, the unit will display “C 15” for 1 second and then display the OHMS input using the default calibration. 2. Connect the test leads from the 5520 main Jacks to the 712 jacks in 4 wire configuration (2 wires at 5520, 4 wires at 712). The unit should read 15.0 Ω ±5%. 3. Push to go to the next calibration point. “C 400” will be displayed for 1 second and then it will display the ohms input. 4. Source 400 Ω from the 5520.
71X Series Calibration Manual 714 Calibration (Earlier than V2.0) Temperature Measure 1. On the 714 Calibrator push and hold the and keys, then turn on the 714 by pressing and releasing the key. 2. When the display momentarily shows CAL, release both the and keys. This puts the 714 into the Cal Mode. The 714 should display: INPUT 0.00 mV 3.
Process Calibrators Calibration TYPE J ------ °C then change to: TYPE J 0.xx °C This number represents the absolute error of the "CJC" sensor and should be below 1°C. 6. Push any key on the 714 Calibrator. The 714 should reset itself, displaying all segments momentarily. The display should then change to: INPUT xx.x °C where xx.x is some variable number; or OL (overload) may be indicated. 7. Push the key to turn the calibrator off and remove the Type J thermocouple test lead. 714 Calibration (V2.
71X Series Calibration Manual 5. Push to complete mV INPUT calibration. “CHEC” will be displayed for 1 second. The new calibration constants are applied and the mV INPUT calibration can be checked. 6. Push to go to the next mode. CJC 1. In CJC Cal Mode the unit will display “C CJC” for 1 second followed by IN 0°C for another second. Next it will display the difference between the temperature as measured by the CJC sensor and the temperature measured by a J type thermocouple. 2.
Process Calibrators Calibration 12. Push any key on the 715 Calibrator. The display should read: INPUT ----- V then change to: INPUT 0.00 mV 13. Set the Fluke 5520A to 0.0000 mV. 14. Push any key on the 715 Calibrator. The display should read: INPUT ----- mV then change to: INPUT 100.00 mV 15. Set the Fluke 5520A to 100.0000 mV. 16. Push any key on the 715 Calibrator. The display should read: INPUT ----- mV then change to: OUTPUT mV mA/Volts Source Measure 1.
71X Series Calibration Manual 3. The calibration will be performed in the following order: V INPUT mV INPUT mA INPUT V OUTPUT mV OUTPUT mA OUTPUT V INPUT 1. In V INPUT mode, the unit displays “CAL 0” for 1 second followed by the input voltage using the default calibration. 2. Connect the test leads from the 5520 main Jacks to the V and COM and source 0.0 V. The unit should read 0.000V ±0.010V. 3. Push to go to the next calibration point. “CAL 25” will be displayed for 1 second and then the input voltage.
Process Calibrators Calibration V OUTPUT 1. In V OUTPUT mode, the unit displays “C 0” for 1 second followed by “ .0000”. The Calibrator is now sourcing V using the default calibration. 2. Connect the test leads from V and COM to V and COM of ….DMM. The 715 should source 0.000V ±0.010V. 3. Adjust the source value using the up and down big arrows for gross and small arrows for fine adjustment, until you read 0.000V on the DMM. 4. Push to go to the next calibration point.
71X Series Calibration Manual 717 Calibration (Earlier than V2.0) mA Measure 1. Hold down the and the keys at the same time, then push the green key. When the display shows CAL momentarily, release the and the keys immediately. After CAL shows, the display will automatically read: CAL 0.000mA 2. Connect the test leads from the AUX jacks of the Fluke 5520A to the mA jacks on the 717 Calibrator (Black to Black and Red to Red). 3. Set the Fluke 5520A to 0.00000 mA and push O. 4.
Process Calibrators Calibration 6. Once the pressure has stabilized, push any key on the 717 Calibrator. The display should read: CAL ------ PSI then depending on the model selected in step 2, change to either: CAL 15.000 PSI CAL 50.000 PSI or 7. Set the deadweight tester for 15 PSI (or 50 PSI) to be injected into the pressure port of the 717 calibrator. 8. Once the pressure has stabilized, push any key on the 717 Calibrator.
71X Series Calibration Manual 717 Calibration (V2.0 to V3.9) mA Measure Note For versions 3.00 and later, has changed to . 1. Hold down both and on the 717 Pressure Calibrator. Push and release . 2. The display shows CAL xxx, as long as and are pressed. Where xxx is a number, indicating the number of times the 717 has been through the calibration adjustment. When and are released, PASS is displayed. The password is required before you can enter the calibration mode. The password is 817.
Process Calibrators Calibration 1. Remove two-wire test lead from the 717 Calibrator and carefully attach the pressure fitting of the deadweight tester to the pressure jack on the 717 Calibrator. Note The use of TEFLON tape at the pressure fittings strengthens the seal. 2. The lower display shows rAnGE. This is an indication to choose the correct model of the 717 Calibrator. Choose the correct range.
71X Series Calibration Manual In mA Measurement Calibration mode, the 717 will show: mA on the upper display and CAL 0 mA on the lower display 5. Connect the test leads from the AUX jacks of the Fluke 5520A to the mA jacks on the 717 (black to black and red to red). 6. Set the Fluke 5520A to 0.00000 mA. 7. When 0.0 mA is sourced from the 5520A, the upper display shows approximately 0.000 mA. When is pushed, the unit makes the calibration constant for that point and the lower display changes to CAL 12 mA.
Process Calibrators Calibration The lower display shows 0 PSI and the upper display shows the current indication. When the unit is vented, the upper display reads 0.00 ± approximately10 % of full scale. When is pushed, the lower display shows the subsequent pressure to apply. 4. Apply the requested pressure that shows on the lower display and when the upper indication is stable, push . 5. Do step 4 again until the lower display shows negative pressure. 6. Apply requested negative pressures, push .
71X Series Calibration Manual Pressure Measure The 718 Pressure Calibrators have built-in temperature compensation. Instruments being calibrated should be in a stable temperature environment for several minutes before calibration. Calibration facilities should be maintained near 23 °C nominal. Re-calibration (re-characterization) is performed in terms of ‘PSI’ pressure units. Inputs using other pressure units (ie. kPa and bar) must be mathematically converted. 1.
Process Calibrators Calibration 7. Once the pressure has stabilized, push any key on the 718 Calibrator. The display should read: CAL ------ PSI then change to: CALU 8. Release pressure by venting the system. 9. Push the key to go to vacuum calibration. Otherwise, push any key to finish calibration. If calibrating vacuum, the display should show: CAL -12.000 PSI 10. Make sure the pressure/vacuum switch is in the vacuum position.
71X Series Calibration Manual 4. Set the Fluke 5520A to 0.00000 mA and push O. 5. When 0.0 mA is sourced from the 5520A the upper display indicates about "0.000 mA". When is pushed, the unit establishes the calibration constant for that point and the lower display changes to "CAL 24 mA". The upper display still reflects the applied current so it does not change until after step 6 when 24 mA is applied." 6. Set the Fluke 5520A to 24.0000 mA. 7. The upper display reads approximately 24.000 mA.
Process Calibrators Calibration 6. The CHEC mode allows for a quick check of the calibration constants that have just been stored. Changes to the applied pressure reflect on the display. Push to continue. The unit will then reset power. 7. The 718 Calibrator is now out of the CAL mode and into the normal mode of operation. Carefully vent all pressure, push to turn the calibrator off, and disconnect all pressure fittings. 718 Calibration (V4.0 and Later) mA Measure 1.
71X Series Calibration Manual The CHEC mode allows for a quick check of the calibration constants that have just been stored. Changes to the applied current are shown in the display. 9. Push to continue. The lower display changes to: rAnGE Pressure Measure The Calibrator has built-in temperature compensation. Instruments being calibrated should be in a stable temperature environment for several minutes before calibration. Calibration facilities should be maintained near 23 °C nominal.
Process Calibrators Calibration 718Ex Calibration mA Measure 1. Hold down both and on the 718Ex Pressure Calibrator. Push and release . 2. The display shows CAL xxx, as long as and are pressed. Where xxx is a number, indicating the number of times the 718Ex has been through the calibration adjustment. When and are released, PASS is displayed. The password is required before you can enter the calibration mode. The password is 817. Enter the most significant digit first.
71X Series Calibration Manual Pressure Measure The 718Ex Pressure Calibrator has built-in temperature compensation. Instruments being calibrated should be in a stable temperature environment for several minutes before calibration. Calibration facilities should be maintained near 23 °C nominal. Re-calibration (re-characterization) is performed in terms of ‘PSI’ pressure units. Inputs using other pressure units (ie. kPa and bar) must be mathematically converted. 1.
Process Calibrators Calibration 719 Calibration (V1.0) mA Measure 1. Hold down both and on the 719 Pressure Calibrator. Push and release . 2. The display shows CAL xxx, as long as and are pressed. Where xxx is a number, indicating the number of times the 719 has been through the calibration adjustment. When and are released, PASS is displayed. 3. A password is required to enter calibration mode. The password is 917. Enter the most significant digit first. The password appears below PASS.
71X Series Calibration Manual mA Output Calibration 1. Connect a test lead across the Fluke 719 mA jacks, connecting red to black. 2. Push to start the mA source calibration. 3. The unit will start its auto-calibration process for the mA output using an internal mA measurement circuit calibrated at previous stage. It will generate 17 different output values, measure each of them, and save the measured values as calibration points. 4.
Process Calibrators Calibration 7. Apply requested negative pressure, push . CHEC appears on the lower display. The CHEC mode allows for a quick check of the calibration constants that have just been stored. Changes to the applied pressure are shown on the display. 8. Push to continue. The Calibrator will restart in normal mode. The 719 Calibrator is now out of the Calibration mode and into the normal mode of operation.
71X Series Calibration Manual Replacement Parts and Accessories Table 71 lists the replaceable parts and accessories for the 71X Calibrators. See Figure 7 for an exploded view of the 718 Calibrator. Fluke repair is recommended for the 718Ex and no 718Ex replacement parts are listed in Table 71. Note Not all parts listed in Table 71 are shown in Figure 7. Table 71. Replaceable Parts and Accessories Ref. Des.
Process Calibrators Replacement Parts and Accessories Table 71. Replaceable Parts and Accessories (cont.) Ref. Des. Description PN or Model No. Used On Qty. MP14 Spacer for pressure input 687449 717,718 1 MP20 MP21 MP22 MP85 Shield, LCD, Top Case LCD Zebra Strip O-ring for input/output receptacle Case top 687092 643376 831933 620192 620234 620200 690997 1640322 690997 691147 3255195 2402610 71X 71X 712,715 712 714 715 717 30G 717 100G 718 30G 718 100G 718Ex 30 712 V2.
71X Series Calibration Manual Table 71. Replaceable Parts and Accessories (cont.) Ref. Des. PN or Model No. Description - Holster, yellow Fluke-7XX Test Lead Set AC72 Used On 664182 3397308 718 712 CG81Y TL20 Alligator Clips Red Black Holster, Yellow Industrial Test Lead Set 1670641 1670652 2074033 1639457 TL75 Test lead set 855742 715 718 71X 715 717 715 717 718 719 71X Qty.