
Application Note

8. Enter Tag information.
a. Depress the “Done” soft-
key and enter the Tag
information for your test.
b. Depress the “Done” soft-
key when tag entry is
complete.
9. Adjust setpoints or reset
points.
a. If the switch failed any of
the test parameters, it is
necessary to adjust the
set and/or reset points. To
do that, first select the
“adjust” softkey.
b. Depress the “Step Size”
softkey, then enter a step
size of “.1” °C.
c. Depress the “Done”
softkey.
d. Depress the “
↓” key until
the DPC source value is
20 °C (the setpoint).
e. Slowly adjust the setpoint
on the limit switch until
the measure screen tog-
gles from reset to set.
Depress the “
↑” key until
the DPC measure screen
toggles to Reset. If the
DPC toggles from set to
reset between 21 °C and
23 °C, the deadband
should be correctly set.
If it does not toggle prop-
erly, adjust the reset point
until it toggles within that
band.
f. Verify the set and reset
points toggle correctly, by
depressing the “
↓” and
“
↑” keys to slew the DPC
source temperature across
the set and reset values.
g. Once that is complete,
depress the
“Done”
softkey.
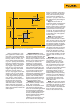
Figure 5. MEASURE/SOURCE split screen, contacts reset.
7. You should now see the split screen
(Figure 5). Select the “Auto Test” softkey
and the “Continue” softkey. The DPC will
now ramp the simulated thermocouple
potential into the limit switch back and
forth past the nominal setpoint and record
the sourced temperature values for the
actual setpoint, and then show that value
in the upper left-hand corner of the DPC
display. Once that is done, the DPC will
then test the reset point of the switch by
ramping the simulated thermocouple
potential into the switch back and forth
past the nominal (21 °C - 23 °C) expected
reset value. Once that value is recorded,
you should be presented with a post test
summary similar to that in Figure 6. Errors
exceeding test tolerance are recorded in
inverse video.
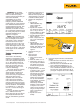
Figure 6. Post-test summary, with reverse video.
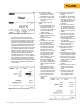
Figure 7. Post-test summary, with all results normal.
10. Confirm the As Left settings.
a. Depress the “As Left”
softkey.
b. Confirm the test settings.
c. Depress the “Done”, “Auto
Test” and “Continue” soft-
keys. Monitor the DPC as
it performs the As Left
evaluation.
d. Once the post test sum-
mary is displayed, review
the results. If all results
are in normal video (as in
Figure 7), the As Left test
passes.
e. Depress the “Done” soft-
key, and “D ne
” again to
save the Tag information.
f
. If there were inverse
v
ideo indications of a fail-
ure, repeat the
adjustments performed in
Step 9 until a passing
result is obtained.
11. Review results in memory,
a. Depress the “Done”
and “Review Memory”
softkeys.
b. Move the cursor to the tag
entry associated with this
test and depress “ENTER.”
c. Move the cursor to the As
Found entry and depress
“Enter” to review your As
Found result.
d. Depress the “Done”
softkey.
e. Move the cursor to the As
Left entry and depress
“Enter” to review that
result
.
f. Depress the “Done” soft-
key, then depress the
“Tag” softkey to review
your Tag information.
4 Fluke Corporation Process and temperature switch applications with the 740 Series DPCs