
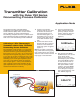
Application Note
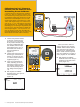

2 Fluke Corporation 750 Series Documenting Process Calibrators
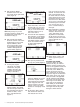
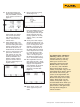
5. Next press the “MEAS/
SOURCE” button once and
you will be in the split screen
mode (Figure 4).
Figure 4.
Note: Skip to step 7 if you are
measuring current in series using
the house loop power source
mentioned in step (2).
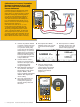
6. Next, depress the “SETUP”
button on the DPC. The cursor
should begin on loop power.
Depress “ENTER,” down
arrow until the DPC cursor
is on Enabled and depress
“ENTER.” Next depress the
“Done” softkey (Figure 5).
Figure 5.
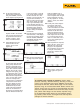
7. At this point depress
“As Found” and select
“Instrument” and press
“ENTER,” then fill in the
template, use the default
“Delay=0 seconds.”)
Figure 6.
Depress “DONE.” You should
now see the split screen and
are presented with soft key
choices of “Abort,” “Auto
Test,” and “Manual Test”
(Figure 7).
Figure 7.
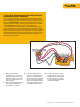
8. Select “Auto Test,” and watch
the DPC take 0 %, 50 % and
100 % measurements of cur-
rent (4, 12 and 20 mA nomi-
nal) while sourcing 100 °C,
200 °C and 300 °C.
9. Once the DPC has completed
this evaluation, it will display
the post test summary screen
with the SOURCE, MEASURE
and ERROR columns. Failures
in the error column will be
in reverse video (Figure 8).
Depress “Done.”
Figure 8.
10. Now you are presented with
the Tag entry screen (Figure 9).
Figure 9.
Press the “ENTER” key to edit
the entries. Depress “Done”
when complete until the split
screen reappears with the
soft key options of “As Left,”
“Adjust,” “Save” and “More
Choices” on the display of the
DPC.
11. At this point, select “Adjust”
and the DPC will source 0 %
and measure for 4 mA to
0.25 %. As long as the error
exceeds .25 % the error win-
dow in the measure half of
the screen will be in reverse
video. Adjust the zero on the
transmitter until the error is
less than 0.25 %. Next, select
“Go to 100 %” and adjust the
transmitter span in the same
way. You may also “Go to
50 %” to check linearity at
mid-span.
12. After adjustment is complete,
select “As Left,” “Done” and
“Autotest.” Watch the 0-50-
100 % evaluations. If the
adjustment was successful,
all the errors in the post run
summary should be in normal
video (or less than .25 %)
(Figure 10).
Figure 10.
13. Select “Done,” “Done,” and
“Done” again and you are
done!
To review your results
in memory, select the “More
Choices” soft key, the “Review
Memory” soft key and move your
cursor to the applicable result and
press enter. Select “As Found”
or “As Left,” then “ENTER” and
review the setup for the test,
select “Next Page” for the results,
and press “Tag” for its associated
label. Select “Done” and “Done”.
Move your cursor to the applicable
“As Left” result and press “ENTER”
and review the test setup, select
“Next Page” for the results, and
press “Tag” for its associated
label. When you are finished
reviewing results, press “Done”
until right-most soft key label
changes to “More Choices.”