
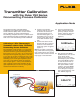
Application Note


Fluke Corporation 750 Series Documenting Process Calibrators 7
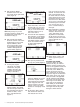
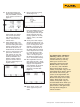
8. At this point depress “As
Found”, select “Instrument”
and press “ENTER,” then fill
in the template per Figure 24.
Figure 24.
Depress “DONE.” You should
now see the split screen and
are presented with soft key
choices of “Abort,” “Auto
Test,” and “Manual Test.”
9. Select Manual Test, and
watch the DPC for the
prompt: “Go to 3 PSI”
(Figure 25).
Figure 25.
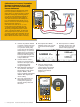
At that point using the hand
pump, pump until the DPC
display is reasonably close
to 3 PSI and depress “Accept
Point.” Now the DPC should
display “Go to 9 PSI.” Again,
using the hand pump, pump
up reasonably close to 9 PSI
and depress “Accept Point.”
When the DPC responds with
“Go to 15 PSI” pump to that
value and “Accept Point.”
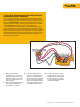
It is important to understand
a key feature of the DPC at
this point. When the error
is being calculated on the
measured mA by the DPC,
it will make the calculation
based on the deviation of
the amount of pressure being
sourced. What this means is,
if you are sourcing 3.120 PSI
(1% of span above nominal),
the DPC will look for a mA
reading of 4.160 mA (also 1%
of span above nominal). In
order to make a proper evalu-
ation of the device you need
only to get reasonably close
to the nominal pressure val-
ues with the hand pump. The
remaining source pressure
error is compensated for by
the DPC during mA measure
calculations.
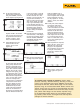
10. Once the DPC has completed
this evaluation, it will display
the post test summary screen
with the SOURCE, MEASURE
and ERROR columns (Figure
26). Depress “Done.”
Figure 26.
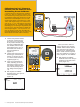
11. Now you are presented with
the Tag entry screen (Figure
27).
Figure 27.
Press the “ENTER” key to
edit the entries, press “Done”
when complete until the split
screen reappears with the
soft key options of: “As Left,”
“Adjust,” “Save,” and “More
Choices.”‘
12. At this point, select “Adjust”
and the DPC will source
0%, instruct you to “Go to
3 PSI” and measure for 4 mA
to 2%. As long as the error
exceeds 2% the Error win-
dow in the measure half of
the screen will be in reverse
video. Adjust the zero on the
P to I until the error is less
than 2 %. Next select “Go to
100 %” and adjust span in
the same way.
13. After adjustment is complete,
select “As Left,” “Done” and
“Manual Test” and repeat
step (9). If the adjustment
was successful, all the errors
in the post run summary
should be in normal video
(Figure 28).
Figure 28.
14. Select “Done,” “Done,” and
“Done” again and you are
done!
To review your results in memory, select “More
Choices” soft key, “Review Memory” soft key, move your
cursor to the applicable and press “ENTER” and review
the setup for the test, select “Next Page” for the results,
depress “Tag” for its associated label. Select “Done” and
“Done” next move your cursor to the applicable “As Left”
result and depress “ENTER” and review the setup for the
test, select “Next Page” for the results, depress “Tag”
for its associated label. When you are finished review-
ing results, press “Done” until right-most soft key label
changes to “More Choices.”