
User's Manual


Testing
Test Scheduling
5
5-5
The Test Scheduler
The Test Scheduler provides a means for you to quickly categorize your devices
according to their respective Due Date values. The Test Scheduler may be
accessed two different ways: via the Schedule button on the Main Menu, and via
the Test Scheduler... button in the Calibrator Manager screen. Let’s take a
look.
Example 5.1: The Test Scheduler
In this example, we will determine the scheduling status of the sample records that
came with DPC/TRACK. (The example assumes that the sample records have not
been altered in any way. You may ensure this by rebuilding the sample records as
described in Chapter 6, “Creating & Deleting.”)
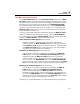
1. Select the Schedule button on the Main Menu to access the Scheduler
screen.
By default, the Start Date and End Date fields contain today’s date and the
date one month from today, respectively. The various checkboxes allow you to
specify the Tag ID records you wish to search for with respect to the specified
date range. We’ll be working within the date range of 3/1/96 to 4/1/96. If you
choose to work with a different date range, your results will differ from ours
later on.
2. Select each of the five checkboxes on the Scheduler screen. This will give us
a complete breakdown of our devices.
3. Select the Go button. The results of our search are displayed.
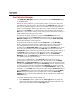
4. Let’s take a look at the three records due for testing. Select the View... button
(corresponding to the Due category) to access the records for SAMPLETAG2,
SAMPLETAG3, and SAMPLETAG5. When you’re done looking at the
records, select the Done button to return to the Scheduler screen.
5. Optionally, select the Report button to generate a summary report of our
scheduling information.
6. Select the Done button to return to the Main Menu.