
User's Manual

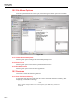

Test Instrument Record Screen
17.3 File Menu Options17
17-5
17.2.1.1.9 Date Sent for Cal & Date Returned
These fields are to be filled in manually and are optional.
17.2.1.10 Approved By, & Approved On
When this box is checked and saved, the fields will be filled in with the user and a date &
time when it was approved. (Please note that if you have not been granted approval
power for Test Instruments, the Approved by box will be grayed out and inaccessible.)
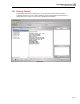
17.2.2 Calibration Points Tab
This page contains fields in which to enter calibration information for the Test
Instrument, such as # of cal points, stated accuracy, resolution, etc. Entering calibration
specification information for Test Instruments is done in exactly the same manner as it is
done for instruments, therefore you may reference Chapter 15 (Master Instrument
Record) for more information on how to use this screen.
17.2.3 Additional Info Tab
This page allows you to record additional information about the Test Instrument like its
location, responsible technician, warranty expiration date, etc. You can also note which
vendors sell or service the Test Instrument. To do this highlight the vendor desired, and
click the appropriate arrow buttons between the two list boxes labeled Available Vendors
and Vendors Which Sell or Service This Test Instrument. (Vendor records are added
through the Lists menu at the top of the Home Screen, see Chapter 12) Additionally, you
can see the date and time of the last modification made to the Test Instrument record.
17.2.4 User Defined Tab
This tab page contains all user defined variables (fields) that have been set up for the
TEST INSTRUMENT RECORD screen. (See Chapter 8 for instructions about how to set
up user defined variables.)
17.2.5 Notes Tab
This tab page is used to enter and/or view notes for the test instrument record. To enter a
new note, click the Add a Note
button. Type text into the field provided and click the
Save Record
button on the screen’s toolbar.
Once a note is entered and saved for the record it cannot be modified or deleted. As new
notes are added, they will be inserted at the top of those listed (most recent notes first).
As the record acquires multiple notes, you may change their order by clicking the Sort
Ascending/Descending button.
17.3 File Menu Options
The following File Menu Options are for the Test Instrument Record
17.3.1 New Record[Ctrl + N]
Selecting this option will open a blank Test Instrument Record screen. The Instrument ID
must be entered before you can save the record.
17.3.2 Copy Record[Ctrl + Y]
This button will create a Copy of the current record. All fields will be copied except: ID,
Serial Number, First & Last Cal dates, Approved by, Notes and any User Defined
Signatures
17.3.3 Save Record[Ctrl + S]
Selecting this option will save Test Instrument data.
17.3.4 Find Record[Ctrl + F]
Selecting this option will open the Find Test Instrument screen allowing searches by Test
Instrument ID or Serial Number.