
User's Manual


DPCTrack2
Users Manual
19-6
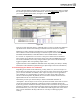
If you are not utilizing Separate As Found/As Left Inputs and the left as value for a test
point is the same as the found as value, then you can enter the Fnd As value, click on the
Lft As cell, and just hit the equal (=) key on your keyboard to automatically transfer the
same value to the Lft As cell. (This will only work if the Lft As value is blank.)
If you need to see more information about the item such as accuracies and/or limits you
may display this information on the screen by selecting “Columns” from the View menu
at the top of the screen. This will give you the option of choosing the additional
information that you would like to see.
Additionally, the Show Group Details
button will provide you with any other information
for the test point group (as entered on the item’s master record) that is not already shown
on the screen.
When you add a new calibration record, any information entered into the Description
column on the record providing the calibration specification source will automatically
appear in this column on the CALIBRATION screen. You then have the option of
modifying the default descriptions and/or adding new information into the other
Description cells.
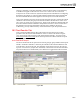
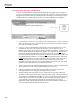
19.3.2 Separate As Found/As Left Inputs
Marking this box will allow you to record separate as found and as left input values when
entering calibration records for Instruments, Loops, and/or Test Instruments. The ability
to document separate as found and as left inputs is useful when performing calibrations in
which it is very difficult to reach the nominal input value as stated on the item’s master
record. The Separate As Found/As Left Inputs setting provides the ability to recalculate
an item’s expected output values and low and high limits to accurately reflect the input
values that were achieved during the calibration.
When entering a calibration using Separate As Found/As Left Inputs you have the ability
to change the view in the grid to either simplify things or give you a big picture view of
the calibration. The button to the right of the Separate As Found/As Left Inputs box
toggles to provide you with four (4) different options. Clicking this button with your
mouse allows you to view and enter Left As values (Enter Left As
or View Left As), view
only the Fnd As values (View Found As)
, or view both columns at the same time (View
Found As/Left As).
If the View Found As/Left As
option is on then, every other cell appears with five (5)
dashes (-----) denoting that values are not required in those cells. (Note: If the Separate
As Found/As Left Inputs box is not marked, the toggle button will not appear on the
screen.)
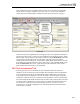
19.3.3 Modifying Calibration Specifications
If you need to change any of the information or values in the calibration specifications
grid, for example input signals, resolutions, signal types etc., you may do this by clicking
the Modify Specs
button. Doing this will open up most of the grid’s cells and make them
available for modification. The only columns that will stay inaccessible are those that are
in the Point and Input Specifications sections. The values in the Nom In Val and In +/-
columns represent the target setpoint for each input value in addition to the Input
Tolerance, while the data in the G-# column denotes each row by group number and test
point number within that group.
If your changes will affect the output values, low and high spec limits then click the
Recalculate
button to select from one of the following three options, “Calculate LINEAR
outputs and limits”, “Calculate SQUARE ROOT outputs and limits” or “Calculate
Limits”. (Note: If the item is set to “Linear” then the “Calculate SQUARE ROOT” will
not be accessible and if set to “Square Root” then “Calculate LINEAR outputs and
limits” will not be accessible. If “Manual” is selected then both will be available) Once