
Application Note


Deadband. This is closely
related to reset. Deadband pre-
vents a switch from cycling
around a setpoint. Hysteresis pro-
vides some deadband,
automatically. But for some
proc
esses, hysteresis is not
enough to prevent undesirable
on/off cycling. So, many switches
have additional deadband inten-
tionally designed into them. That
deadband may be fixed, fixed
selectable, or variable. For exam-
ple, an electronic thermostat used
for a heat pump may have a fixed
selectable deadband of 1.5
deg
rees or 3 degrees.
Range. This is specified with
the low and high points of opera-
tion
. For example, if the switch
will control a tank to maintain a
level between 6 feet of water
and 9 feet of water, it has a cali-
bration range of 6 to 9 feet. The
switch itself might have an actual
range of 0 to 50 feet — this range
would appear on the nameplate
of the switch.
Testing a temperature
switch
The switch in the following
example is a temperature switch
with a type K thermocouple input
and a low temperature setpoint of
20 °C. This switch functions in
much the same way as the ther-
mostat in your home. The Low
Limit example in Figure 1 illus-
trates the terminology.
We will be using the normally
open contacts of this switch.
These c
ontacts w
ill close upon
switch actuation, which will
occur with a drop in temperature.
This sw
itch does not ha
ve
adjustable reset. The contacts
will re-open upon automatic
reset, which oc
curs as the tem
-
perature moves back up and past
the setpoint in an amount greater
than its deadband
. The deadband
is a minimum of 1 °C and maxi-
mum of 3 °C across the range of
the sw
itch.
To set up the Fluke 740 Series
DPC to calibrate the switch,
follow these step-by-step instruc
-
tions. Keystroke entries for the
DPC are surrounded by quotation
mark
s.
1. Beginning in the power up
state of the calibrator, or
Measure mode, depress the
“ohms/continuity” key twice
to enable continuity mode.
2. Simulate the temperature
input.
a. Depress the
“MEAS/SOURCE” key
once to obtain the
Source mode.
b. Depress the “TC/RTD”
key, move the cursor with
the “
↓” key to “K” and
depress “E
NTER” to select
a type K thermocouple.
c. Depress “ENTER” again to
select “Linear T.”
d. Enter a temperature out-
put of “25” and depress
“ENTER.”
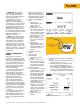
e. Depress the
“MEAS/SOURCE” key to
obtain the split screen
display. The display of the
74X should be as per
Figure 2.
3. Connect the DPC, per
Figure 3.
4. Take As Found
measurements.
a. Select the “As Found”
softkey.
b. Move the cursor to “1 Pt.
c. Switch Test” with the “
↓”
key and depress “ENTER.”
You should now see the
switch test setup screen.
5.
Enter the setpoint
.
a. Depress “Enter” and enter
a setpoint of “20” °C, then
depress “ENTER” again.
The Setpoint Type is set
for low and the Set State
is a short by default —
perfect for this particular
test. (If these conditions
were different, we would
change them here.).
These setup conditions
describe a switch that has
a setpoint of 20 °C and
closes a set of contacts as
long as the input temper-
ature to the switch is
below 20 °C.
b. Depress the “Done”
softkey.
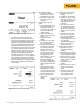
6. Enter the setpoint tolerance and deadband
settings.
a. Move the cursor to tolerance and enter a
setpoint tolerance of “1” °C.
b. Move the cursor to Deadband Min and
enter a minimum deadband of “1” °C.
c
.
Move the cursor to D
eadband Max and
enter a maximum deadband value of 3
°
C
.
The test setup screen should now be as
per Fig
ure 4. D
epress the “D
one
” softkey
.
Figure 2. MEASURE/SOURCE split screen, contacts open.
ENTER
V
RTD
MEAS
SOURCE
mA
mA
RTD
V
30
0
V
MAX
30V MAX
TC
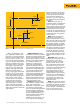
Fluke 741/743
To Limit
Switch Contacts
To Limit Switch
Thermocouple
Input
Figure 3. Connecting the DPC.
Figure 4. Test setup screen.
3 Fluke Corporation Process and temperature switch applications with the 740 Series DPCs