
User's Manual


Making Measurements
Measuring Capacitance (8846A only) 4
4-13
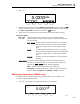
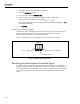
2. Press K.
0.0333
uA
~
F1 F2 F3 F4 F5
caw08f.eps
3. With the test leads connected to the 400 mA and Input LO connectors, press the €A
soft key as shown above, if not already highlighted. If the test leads are connected to
the 10A and Input LO connectors, then press the 10A soft key.
4. Apply power to the measured circuit and read the current in the Meter’s display.
Function modifiers:
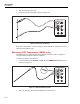
Filter Displays the filter menu. For best accuracy and stable readings,
choose a filter based on the lowest frequency to be measured and the
accuracy needed.
3HZ SLOW Provides higher measurement accuracy on ac signals
between 3 Hz and 20 Hz. However, the measurement
cycle time is longer than it is when using the 20 Hz
filter.
20HZ Provides higher measurement accuracy on ac signals
between 20 Hz and 200 Hz. However, the measurement
cycle time is longer than it is when using the 200 Hz
filter.
200HZ Provides accurate measurements on ac signals 200 Hz
and above.
2ND MEAS Cycles the secondary display through the measurement functions
listed below, and then off. When a second measurement function is
selected, the 2ND MEAS soft key label is highlighted.
IDC - Displays the dc current the ac signal is riding on.
Frequency - Displays the frequency of the ac signal on the Meter’s
current connectors (Input Lo and 400 ma or 10A) connectors.
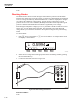
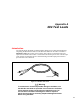
Measuring Capacitance (8846A only)
The Fluke 8846A is capable of measuring capacitance from 1 pF to 100 mF (0.1 F).
To make a capacitance measurement:
1. Press C. An example of the capacitance display is shown below.
0.000
nF
F1 F2 F3 F4 F5
caw10f.eps