
user manual


Table Of Contents
- 45 Dual Display Multimeter
- 1. Introduction
- 2. Getting Started
- 3. Operating the Meter From the Front Panel
- 4. Applications
- 5. Operating the Meter Using the Computer Interface
- Introduction
- Preparing the Meter for Operations via the RS-232 Interface
- Preparing the Meter to be Operated via IEEE-488 Interface
- Getting Started With An Installation Test
- How the Meter Processes Input
- How the Meter Processes Output
- Triggering Output
- Service Requests (IEEE-488 Only and Status Registers
- Computer Interface Command Set
- IEEE-488 Capabilities and Common Commands
- Function Commands and Queries
- Function Modifier Commands and Queries
- Range and Measurement Rate Commands and Queries
- Measurement Queries
- Compare Commands and Queries
- Trigger Configuration Commands
- Miscellaneous Commands and Queries
- RS-232 Remote/Local Configurations
- Sample Program Using the RS-232 Computer Interface
- Sample Programs Using the IEEE-488 Computer Interface
- 6. Maintenance
- Appendices
Operating the Meter From the Front Panel
Selecting a Measurement Function
3
3-5
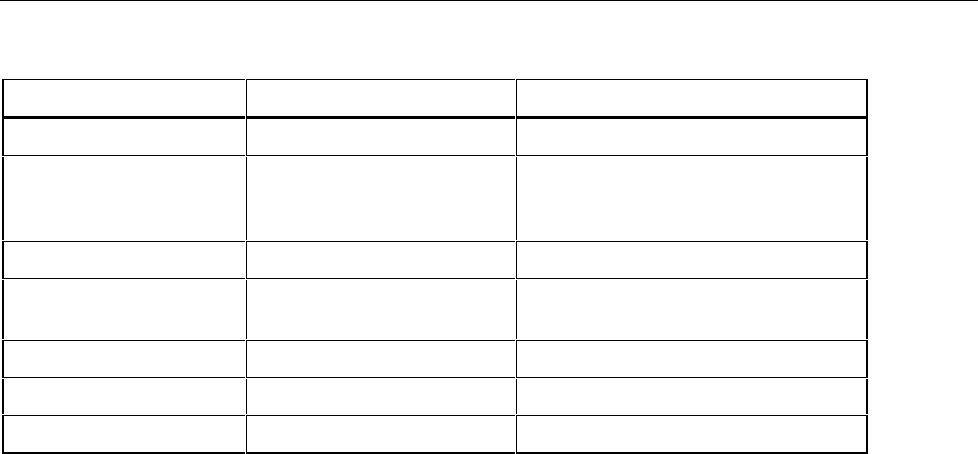
Table 3-1. Input Limits
FUNCTION INPUT TERMINALS MAXIMUM INPUT
| VeG and COM 1000V dc
{ and FREQ VeG and COM 750V ac rms, 1000V peak, 2 x 10
7
V-Hz
normal mode, or 1 x 10
6
V-Hz common
mode (whichever is less)
mAD and FREQ 100 mA and COM 300 mA dc or ac rms
\ and FREQ 10A and COM 10A dc or ac rms (or 20A dc or ac rms for
30 sec. Max)
e VeG and COM 500V dc or ac rms on all ranges
G VeG and COM 500V dc or ac rms
All Functions Any terminal to earth 1000V dc or peak ac
Selecting a Measurement Function
Press a function button (white), shown in Figure 3-5, to select a measurement function To
select ac + dc total rms readings, press Z and Y, or D and C, simultaneously.
When you select a function, annunciators turn on to indicate the function selected. If a
reading is shown on the secondary display when a function button is pressed, the
secondary display will be turned off.
Ranges and full scale values are summarized in Table 3-2 for voltage, Table 3-3 for
current, Table 3-4 for ohms, and Table 3-5 for frequency.
Ranging
(E, U, T)
Ranging operations are performed using the E, U, and T buttons (see Figure 3-6).
Autoranging
When you are in the autorange mode, the AUTO annunciator is lit.
In autorange, the meter automatically selects the next higher range when a reading is
greater than full scale. If no higher range is available, "OL" (overload) is displayed on the
primary or secondary display. The meter automatically selects a lower range when a read-
ing is less than approximately 9 % of full scale.