
user manual
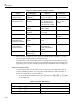

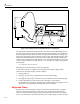
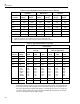
Table Of Contents
- 45 Dual Display Multimeter
- 1. Introduction
- 2. Getting Started
- 3. Operating the Meter From the Front Panel
- 4. Applications
- 5. Operating the Meter Using the Computer Interface
- Introduction
- Preparing the Meter for Operations via the RS-232 Interface
- Preparing the Meter to be Operated via IEEE-488 Interface
- Getting Started With An Installation Test
- How the Meter Processes Input
- How the Meter Processes Output
- Triggering Output
- Service Requests (IEEE-488 Only and Status Registers
- Computer Interface Command Set
- IEEE-488 Capabilities and Common Commands
- Function Commands and Queries
- Function Modifier Commands and Queries
- Range and Measurement Rate Commands and Queries
- Measurement Queries
- Compare Commands and Queries
- Trigger Configuration Commands
- Miscellaneous Commands and Queries
- RS-232 Remote/Local Configurations
- Sample Program Using the RS-232 Computer Interface
- Sample Programs Using the IEEE-488 Computer Interface
- 6. Maintenance
- Appendices

Operating the Meter From the Front Panel
Power-Up Configuration
3
3-19
The last number entered (or, in REL, the last measured value) is shown with the left most
digit displayed in normal intensity and the remaining digits dim. (If the number is
negative, the minus sign is dim.) Related annunciators are lit, and "EDIT" is shown in the
secondary display.
2. Press U to step the bright digit through numbers between O and 9. Holding down U
causes this digit to scroll continuously.
Press T to select the digit to be edited. Each press of T causes the digit to the right
to be selected and go bright, while causing the previously selected digit to go dim. When
the right most digit has been selected, the next press of T selects the sign: if the sign is
positive, the negative annunciator flashes bright dim; if the sign is negative, the negative
annunciator is bright. U will toggle the sign between positive and negative.
3. Any time during editing, you can store a selected value by pressing E.
4. To abort the edit and return the meter to normal operation, press any button except E,
U, and T .
Power-Up Configuration
Factory Settings of Power-Up Configuration
When the meter is turned on and completes the power-up sequence, it assumes its power-
up configuration. The power-up configuration set at the factory is shown in Table 3-13.
The IEEE-488 address, the RS-232 baud rate, parity, echo, and print-only rate are not
changed when power is cycled off and on. These parameters remain as set until changed
by the user.
Changing the Power-Up Configuration
You can change the power-up configuration to one that more closely meets your needs
and preferences. Any combination of meter parameters can become the power-up
configuration.
To save any configuration in which the meter is operating, press S and, while holding
it down, press E. The following parameters are saved:
• Measurement function and initial range on primary display.
• Measurement function and initial range on secondary display.