
user manual

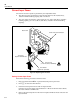
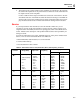
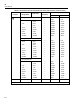

Table Of Contents
- 45 Dual Display Multimeter
- 1. Introduction
- 2. Getting Started
- 3. Operating the Meter From the Front Panel
- 4. Applications
- 5. Operating the Meter Using the Computer Interface
- Introduction
- Preparing the Meter for Operations via the RS-232 Interface
- Preparing the Meter to be Operated via IEEE-488 Interface
- Getting Started With An Installation Test
- How the Meter Processes Input
- How the Meter Processes Output
- Triggering Output
- Service Requests (IEEE-488 Only and Status Registers
- Computer Interface Command Set
- IEEE-488 Capabilities and Common Commands
- Function Commands and Queries
- Function Modifier Commands and Queries
- Range and Measurement Rate Commands and Queries
- Measurement Queries
- Compare Commands and Queries
- Trigger Configuration Commands
- Miscellaneous Commands and Queries
- RS-232 Remote/Local Configurations
- Sample Program Using the RS-232 Computer Interface
- Sample Programs Using the IEEE-488 Computer Interface
- 6. Maintenance
- Appendices
6-1
Chapter 6
Maintenance
Note
When servicing the meter, use only the replacement parts specified.
Introduction
Chapter 6 provides the information necessary for the user to perform basic maintenance.
Users should not attempt to perform maintenance not described in this chapter. Qualified
service personnel should refer to the 45 Service Manual (P/N 856042) for complete main-
tenance, service, and calibration procedures.
Cleaning
WWarning
To avoid electrical shock or damage to the meter, never get
water inside the case.
Caution
To avoid damaging the meters housing, never apply solvents to
the meter.
If the meter requires cleaning, wipe it down with a cloth that is lightly dampened with
water or a mild detergent. Do not use aromatic hydrocarbons, chlorinated solvents, or
methanol-based fluids when wiping down the meter.
Line Fuse
The meter has a T 125mA, 250V, (Slow blow) line fuse in series with the power supply.
This fuse is located on the rear panel. To replace this fuse, unplug the line cord and
remove the fuse holder with fuse as shown in Figure 6-1. The meter is shipped with a
replacement fuse.
W Warning
To avoid electric shock or fire, do not use makeshift fuses or
short-circuit the fuse holder.