Handheld Video Stabilizer I N S T R UC TI O N M AN UA L All rights reserved No part of this document may be reproduced, stored in a retrieval system, or transmitted by any form or by any means, electronic, mechanical, photocopying, recording, or otherwise, except as may be expressly permitted by the applicable copyright statutes or in writing by the publisher.
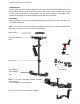
FLYCAM HD HA NDHELD VIDEO STABILIZER 2 INTRODUCTION Smaller, lighter, faster is the latest industry trend in DSLR cameras and video camcorders. Many have features that rival those of their big brothers with amazing results. Recognizing the need to match newer technology in image capture with the camera platforms that support them, Flycam has developed an all new FLYCAM HD Hand Held Camera Stabilizer.
FLYCAM HD HA NDHELD VIDEO STABILIZER 3 HEAD ASSEMBLY Head Plate Mid Plate Bottom Plate Head Plate These three individual pieces are shipped as one assembled unit. Note: The threaded stud is located in the center of the base plate for attach it with central post. BASE PLATFORM Provided with 16 weights to balance the camera on stabilizer.
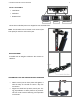
FLYCAM HD HA NDHELD VIDEO STABILIZER 4 ATTACHING HEAD PLATE ASSEMBLY TO CENTRAL POST Loosen the 2x allen bolts at bottom of the camera plate and align the holes with the top of the central post. Retighten the allen bolts securing the head to the stalk. Remove the Head plate from the 3-piece head assembly in preparation to attach it to your camera. You will note a number of mounting holes that can be used to adapt to various cameras. Now Center the Head Plate on the camera and secure it properly.
FLYCAM HD HA NDHELD VIDEO STABILIZER 5 A DDIN G W E IGHTS A N D P O S ITIO N IN G FO R P RO P E R BA L A N C E Continuing the assembly and balance requirements to make your Flycam HD Stabilizer fully functional you will note that the base platform has a provision to mount the balance weights via 2x BH bolts secured with knobs on both sides of the post.
FLYCAM HD HA NDHELD VIDEO STABILIZER 6 BA LA N C IN G THE HORIZ O N TA L A XIS When your Flycam HD Hand held video stabilizer is properly assembled, you can start the test and setup of the horizontal balance. Horizontal balance allows the camera to remain level during operation with the Central Post in a vertical position unless off axis framing is desired. When testing for horizontal balance start from a flat and level surface like a table.
FLYCAM HD HA NDHELD VIDEO STABILIZER 7 BA LA N C IN G THE V ERTIC A L A XIS The sled should be tied up to the docking adapter of your stand or similar so that you can start the fore & after balancing adjustments by centering the camcorder over the central post. To do this: Loose side screws of head plate and bottom screws of the bottom plate. Look at Flycam HD Handheld video stabilizer from the side.
FLYCAM HD HA NDHELD VIDEO STABILIZER 8 A DROP TIME OF 2 - 2.5 SECONDS IS PREFERRED. Note: Recheck the balance by looking at the sled. If necessary, use side screws and bottom plate screws to make required adjustments. BA LA N C IN G REV IEW Proper system balance can only be achieved once your camera is set up with appropriate accessories ready for shooting.
FLYCAM HD HA NDHELD VIDEO STABILIZER 9 Check to see if your camera is sitting level. If not, repeat the necessary steps until it does. Practice walking/movements ensuring your body motion is not transmitted to your hands and then the FLYCAM and camera.
FLYCAM HD HA NDHELD VIDEO STABILIZER 10 PRACTICE MAKES PERFECT - WALKING THE LINE Practice this simple exercise to master your Flycam HD Hand held video stabilizer with professional results. Using masking or gaffers tape, create a cross mark on a flat and even wall. The mark becomes your framing center. On the floor leading up to the cross mark, lay a straight tape line of about 20 feet. Practice walking the line, while keeping the cross mark center framed and in focus.
FLYCAM HD HA NDHELD VIDEO STABILIZER 11 WARRANTY We offer a one year warranty for our products from the date of purchase. We will repair or replace your product, free of charge, in the event of a defect in materials or craftsmanship obtained during normal use or handling based on the user manual. Please note that we will not cover any shipping costs for returning the product to us. If any VAT or import duties are applied to the return, we will also charge these costs to the customer.