User Manual 1
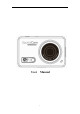
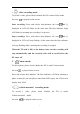
Thank you for buying our Wi-Fi DV. Before start using this product, please read this manual carefully to maximize its performance and extend the life of the product. Appearance and Buttons 1. 2. 3. 4. 5. 6. 7. Shutter button Power button LCD display Micro USB port Mini HDMI port Micro SD card slot Reset button 8. WiFi switch 9. WiFi status indicator (orange)and Working Indicator Light(blue) 10. Lens 11. Indicator Light for charging (Red) 12.Mode Switch 13.
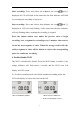
LCD Display Illustration Turn on the Wi-Fi DV, the LCD will display the following status and settings: 1. Camera mode 2. Video recording mode 3. vehicle-mounted mode 4. TF card icon (display when loaded) 5.
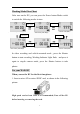
Working Mode Flow Chart After turn on the DV, you can press the Power button/Mode switch to switch the following modes in turn: Power Mode switch button Video preview mode (1080P 30fps) Camera mode (8MP) Video mode (720P,60fps) Mode switch Power Power Video mode (720P,60fps) button Mode switch button Video preview mode (1080P 30fps) Camera mode (5MP) In video recording and vehicle-mounted mode , press the Shutter button to start recording, Working Indicator Light flash,and press it again to s
2. Charging the battery. The DV uses built-in rechargeable lithium battery. When the DV is off, connect it to the PC via USB cable ,and the DV will on.Please turn off the DV,the indicator light for charging will light on .During charging, Indicator Light for charging will light on,and Indicator Light for charging off when charging completes. Note: When the DV is on, connecting it to the PC will not charge. It will not charge until the DV turn off. Turn on/off 1.
Note: The DV will turn off automatically if it is idle for 5 minutes. Start to Use Default setting: After turn on the DV, the default setting is as below: HI Video recording mode icon The DV is in video recording mode. Video resolution FHD: 1080p@30fps Recording time Stands for 00 minuter and 00 second. TF card icon Display when a TF card is inserted, otherwise no display. Battery level Battery is full Wi-Fi icon Display when activated. The DV provides different shooting modes.
1. video recording mode To record a video, please check whether the DV is under Video mode. the icon is played on the screen Start recording: Press and release the button, the icon and [:] displayed in LCD will flash. At the same time The blue indicator Light will flash too, meaning the recording is in process. Stop recording: Press and release the button, the icon and [:] displayed in LCD will stop flashing.
Start recording: Press and release the button, the icon and [:] displayed in LCD will flash. At the same time the blue indicator will flash too, meaning the recording is in process. Stop recording: Press and release the button, the icon and [:] displayed in LCD will stop flashing. At the same time the blue indicator will stop flashing either, meaning the recording is stopped.
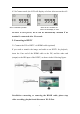
4.2 In Camera mode ,the LCD will display as below after turn on the wifi Wi-Fi is disabled by default When Wi-Fi is enabled, the Wi-Fi icon will display on LCD In order to save power, Wi-Fi will be automatically disabled if no terminal is connected after 30 seconds. 5. Connecting to HDTV 5.
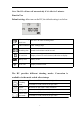
5.2 When HDTV is connected, it enters Playback mode, the LCD displays as below: 1 2 3 S/N 1 2 3 Icon name Playback mode File number Description Under Playback mode currently. There are 31 files and you are viewing the 19th one. Video icon The file is a video. In Playback mode, press the Power button to switch to the next photo or video.When a video file is selected, press the Shutter button to play it, and press the Shutter button again to stop playing.
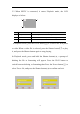
6. Connecting to PC 6.1 Turn on the DV and connect it to the USB port of the PC via the attached USB cable. The DV will enter U-disk mode and the LCD will display as below after connection: Now you can view the photos or videos taken by DV on PC. 6.2 In U-disk mode (PCO mode), press the Shutter button to switch to web cam mode (PCC mode), and the LCD will display as below: Now you can start the web cam through application.
APP (support Android and iOS) 1. How to install an APP 1.1 Search for ”iSmart DV” in Google Play (for Android OS) to find the APP and install it according to the instruction. 1.2 Search for ”iSmart DV” in APP Store (for iOS) to find the APP and install it according to the instruction. 2. Android APP 2.1 Install iSmart DV APP (provided by dealer or via internet) on smartphone or tablet. When installation completes, the LCD will display icon . 2.
2.4 Click the icon in the App list of the smartphone or tablet to open it. Now you can preview the image sent by the DV on the phone or tablet and start some operating. The operation interface on terminal is shown in the following figure. 1. Video resolution 2. White balance 3. Setup (enter setup menu) 4. Enter Playback mode 5. Shutter button 6. Photo mode 7. Video mode 8. Wi-Fi signal icon 9. DV battery icon 3. iOS APP 3.
3.4 Click the icon in the App list of the iOS phone or tablet to open it. Now you can preview the image sent by the DV on the phone or tablet and start some operating. The operation interface on terminal is shown in the following figure. 1. DV battery icon 2. Video resolution 3. White balance 4. Setup (enter setup menu) 5. Enter Playback mode 6. Shutter button 7. Photo mode 8. Video mode Note: 1.