® Contour Cordless XT Original Instructions ION T A RM NFO I T TA N se R O nce e r I M P before u e f re re d u t a u e f R r ain fo t e r &
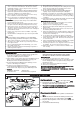
Carton Contents Safety Lock-off Switch Switch Lever Steady Handle Battery Pack Battery Charger Upper Shaft Guard Lower Shaft Instruction Manual Plant and Tree Guard Wheel IMPORTANT ! Please check the contents of the carton are correct BEFORE assembling your new Flymo product. IF ANY PARTS ARE MISSING CONTACT:Husqvarna UK Ltd. Customer Service Department direct Telephone : 0844 844 4558 UK 1800 882 350 ROI FAX : 01325 302530 Safety WARNING. When using the product the safety rules must be followed.
10. Do not charge the battery or use the unit in an explosive or corrosive environment. Avoid areas where flammable liquids or gases are present to avoid creating a fire or explosion. 11. Do not attempt to repair the unit including the battery. Nylon line replacement and cleaning the unit are the only items suitable for user maintenance. 12. Do not insert any object into the motor area. Keep free of debris to avoid overheating. 13. Do not incinerate or mutilate the battery.
Assembly Instructions cont’ D Safety Guard Assembly (D) & (E) 1. Locate the safety guard (D1) over the cutting head (D2). Ensure the nylon line is fed through the hole in the safety guard as illustrated in fig D. 2. Push into location and turn safety guard in the direction illustrated in Fig E, until a click is heard and the safety guard is securely locked in position. • ENSURE THE SAFETY GUARD IS SECURELY IN PLACE BY ATTEMPTING TO TWIST GUARD.
How to trim and edge H J 2 • • 2 K • • L1 L2 2 1 K! IC CL N √ How to trim 1. Hold as illustrated in Fig H. 2. To start, squeeze the safety lock-off (H1) and then the switch lever (H2). 3. Cut with nylon line at an angle using the tip. See Fig J. 4. Swing trimmer in and out of the cutting area taking small cuts (K) 5. Line is fed out automatically every time the trimmer head stops rotating and returns to operating speed. • Extra line can be fed out manually as described in Manual line feed 6.
Auto Line Feed System P line cutter How the automatic line feed works (P) 1. When initially switching on the trimmer, a small length of line is fed out. 2. A ‘clattering’ noise will be heard when the nylon line hits the line cutter. DO NOT BE ALARMED this is quite normal. After approximately 5 seconds the line will be cut to the correct length and the noise will reduce as the motor reaches full speed. • Make sure the motor is up to full speed before trimming or edging. 3.
Maintenance V • WARNING Remove the Battery Pack before attempting any maintenance or adjustment. Cutting head continues to rotate after the trimmer has been switched off. Keep fingers and hands clear of the line cutter on leading edge of guard. Caring for your Product W After you have finished using your product, follow the procedure below: 1. Never clean your trimmer with water, cleaning fluids, or solvents, just remove debris with a suitable tool, a soft brush or dry cloth. 2.
Fault Finding Chart WARNING Remove the Battery Pack before attempting any maintenance or adjustment. FAULT CHECK LINE NOT FEEDING OR LINE TOO SHORT OR TRIMMER VIBRATES CONTINUOUS CLATTERING NOISE LINE SNAPS CONTINUOUSLY ACTION Is the automatic line feed working? No Manually feed out line. SEE “MANUAL LINE FEED” Is the line fed out and visible? Has line been removed from cleat? No Remove cap and spool, free line and re-fit spool and cap.
Guarantee & Guarantee Policy If any part is found to be defective due to faulty manufacture within the guarantee period, Husqvarna UK Ltd., through its Authorised Service Repairers will effect the repair or replacement to the customer free of charge providing: (a) The fault is reported directly to the Authorised Repairer. (b) Proof of purchase is provided. (c) The fault is not caused by misuse, neglect or faulty adjustment by the user. (d) The failure has not occurred through fair wear and tear.