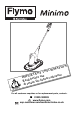
TIO A M R N NFO I T TA N se R nce O e r P u e f e I M befor re re u t d u a f Re for n i a t & re For all customer enquiries or for replacement parts, contact:- ☎ 01325 300303 www.flymo.com eop.customer.services@electrolux.co.
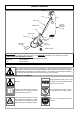
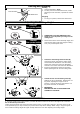
Carton Contents handle bolt nut cable clip plastic wing knob handle tube electric cable with moulded on plug bolt motor cover fixing pin nut plastic wing knob hood instruction manual fixing pin plastic cutters IMPORTANT ! Please check the contents of the carton are correct BEFORE assembling your new Flymo product.
General 1. Never allow children or people unfamiliar with these instructions to use the product. Local regulations may restrict the age of the operator. 2. Only use the product in the manner and for the functions described in these instructions. Only use this product for cutting grass. 3. Never operate the product when you are tired, ill or under the influence of alcohol, drugs or medicine. 4. The operator or user is responsible for accidents or hazards occurring to other people or their property.
CABLES - IMPORTANT • Use only 1.00mm2 size cable up to 40 metres length maximum. Maximum rating : 1.00mm2 size cable, 10 amps 250 volts AC. THE MINIMO IS SUPPLIED WITH AN ELECTRIC MAINS CABLE WIRED DIRECTLY INTO THE PRODUCT. 1. Flymo Mains Cables and Extension Cables are available from your local Electrolux Outdoor Products Service Centre. 2. Do not wire an extension cable directly to your product yourself.
Starting and Stopping D Lock-off button Switch lever Starting 1. Hold as illustrated in Fig D. 2. To start, press the lock-off button down, whilst pressing the lock-off button, squeeze the switch lever. Stopping 1. To stop your product, release the switch lever. Adjusting the Cutting Height E HIGHEST This symbol visible F LOWEST This symbol visible G • • THERE ARE 2 CUTTING HEIGHTS (E & F) Height of cut is adjusted by turning over the cutting head.
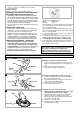
Cutting System Maintenance • Always handle the plastic cutters with care sharp edges could cause injury. USE GLOVES. Checking your Cutting System (J) • The cutting system must be kept in good condition and inspected before and after use. • Disconnect from the mains electricity supply and wait until the cutting head has stopped rotating. Turn your product upside down. 1.Visually check cutting head for wear. Replace if damaged. 2.Visually check plastic cutters for wear and replace when necessary. 3.
Fault Finding Hints Fails to Operate 1 Is the Power Turned On? 2 Check the fuse in the plug, if blown replace. 3 Fuse continues to blow? Immediately disconnect from the mains electricity supply and consult your local approved Service Centre. Poor Flotation 1. Disconnect from the mains electricity supply. 2. Clean the underside of the hood and the fan blades. 3. Raise to a higher height of cut. See Adjusting the Cutting Height. 4.
Guarantee & Guarantee Policy If any part is found to be defective due to faulty manufacture within the guarantee period, Electrolux Outdoor Products, through its Authorised Service Repairers will effect the repair or replacement to the customer free of charge providing: (a) The fault is reported directly to the Authorised Repairer. (b) Proof of purchase is provided. (c) The fault is not caused by misuse, neglect or faulty adjustment by the user. (d) The failure has not occurred through fair wear and tear.