® Original Instructions Multimo 340XC Multimo 360 Multimo 360XC Multimo 420 Multimo 420XC Multimo 360XC Multimo 420XC Multimo 340XC Multimo 360 Multimo 420 N MATIO R O F IN TANT e R O P s IM efore u ference Read bn for future re & retai
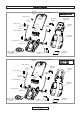
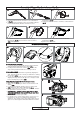
Carton Contents lock off button switchbox Multimo 340XC cable clip x 2 start/stop lever grassbox handle washer x4 Easi-Reel cable spool cam lock x 4 bolt barrel nut x 4 grassbox upper upper handle roller half x 2 lower handle x 2 grassbox half x 2 pivot block x 2 spring x 2 electric cable with moulded on plug instruction manual mulching plug lock off button switchbox Multimo 360 Multimo 420 cable clip x 2 start/stop lever grassbox handle washer x4 cam lock x 4 bolt barrel nut x 4 gras
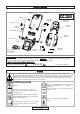
Carton Contents lock off button switchbox Multimo 360XC Multimo 420XC cable clip x 2 start/stop lever washer x4 grassbox handle cam lock x 4 bolt upper handle barrel nut x 4 lower handle x 2 Easi-Reel cable spool grassbox upper roller half x 2 grassbox half x 2 pivot block x 2 spring x 2 electric cable with moulded on plug instruction manual mulching plug IMPORTANT ! Please check the contents of the carton are correct BEFORE assembling your new Flymo product.
Safety General 1. This product is not intended for use by persons (including children) with reduced physical, sensory or mental capabilities, or lack of experience and knowledge, unless they have been given supervision or instruction concerning the use of the product by a person responsible for their safety. Children should be supervised to ensure that they do not play with the product. Local regulations may restrict the age of the operator. 2.
Cables CABLES - IMPORTANT • Use only 1.00mm2 size cable up to 40 metres length maximum. Maximum rating : 1.00mm2 size cable, 10 amps 250 volts AC. • YOUR PRODUCT IS SUPPLIED WITH AN ELECTRIC MAINS CABLE FITTED WITH A FEMALE CONNECTOR. 1. Flymo Mains Cables and Extension Cables are available from your local Approved Service Centre. 2. Do not wire an extension cable directly to your product yourself.
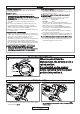
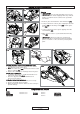
Assembly of Lower Handles to Lawnmower C1 C2 C3 1. Pull the lower handle bolt until it locks into position as illustrated in fig C1. 2. Place the Spring over the Bolt (C2) D1 D2 D4 lower handle cam lock Insert the Lower Handle, Washer and Cam Lock on to the Bolt (D3) and turn the Cam Lock 3 times clockwise, as illustrated in fig D4. 4. Insert the Barrel Nut into the Cam Lock as illustrated in fig D1. 5. Ensuring the lower handle is in the correct position (D2) D3 3.
Assembly of Upper Handles to Lower Handles E1 E2 E3 x3 1. Insert the Barrel Nut into the Cam Lock as illustrated in fig E1. 2. Attach the Upper Handle to the Lower Handle with the Round Headed Bolt, Washer and Cam Lock as E4 illustrated in fig E2 3. Turn the Cam Lock 3 times clockwise, as illustrated in fig E3. E5 E6 5. The Cam Lock can be unlocked and locked as illustrated in fig E6. Repeat for the other side. 4.
How to Mow K Your product can be used to cut grass using the following methods:1. Grassbox Fitted:- grass is collected effectively and compacted into the grassbox. (K) 2. Rear Discharge:- Effectively cuts long grass with no need to empty the grassbox (L) 3. Mulch Plug Fitted:- grass cuttings are finely chopped to return nutrients to your lawn (M). See ‘Mulching Plug’ on page 7. L How to Mow 1.
Cutting Height Adjustment Cutting Height Adjustment • Height of cut is adjusted by raising or lowering the wheels using the height adjustment lever (Q) • There are five heights of cut on this product. • NOTE A medium height of cut is recommended for most lawns. The quality of your lawn will suffer and collection will be poor if you cut too low. Q Starting and Stopping To Start your Lawnmower 1. Connect female extension cable connector to the back of the switchbox. (R) 2.
Caring for your Lawnmower Z1 Z2 Cleaning • USE GLOVES • IMPORTANT:- It is very important that you keep your lawnmower clean. Grass clippings left in any of the air intakes or under the deck could become a potential fire hazard. 1. Remove grass from under the deck with brush. (Z1) Z3 Z4 2. Using a soft brush - remove grass clippings from all air intakes (Z2), the discharge chute (Z3) and the grass box (Z4). 3. Using a soft brush, remove grass clippings from the vision window (Z5). Z5 4.
Easi-Reel Cable Winder (XC models only) Y1 Y2 Storing your cable in the Easi-Reel cable winder 1. Insert the female connector into the centre of the cable winder (Y1) 2. Place the cable under the cable guide (Y2) 3. Turn the cable winder (Y3) until all of the cable is wound in.(Y4) Y3 Y4 Unwinding the cable before re-use 1. Pull the cable by the plug and unwind the cable fully. • Ensure that the cable is released from the cable guide (Y2) before using your machine.
Guarantee & Guarantee Policy If any part is found to be defective due to faulty manufacture within the guarantee period, Husqvarna UK Ltd., through its Authorised Service Repairers will effect the repair or replacement to the customer free of charge providing: (a) The fault is reported directly to the Authorised Repairer. (b) Proof of purchase is provided. (c) The fault is not caused by misuse, neglect or faulty adjustment by the user. (d) The failure has not occurred through fair wear and tear.