TIO A M R N NFO I T TA N se R nce O e r P u e f e I M befor re re u t d u a f Re for n i a t & re For all customer enquiries or for replacement parts, contact:- ☎ 01325 300303 www.flymo.com eop.customer.services@electrolux.co.
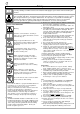
1 Safety Please Note :- This manual covers various products. Please read the user instructions carefully to fully identify, assemble and use the features that apply to your electric wheeled rotary lanwmower. If not used properly this lawnmower can be dangerous! This lawnmower can cause serious injury to the operator and others, the warnings and safety instructions must be followed to ensure reasonable safety and efficiency in using this lawnmower.
2 13. Do not tilt lawnmower when the motor is running, except when starting and stopping. In this case, do not tilt more than absolutely necessary and lift only the part which is away from the operator. Always ensure that both hands are in the operating position before returning the appliance to the ground. 14. Do not put hands near the grass discharge chute. 15. Never pick up or carry a mower when it is operating or still connected to the mains supply. 16.
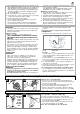
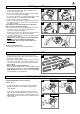
3 a Lower Handle Assembly - RE420/420c C1 C2 Lower Handles - RE420/420c (C1, C2) 1. If your product has Cutting Height with levers (see Cutting Height Adjustment), ensure the lever is at the Highest Cut Height before following steps 2 & 3. 2. Insert lower handles into deck as shown in Fig C1. 3. Push each handle firmly down until it is located securely into the deck (C2). 4. Insert screw through the washer and into holes using a pozidrive screwdriver and tighten fully into deck as shown in Fig C2.
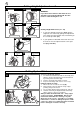
4 Starting and Stopping To Start your Lawnmower 1. Connect female extension cable connector to the back of the switchbox. (L) 2. Form loop in mains cable and push the loop through the slot as illustrated in picture (M) 3. To secure, position loop over the hook and pull the cable back through the slot as illustrated in picture (N). 4. Connect plug to mains and switch on. 5. Tilt the handle downwards to slightly raise the front of the lawnmower and to reduce the risk of lawn damage whilst starting.
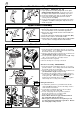
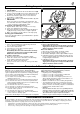
5 Cutting Height Adjustment cont’ Levers fitted T1 Levers fitted T2 WARNING: If you have levers fitted to the wheel do not attempt to unscrew the wheel hub. Use the levers to alter the height of cut. 3 2 1 T3 Lowest Cut Height Levers fitted Levers fitted T4 Cutting Height with Levers (T1 - T7) 1. If you have Height of Cut levers (Figs. T), the height of cut is altered by pulling the adjustment lever away from the location slots and moving to the selected position (T1). 2.
6 Caring for your Lawnmower Cleaning (W, Y, Z) • USE GLOVES 1. Remove grass from under the deck with a brush.(W) 2. Using a soft brush (X) remove grass clippings from all air intakes, the discharge chute and the grass box. 3. Remove the blade to gain access to the fan and clean with a soft brush.(Y) 4. Wipe over the surface of your lawnmower with a dry cloth. • IMPORTANT Never use water for cleaning your lawnmower.
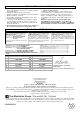
Service Recommendations 1. We strongly recommend that your product is serviced at least every twelve months, more often in a professional application. 2. Always use genuine Flymo Spare Parts. 3. Prepacked spares are available from most Electrolux Outdoor Products stockists. 4. Your product is uniquely identified by a silver and black product rating label 5.