ROLLER COMPACT ROLLER COMPACT 3400 ROLLER COMPACT 340/400 ROLLER COMPACT 4000 For all customer enquiries or for replacement parts, contact:- ☎ 0870 609 1901 www.flymo.com customer.services@husqvarna.co.
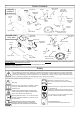
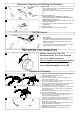
Carton Contents ROLLER COMPACT 340//3400/400 grassbox lid lower handle fixing pins washer bolts height adjsutment lever lock-off button washer nuts cable winder attachment (RC3400 only) handle knobs deck cable clips instruction manual spanner /scraper spacer upper handle electric cable with moulded on plug lower handle ROLLER COMPACT 4000 Easi Reel cable winder (RC3400 only) Easi-Reel cable spool washers bolts lower handle fixing pins grassbox lid height adjsutment lever lock-off but
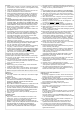
General 1. Never allow children or people unfamiliar with these instructions to use the mower. Local regulations may restrict the age of the operator. 2. Only use the lawnmower in the manner and for the functions described in these instructions. 3. Never operate the lawnmower when you are tired, ill or under the influence of alcohol, drugs or medicine. 4. The operator or user is responsible for accidents or hazards occurring to other people or their property. Electrical 1.
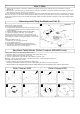
Assembly Instructions B A C D grassbox lid handle knob bolt 2 lower handle fixing pins 1 Assembly of Lower Handles to Deck 1. Insert lower handle into holes in the deck (A). 2. Release the grassbox catch and lift the grassbox lid (B). 3. Rest the grassbox lid against the lower handle and remove the grassbox. 4. Push the lower handle into place ensuring that the holes in the lower handle are correctly located behind the holes in the deck. 5.
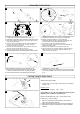
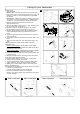
Removing, Emptying and Refitting the Grassbox J Grassbox Full • As the grassbox fills up, grass will be visible through the window in the lid (J). • When the window is full it is time to empty the grassbox. grassbox empty Emptying the Grassbox • Stop the lawnmower, as described in ‘To Stop your Lawnmower’and wait until the blade has stopped rotating, BEFORE lifting the grassbox lid. 1. Release grassbox catch and lift grassbox lid (B). See Assembly Instructions. 2.
How to Mow 1. Start mowing the edge of the lawn nearest to the power point so the cable is laid out on the lawn you have already cut. 2. Mow twice a week during the growing season, your lawn will suffer if more than a third of its length is cut at one time and this may also result in poor collection. Do Not Overload Your Mower: Mowing long thick grass may cause the motor speed to drop, you will hear a change in the motor sound. If the motor speed drops you may overload your lawnmower which may cause damage.
Caring for your Lawmower W Cleaning (W) • USE GLOVES • IMPORTANT: It is very important that you keep your lawnmower clean. Grass clippings left in any of the air intakes or under the deck could become a potential fire hazard. • IMPORTANT Never use water for cleaning your lawnmower. Do not clean with chemicals, including petrol, or solvents - some can destroy critical plastic parts. 1. Remove grass from under the deck with the spanne/scraper tool 2.
Fault Finding Hints Fails to Operate 1. Is the correct Starting procedure being followed? See ‘To Start your Lawnmower’. 2. Is the grassbox lid firmly closed? 3. Is the Power Turned On? 4. Check the fuse in the plug, if blown replace. 5. Fuse continues to blow? Immediately disconnect from the mains electricity supply and consult your local approved Service Centre. Poor Grass Collection 1. Disconnect from the mains electricity supply. 2.
Guarantee & Guarantee Policy If any part is found to be defective due to faulty manufacture within the guarantee period, Husqvarna Outdoor Products, through its Authorised Service Repairers will effect the repair or replacement to the customer free of charge providing: (a) The fault is reported directly to the Authorised Repairer. (b) Proof of purchase is provided. (c) The fault is not caused by misuse, neglect or faulty adjustment by the user. (d) The failure has not occurred through fair wear and tear.