
User's Manual Part 2


J2 680 System Manual
Version 1.0 May 11, 2012
59
Enabling RAID in the BIOS
The Intel manual for the Intel Matrix Storage Manager covers this same information
given below in more detail and can be downloaded from the J2 web site. The
documentation below is tailored for the 680 only.
Link: http://www.j2retailsystems.com/support/680/RAID/
Perform the following steps to enable the RAID option in the system BIOS:
1. Enter the BIOS Setup program by pressing the DEL key after the BIOS sign-on
screen appears.
2. Select the Advanced menu, and then the SATA Configuration menu.
3. Switch the Configure SATA Ports option from SATA to RAID.
4. Press the F10 key to save the BIOS settings and exit the BIOS Setup program.
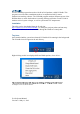
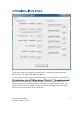
RAID Volume Creation
Perform the following steps to create a RAID volume:
1. When the Intel Matrix Storage Manager option ROM status screen appears during
POST, press the Ctrl and i keys at the same time to enter the Intel Matrix Storage
Manager option ROM user interface.
2. Select Option 1: Create RAID Volume and press the Enter key.
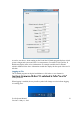
3. Use the up or down arrow keys to select the RAID level and press the Enter key.
4. Unless you have selected RAID 1, use the up or down arrow keys to select the
stripe size and press the Enter key.
5. Press the Enter key to select the physical disks.
6. Select the appropriate number of hard drives by using the up or down arrow keys
to scroll through the list of hard drives and pressing the Space key to select the
drive. When finished, press the Enter key.
7. Select the volume size and press the Enter key.
8. Press the Enter key to create the volume. At the prompt, press the Y key to
confirm volume creation.
9. Select Option 4: Exit and press the Enter key. Press the Y key to confirm exit.
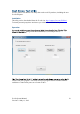
F6 Installation Method
Note: For this step you will need both a USB CD ROM and USB Floppy.
Drivers can be downloaded here: http://www.j2retailsystems.com/support/680/RAID/
(continued on next page)