USER MANUAL VERSION 1.
Copyright 2016 All Rights Reserved Manual Version 1.0 Part Number: The information contained in this document is subject to change without notice. We make no warranty of any kind with regard to this material, including, but not limited to, the implied warranties of merchantability and fitness for a particular purpose. We shall not be liable for errors contained herein or for incidental or consequential damages in connection with the furnishing, performance, or use of this material.
FCC FCC Radiation Exposure Statement This device complies with part 15 of the FCC rules. Operation is subject to the following two conditions: (1) This device may not cause harmful interference. (2) This device must accept any interference received, including interference that may cause undesired operation. FCC Statement This equipment has been tested and found to comply with the limits for a Class B digital device, pursuant to part 15 of the FCC rules.
LEGISLATION AND WEEE SYMBOL 2012/19/EU Waste Electrical and Electronic Equipment Directive on the treatment, collection, recycling and disposal of electric and electronic devices and their components. The crossed dust bin symbol on the device means that it should not be disposed of with other household wastes at the end of its working life. Instead, the device should be taken to the waste collection centers for activation of the treatment, collection, recycling and disposal procedure.
Revision History Changes to the original user manual are listed below: Revision 1.
Table of Contents 1. Packing List................................... 1 1-1. Standard Accessories......................................................1 2. System View................................... 2 2-1. 2-2. 2-3. 2-4. Touch Panel......................................................................2 Touch Pamel with Printer Stand......................................3 Dimensions.......................................................................4 IO Port View......................................
The page is intentionally left blank.
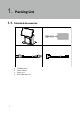
1. 1-1. Packing List Standard Accessories a. b. c. d.
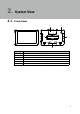
2. 2-1. System View Touch Panel 1 2 3 6 4 5 Item No.
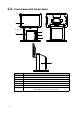
2-2. Touch Pamel with Printer Stand 1 2 4 3 5 6 7 Item No.
Dimensions 261 mm 28 mm 164 mm 24 mm 261 mm 338 mm 2-3. 188.
2-4. IO Port View a Item No. a b c d e f g h 5 b c d e f g h Description Cash drawer COM2/COM1 DC 19V in Micro USB USB 2.
3. System Assembly & Disassembly 3-1. Install Touch Panel to Printer Stand 1. Directly put the touch panel into the cradle of printer stand. 3-2. Install the Power Adapter 1. Use both hands to pull the cover of the system box upward to release the cover from the system box.
2. Place the system face down to access the bottom of the stand. 3. Thread the power adapter cable through the hole of the stand as shown in the picture. 4. Find the power connector on the right of the I/O panel (refer to chapter 2-4 c.) and connect the power adapter to the DC-IN connector. 5. Finally arrange and fix the cable by using the hook as shown in the picture. Warning: • Please follow the direction to plug the adapter and make sure it is fully connected into the I/O port.
3-3. Connect iPad Jacket to Printer Stand 1. After the power adapter is installed, remember to push the paring button on the IO port so that the touch panel and the printer stand will be connected. 3-4. Remove Touch Panel from Printer Stand 1. Push the release button on the printer stand and then pull the touch panel upward to release it from the printer stand.
When the switch panel on the printer stand shows “Lock“, you can not push the release button to remove the iPad Jacket. Use the provided key or APP to unlock printer stand. Please follow the below steps: • Manually unlock 1. Open the cover of the system box. 2. You will find the key on the top of the printer. 3. Insert the key and then pull the touch panel upward to release it from the printer stand.
• APP unlock (demo APP) 1. Use the Touch ID to login the APP program. 2. Enter password to login the APP program if the device is not equipped with the fingerprint sensor. Default password:1234. 3. Click "BLE Config".
4. Click the device to connect. 5. The BLE is now connected, then click "DOCK" 5 . U s e t h e To u c h I D o r e n te r t h e password to login again. 6. Now the device is unlock, push the lock button to release the iPad Jacket from the printer stand.
3-5. Load the Thermal Printer Paper Note: Do not switch off the system. The printer must be powered on when replacing the printer paper. 1. Press the button at the right side to open the thermal printer module. * Cut away the first five (5) cm of the paper, to obtain a straight edge and remove the label at the end of the roll. 2. Place the paper roll inside the printer slot, pull out a 2 or 3 cm length and then close the cover. 3.
4.
5.
Appendix: API Information Please contact your service provider for more detailed informaiton on software porting guide.