USER MANUAL Version 2.
Copyright Copyright 2022 All Rights Reserved Manual Version 2.1 The information contained in this document is subject to change without notice. We make no warranty of any kind with regard to this material, including, but not limited to, the implied warranties of merchantability and fitness for a particular purpose. We shall not be liable for errors contained herein or for incidental or consequential damages in connection with the furnishing, performance, or use of this material.
Safety Regulatory Information Caution: Only use approved and UL Listed accessories, battery packs and battery chargers. Do NOT attempt to charge damp/wet mobile computers or batteries. All components must be dry before connecting to an external power source. Power Supply Use only the approved power supply output rated 12 Vdc and minimum 3 A. The power supply is certified to EN60950-1 or EN62368-1 with SELV outputs.
Hearing Aids The wireless device may interfere with some hearing aids. In the event of interference you may want to consult your hearing aid supplier to discuss solutions. Other Medical Devices Please consult your physician or the manufacturer of the medical device, to determine if the operation of your wireless product may interfere with the medical device.
Caution! Any changes or modifications not expressly approved by the party responsible for compliance could void t he user's authority to operate the equipment. CE Marking and European Economic Area The use of 2.4GHz WLAN's, for use through the EEA, have the following restrictions: Maximum radiated transmit power of 100 mW EIRP in the frequency range 2.400 -2.4835 GHz France, outside usage is restricted to 2.4 - 2.454 GHz. Italy requires a user license for outside usage.
with affected area and properly dispose of the battery. Batteries must be charged within the 32° to 95° F (0° to +35° C) ambient temperature range. Replace the battery when a significant loss of run time is detected. Battery Caution Risk of explosion if battery is replaced by an incorrectly type. Dispose of used battery according to the local disposal instructions.
Revision History Version Date Description 1.0 April 2021 Initial release 2.0 June 2021 Add FCC RF Radiation Exposure Statement Specification update 2.
Table of Contents 1 Item Checklist ............................................. 9 1-1 1-2 2 System View .............................................. 11 2-1 2-2 2-3 3 4 viii Standard Items ................................................................................... 9 Optional Items .................................................................................. 10 Front View ......................................................................................... 11 Rear View ............
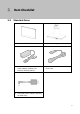
1 Item Checklist 1-1 Standard Items a. Tablet (11.6" or 13.3") b. Premium docking station c. 19V/120W or 19V/65W power adapter (standard, for premium docking station) d. Power cord e.
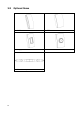
1-2 Optional Items a. MSR b. RFID c. Fingerprint d. iButton e.
2 2-1 System View Front View No.
2-2 12 Rear View No.
2-3 Specification System M276 Motherboard CPU System memory Flash memory F63 M278 F12 F33 F63 F12 Whiskey Lake Celeron 4305U SNM758L-3308 (SnapDragon450) Elkhart Lake J6412 Whiskey Whiskey SNM758L-3308 Lake Lake Core Celeron i3-8145U (SnapDragon450 4305U DDR4 4GB LPDDR3 3GB DDR4 8GB DDR4 4GB 128G eMMC 32G eMMC 128G eMMC DDR4 8GB 128G eMMC F33 Elkhart Lake J6412 LPDDR3 3GB DDR4 8GB 32G eMMC 128G eMMC LCD Touch Panel LCD size 11.6" 13.
System M276 Motherboard F63 M278 F12 F33 F63 F12 F33 Audio Speaker 1x 1W Control / Indicator Sensor G-sensor LED indicator 1 Camera (Optional) Rear camera 5MP Battery & Power Battery 7268mAh, 3.85V (Max. Charging Power=27.
3 Getting Started 3-1 Power On/Off the System 1. Press the power button for 2 seconds to turn on the system and press it for 6 seconds to turn off the system. Note: For best touch performance, remove the protective plastic overlay from the touch screen by peeling it away from one of the corners. Be sure to use a soft pointing device or finger tip to avoid scratching the screen during normal use. 3-2 Installing the Peripheral Kits 1. Remove the dummy cover first.
3-3 Using the Premium Docking Station The premium docking station provides additional connectors and interfaces to support other devices and is also designed to allow the tablet to charge its battery via the dock. 1. To use the premium docking station, firstly connect the AC adapter to the DC-in input and connect the other end to the power outlet. Always plug in the AC adapter first to enable the locking/unlocking function. * You can also charge the battery via the optional 36W power adapter.
Removing the tablet from the dock 3. Press the lock release button on the front of the docking station, and then lift the tablet off the dock. NOTE: The tablet will be locked again if it is not removed from the dock after pressing the release button in 10 seconds. The light on the dock’s lock release button indicates the locking status: Blue - The tablet is locked Green - The tablet is unlocked and can be removed. Adjusting the tablet angle 4.
3-4 Attaching the Shoulder Strap 1. 18 Align and attach the shoulder strap to the tablet as shown and fasten the screws (x2) to secure it.
4 Configuration 4-1 COM Port Power 1. 2. Double click P-2DK10_ConfigTool.exe to run the setup tool. By default, both left and right COM port power are 0V. To change the default COM port power, select power and tap on Write COM Port Power to confirm. * L/R COM port power can be set to different voltage individually, e.g., L:5V and R:12V.
4-2 Cash Drawer COM Port 20 1. 2. Click on New Port COM and enter 7 in the column. Tap on Set COM Port to confirm. 3. 4. Double click P-2DK10_ConfigTool.exe to run the setup tool. By default, both left and right COM port power are 0V. To change the default COM port power, select power and tap on Write COM Port Power to confirm.
5. You can check the current setup condition by tapping on Read. * If the device is not connected or the setup process hasn’t been completed yet, the Read / Write column will be highlighted. 4-3 USB over IP The Premium Docking Station P-2DK10 is designed with the feature of USB over IP that offers a convenient way to extend and share a USB device over long distance, and it also works with multiple tablet-dock pairs.
2. 3. Double click P-2DK10_ConfigTool.exe to run the setup tool. Specify the MAC address of the server in your VirtualHere by clicking on Setp IP. The process may take up to 2~3 minutes showing the message Set IP....If all was done correctly, a popup window should appear indicating Set IP success! 4. 5. The default setting of the system is Mode 1: POS Mode. To change the default mode, select Mode 2: All USB over IP and tap on Write USB over IP. Restart your computer to confirm changes.