
User Manual


3
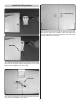
ADDITIONAL ITEMS REQUIRED
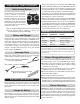
Radio Control System
The Sensei Rx-R (Receiver Ready)
comes with the servos installed, so
all that is required is a 6-channel
transmitter and receiver. The Tactic
™
TTX610 2.4GHz spread spectrum
6-channel radio control system
(TACJ2610) is included with the RTF
(Ready to Fly) version of the Sensei,
so this same radio system is ideal for
your Rx-R version, too.
❏
Tactic TTX610 2.4GHz 6-channel system (TACJ2610)
❏
(4) AA batteries will be required to operate the
recommended transmitter (FUGP7308).
Battery and Charger
The Sensei RTF comes complete with a motor battery and
charger. The Sensei Rx-R version requires a 2200mAh 11.1V
LiPo battery and LiPo Charger. The Sensei was designed for
the Flyzone 2100mAh 11.1V LiPo battery (FLZA6173). Other
LiPo batteries similar in size and connector may also work.
A LiPo battery charger is also required. A safe economical
charger is the Great Planes 3S (3-cell/ 11.1V) LiPo AC/DC
Smart Charger (GPMM3318).
.
Assembly Tools
Other than common hobby tools this is the list of building
supplies that are required to fi nish the Sensei.
❏
Small needle-nose pliers (HCAR0625)
or hemostats (SQUR2502)
❏
#1 Phillips screwdriver (DTXR0174)
❏
Small crescent wrench
❏
Great Planes stick-on lead weight
(Optional, GPMQ4485)
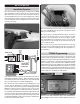
BATTERY PREPARATION
Before starting to assemble the Sensei, we recommend
charging the motor battery. Then, when you are ready to set
up the radio system, the motor battery can be used to power
the receiver.
Charge the Battery
The following is an overview of how to charge your motor
battery using the ElectriFly Smart Charger. If you are using a
different LiPo charger, carefully follow the instructions included
with the charger.
1. Connect the input power to the charger. The GREEN LED
will be lit, indicating standby mode. The RED LED will be OFF.
2. Connect the battery to be charged to the balance plug.
The RED LED will also be lit, and remain RED during the
charging. Both LEDs should be lit solid while charging.
3. If the battery was completely discharged, the RED and
GREEN LEDs will start to fl ash after 2-hours and 40-minutes.
The charger has a built in safety timer.
4. Disconnect the battery from the charger, wait for the GREEN
LED to be lit, and then reconnect the battery to the charger.
5. It will take approximately 1-1/2 hours more to complete the
charge. When the battery is fully charged, the GREEN LED
will turn OFF. Remove the battery from the charger at this time.
6. Charging time depends on the level of discharge of the
battery and if the battery cells were unbalanced.
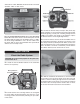
LED SCHEME
Use this table to determine charge action.
RED LED
OFF
OFF
Solid ON
Solid ON
Flashing
GREEN LED
Solid ON
Flashing
Solid ON
OFF
Flashing
ACTION
No battery is connected
Conditioning battery
Battery charging
Charge complete
ERROR*
*Possible sources of battery error may include a highly unbalanced
pack, charger timed out, or one cell of the pack which is low voltage. In
the case of a battery error, please remove the battery pack from the
charger and inspect it carefully for swelling or any other damage, such
as broken wires.
Battery Charging Precautions
● Be careful to avoid overcharging the battery. Only use a LiPo
approved charger. Never use a NiCd/NiMH peak charger.
● Remember to check the temperature of the battery during
the charge. The battery should not get hot. If it does, unplug
the battery from the charger.
● Charge the battery at a maximum charge rate of 2.1 amps.
A higher charge rate will cause the battery to get hot.
● Never place the battery on combustible material or leave it
unattended while charging.
● Never charge the battery in the plane.
● We recommend that a balancing charger be used to charge
the battery. A properly cared for battery will last a long time. If
the battery pack is continually charged without balancing the
individual cells, the life of the battery pack will be shortened.
Battery Recycling
Attention: The Sensei is powered by a rechargeable battery.
At the end of the battery’s useful life, under various state and
local laws, it may be illegal to dispose of the battery into the
municipal waste system. Check with your local solid waste
offi cials for details in your area for recycling options or proper
disposal. We encourage contacting your local recycling center
for more information.