
User Manual


8
RX-R VERSION
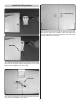
Install the Receiver
All of the wires have been properly connected to the WISE
gyro stabilization unit at the factory. All you need to do are the
fi nal connections to your receiver. The connections shown in
the following illustration are for channel assignments of Tactic
and Futaba brand radio components. Other brand radios
may have different channel assignments. Consult your radio
manual if necessary.
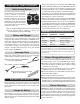
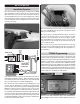
6-CHANNEL RECEIVER
LINK
SET
AIL
NR
ELE
NR
RUD
NR
AIL1
AIL2
ELE
RUD
MODE
SYS
AIL1
E/R/A2
+ –
L1 L2
6-axis Flight Control
AILERON SERVOS
WHITE/YELLOW
RED
BLACK/BROWN
RED
DISCONNECTED
YELLOW
BROWN
DROP DOOR SERVO
BINDING BUTTON
ELEVATOR SERVO
RUDDER SERVO
CH1: TO RX AILERONS
CH2/CH4: TO RX RUD/ELE
CH6
CH1
CH2/CH4
ESC
(The channel numbers shown in the illustration match Tactic
and Futaba brand radio systems. Channel numbers and their
associated functions may be different for other radio brands.
See your radio manual for channel assignments.)
❏
1. Connect the wires leading from the WISE gyro to your
receiver. Use the illustration as a guide. You will notice that
the wire lead connected to the port on the WISE gyro labeled
“E/R/A2” has three connectors at the free end, one on each of
the wires colored yellow, red, and brown. These connectors
are installed in CH2 and CH4 respectively, and the brown wire
connector remains disconnected. Orient these connectors in
the receiver so that the wire position in the plug is inline with
the “WHITE/YELLOW” column in the illustration. The BAT slot
in the receiver will remain empty.
❏
2. The two female connectors that are connected to the top
AIL1 port on the WISE gyro will connect to the aileron servos
when you install the wing.
❏
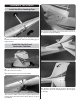
3. Use a piece of double-sided foam tape to secure the
receiver in the location shown. If your receiver has dual
antennas, route one parallel to the tail of the plane and the
other perpendicular to the tail, being sure it is out of the way
of the tail servos. The end tips of the antennas must be at
least 4” [102mm] apart.
❏
4. If necessary, route any of the wire leads out of the way
of the tail servos and pushrods. Using tape or tie straps (not
included) is common in bundling servo wires together for a
tidy installation.
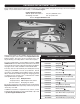
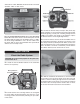
TTX650 Programming
If you have purchased the Rx-R version of the Sensei then
you may need to program the transmitter to operate the mode
switch and recovery switch (described in detail later on in the
manual). If you purchase or have purchased the Tactic TTX610
then it is ready to use out of the box and no additional setup is
required. Instructions are provided here for the Tactic TTX650
transmitter setup. Other brand radios will need to be set up in
a similar manner. If you purchased the RTF Sensei or plan to
use the Tactic TTX610 transmitter with your Rx-R Sensei then
you may skip on to checking the radio system.
Open the CH5 AND CH6 SET option under SETTINGS in
your TTX650 transmitter. Select CH6 for ‘INPUT’ and choose