
User Manual

12
❏
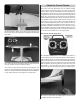
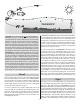
3. Use the transmitter to move the elevator up and measure
the distance it moved from center. This is your “up” control
throw. Measure the down elevator control throw following the
same procedure. Compare the up and down elevator throw
to the recommended elevator throw below. Measure and
compare the rudder and aileron throws as well.
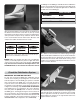
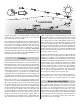
These are the recommended control surface throws:
5/8" [16mm]
Right & Left
1/2" [15mm]
Up & Down
AILERON
1/2" [15mm]
Up & Down
RUDDERELEVATOR
Note: If you ever install different servos in the plane or use a
different radio control system, make sure you check that you
still have the recommended control throws.
NOTE: Unlike most models that don’t have a stabilization
system, you should prepare the plane for fl ight with all the
control surface trim levers in the center position. The Sensei
only will need to be trimmed for level fl ight when in the
ADVANCED mode as described at the end of this manual.
Check the Stabilization System
IMPORTANT SECTION! DO NOT SKIP
For now, let’s just check the WISE gyro stabilization system
to make sure everything is operating in the correct direction.
A full description of how the WISE gyro operates is included
later in the manual. The WISE gyro is set up by the factory
to operate in the correct direction but as a good practice for
any airplane you should always confi rm proper operation prior
to fl ight so the following steps SHOULD NOT BE SKIPPED!
If the WISE gyro is not operating in the correct direction
then your plane will quickly crash. In order to check that
the WISE gyro is assisting by moving the control surfaces in
the correct direction, the system must be set to BEGINNER
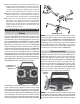
mode. Move the switch above the throttle stick labeled “CH6
FLAPS” (TTX610) to the position marked “2” (position “1” is
INTERMEDIATE mode and position “0” is ADVANCED).
An LED light on the WISE gyro will indicate which stabilization
mode is selected: Double-check that the 3-position fl ight mode
switch corresponds to the expected fl ight mode as indicated
by LED color on the WISE gyro.
MODE LED COLOR
BEGINNER BLUE
GREENINTERMEDIATE
REDADVANCED
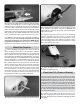
❏
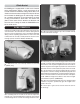
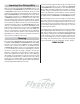
1. Switch on the transmitter fi rst and then plug in the fl ight
battery. Lift the plane and tilt the nose up as shown and observe
the elevators. With the nose pitched up, the elevators should
automatically move down and remain down as long as you
hold the nose of the Sensei up. Repeat a few times to ensure
proper correction direction.
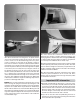
❏
2. Bank the plane to the left (lower the left wing tip so the
right wing tip points up). Observe the ailerons and confi rm
that the right aileron moved up and the left aileron moved
down. Banking the airplane to the right should result in the
opposite aileron corrections.