Printed and Bound with Schematics $25.00 Shareware $ 10.00 ARIZONA RESPONSE SYSTEMS presents FN FAL AND L1A1 HOME GUNSMITHING a workbook by T. Mark "Gunplumber" Graham Revision 010115 Arizona Response Systems 5501 North 7th Avenue Phoenix, Arizona 85013-1755 623-873-1410 http://www.arizonaresponsesystems.com gunplumber@arizonaresponsesystems.com Copyright 1997-2001 by T. Mark Graham. All Rights Reserved.
ARIZONA RESPONSE SYSTEMS presents FN FAL AND L1A1 HOME GUNSMITHING a workbook by T. Mark "Gunplumber" Graham Revision 010115 Arizona Response Systems 5501 North 7th Avenue Phoenix, Arizona 85013-1755 623-873-1410 http://www.arizonaresponsesystems.com gunplumber@arizonaresponsesystems.com Copyright 1997-2001 by T. Mark Graham. All Rights Reserved.
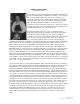
ABOUT GUNPLUMBER (Revised 09-22-00) Do you really care about my biographical information? Probably not. On the other hand it helps to establish my credibility - that I really do know what I'm talking about and you won't ruin your FAL if you follow my workbook. I am T. Mark Graham, known on the Internet as "gunplumber." I'm 32 years old, and been tinkering all my life.
My neighbor had acquired some FAL parts and asked me to assemble it for him. Never done it before, and of course, didn’t have the right tools, but he was in no hurry and I was curious, so got that Israeli FALO put together finally and by golly it worked. My FAL experience may have ended there, but I was a proud owner of a Springfield Armory M1A bush rifle. Problem was, it was a piece of crap – was 26” off in elevation at 100 yards (I bought it new).
PREFACE (Revised 11-01-00) The purpose of this workbook is to assist others in working on FN FAL rifles and their variants. The target audience is the home gunsmith with a low budget, a minimum of tools, and a willingness to jump in with both feet. Writing from Free America (Arizona) I have little knowledge of the rules and regulations in the Occupied Territories.
authorize you to copy this workbook to disk for resale. Also, to ensure the most current edition, if you wish to give a copy to someone else, please refer them to the ARS website for download rather than sending a copy of your possibly-outdated version. This workbook is copyrighted, and intellectual property. Using this workbook and not making the meager shareware payment is theft.
TABLE OF CONTENTS LESSON 101: TOOL SELECTION LESSON 201: REMOVING AND INSTALLING THE BARREL LESSON 202: CONVERTING ISRAELI BARREL TO STANDARD THREAD PITCH LESSON 203: SETTING THE HEADSPACE WHAT IS HEADSPACE? HOW DO I CHECK HEADSPACE? WHAT IS SAFE FOR MY FAL? HOW DO I FIX SHORT HEADSPACE? HOW DO I FIX EXCESS HEADSPACE? LESSON 204: CUTTING AND THREADING THE BARREL CUTTING A BARREL THREADING A METRIC BARREL THREADING INCH PATTERN LESSON 205: TUNING THE GAS SYSTEMS LESSON 207: FOLDING COCKING HANDLE ON A METRIC
LESSON 101: TOOL SELECTION (Revised 01-15-01) MEN can never have enough tools – must be built into their psyches. A little innovation and careful shopping at yard sales and pawn shops will keep the cost down. Rust doesn't keep a hammer from working and most tools polish out nicely. Most MANLY MEN have some of these tools on hand already. Some brands have free replacement if you find a broken one and there is nothing wrong with pooling the cost of the specialty tools with friends who are also building FALs.
Hockey Puck. ($7). This is your bench block - the tool you will use most. Drill a ½" hole in the center. Drill a ¼" hole somewhere else in it. Drill another ½" hole (or cut it) overlapping the edge. Cut a ½" groove across the diameter of the puck to about 1/3 of the depth of the puck. You can now hammer pins from any angle without marring your gun or the work surface. StG-58 Carry Handle Tool. These two simple tools ease the removal and reinstallation of the c-clips on the StG58 carry handle.
kinds of gunsmiths: those who have crawled around the floor for hours looking for parts . . . and liars. Safety Glasses. ($5 and up) I am not going to baby you with safety precautions. Use common sense. You WILL have springs hit you in the eye eventually. Want to gamble on when? Calipers. ($30 and up) Plastic reloading calipers are probably accurate enough for most work. Have an inch to millimeter conversion chart or a calculator. A micrometer will work also, of course, if you know how to use one. Vise.
Headspace Gauge. The .308 "GO" gauge is mandatory. A "GO" and a "NOGO" is preferred ($24 each from Brownells part #513-100-260 and #513-100-261). Also available for about $20 from Midway and Bushmaster/Quality Parts. Front sight Tool. Nice to have in the range bag, but a cheaper substitution is a pair of straight snap-ring pliers. Copyright 1997-2001 by T. Mark Graham. All Rights Reserved.
LESSON 201: REMOVING AND INSTALLING THE BARREL (Revised 01-15-01) To install a barrel on your receiver, you may first have to remove the old barrel, or in the case of some kits, such as the StG-58, you may have to remove the remnants of a demilitarized receiver from your new barrel. There is not enough receiver stub to lock up well either in a bench vise or a barrel wrench. Do not mess with it. You may be enthralled with fondling a small piece of history for a while, but it wears off quickly.
discoloration at the joint. Shut the torch off and repeat the steps above. If the barrel still does not move, you are stuck and will have to find someone to do it right, using a hydraulic barrel vise and a form-fitting receiver wrench. To avoid marring the barrel, you must use a fitted wrench on the flats in front of the receiver face. 11/16" and 27mm are pretty close and can be filed to an exact fit. Ideally, it will be so tight you actually have to tap it with a small hammer to get it on the flats.
METRIC. Use your 12" mill file with the safe edge against the barrel threads. It is easier to keep a long file perpendicular than a short one. Files cut only on the forward stroke. Cut shoulder in four directions, making a square around the round barrel. Then file four more cuts to make an octagon. Take it slow. A good, sharp, file can remove .0005"-.0010" per pass and you will want to test fit each .001" inch. Use a magic marker (poor man's Dykem layout fluid) to color the area you have cut.
LESSON 202: CONVERTING AN ISRAELI BARREL TO STANDARD THREAD PITCH (Revised 09-22-00) Lock barrel in vise jaws (not holding by gas block). Leading with the tapered side, a 1" x 16 tpi die should spin 50-60% of the way on without tension. Continue tightening, using cutting fluid (Tapmatic, Du-Rite, etc) or lubricating oil. Goal is to keep work cool and keep chips clear. Go slow, backing die out often to clear chips. Die should never become too hot to hold in your hand.
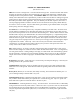
LESSON 203: SETTING THE HEADSPACE (Revised 09-01-99) WHAT IS HEADSPACE? Headspace is the distance between the front of the bolt face and the back of the brass casing when the casing is as far forward in the chamber as it can go. When the round fires, the chambered casing moves backwards until stopped by the bolt face. The chamber and the bolt enclose the casing during firing and contain the massive pressures from the burning propellant.
You don't want to buy a gauge? You really should. Get a factory loaded Federal 168g or 173g National Match .308 cartridge or unfired brass. This is your GO gauge. Cut a disk of masking tape or a feeler gauge that fits over the base of the cartridge. The case plus tape is your NOGO gauge (that's right -- the thickness of a piece of tape is the only variance allowed). You must not use anything but National Match ammunition. Typical military 7.
*A "Gunwriter Whore" is someone who writes glowing reviews of every free gun he gets, to insure he gets more and to insure the manufacturers continue to spend big bucks on advertising in their magazines. Every gun reviewed is the best he's ever seen.
If your bolt will not drop into place, but will close with moderate pressure, you may not want to risk breaking the locking shoulder by removing it again. Apply liberal amounts of lapping compound to the bolt locking surface and the locking shoulder, and with a case in the chamber (no extractor) slam the bolt home repeatedly. Note that I wrote "a case" and not "a live round." Do not use your gauge.
LESSON 204: CUTTING AND THREADING THE BARRELS (Revised 09-22-00) The purpose of this lesson is not to lecture on what is or is not legal under the various Gun Control Acts. It is your responsibility to comply with all applicable rules created by the tax collectors at ATF. The text of relevant laws is in a different section.
Now it is time to thread the barrel. Lock barrel up in vise jaws. Leading with the tapered side of the die (9/16 x 24 tpi LH or 14mm x 1.0 LH for metric or AK brakes, 9/16" x 24 tpi RH for Inch Pattern), insure your die is perpendicular to the barrel. Ideally, you will have the barrel held vertically in the jaws to assist in getting it perpendicular. A large handle on the die works better than a wrench because it is easier to keep straight. Continue cutting using cutting fluid or oil.
LESSON 205: TUNING THE GAS SYSTEM (Revised 09-22-00) There are several factors that contribute to proper cycling in a FAL. Most important is the gas pressure created from the burning propellant that forces the projectile down the barrel. As the projectile passes the gas port, the pressure works in three directions. First, it continues to propel the projectile down the barrel; second, it is exerted outwardly from the inside of the cartridge case against the chamber walls.
powerful the ejection of the spent case. On weapons with a last-round bolt hold-open, open the gas port all the way, then fire with one round in the magazine. Close the port one number at a time until the bolt locks open consistently 5 times. This is your maximum gas setting. For reliability, drop one or two numbers (2 to four clicks) more. If you have an L1A1 style gun, or one that lacks the lastround bolt hold-open device, you will have to experiment to determine the ideal setting.
LESSON 207: FOLDING COCKING HANDLE ON A METRIC RECEIVERS (Revised 05-10-00) There are three types of charging handles (handle, slide cocking) available. One sticks straight out (aluminum or hard rubber) and is typical on metric guns. One folds alongside the receiver (fat = India, thin is other Commonwealth). One sticks out, is spring loaded, incorporates a forward assist, and is typical of Israeli guns. There are a few other experimental variations, Early L2A1, etc, that we won't get into.
You may also choose to remove the material from the inside of the cocking handle by carefully filing or cutting on a mill. While more difficult, this method is safer as it modifies the least expensive part. The long "slide" portion of the cocking handle may need to be reduced slightly in height or width to move freely. Height can be adjusted by holding flat on a belt sander. Width and fine adjustments should be done by careful hand filing or sanding.
LESSON 208: ADJUSTING THE LATCH, LOCKING BODY (Revised 09-23-00) The upper and lower receivers on the FAL are hinged to facilitate cleaning. The two halves snap shut and lock. A lever (lever, locking catch assembly) on the left side of the receiver unlocks the upper receiver by disengaging the catch (catch, locking body). A poor fit of this part results in the receiver snapping open unexpectedly or a wiggle between the upper and lower. The catch is self-adjusting so it can compensate for wear.
LESSON 209: StG-58 BIPOD REMOVAL (Revised 09-22-00) StG-58 FAL kits come with a bipod attached. This bipod is often difficult to remove. The large screws on which the legs pivot are screwed in and locked with crown nuts. These crown nuts are maintained in place by a thread locking compound and 30 years of hardened grease so it may need to be heated for easier removal. You should get a large, expendable screwdriver at a junk sale to convert to a spanner.
LESSON 211: INSTALLING A MUZZLE CONTROL DEVICE (Revised 09-01-99) To the best of my understanding, the current rules prohibit exposed threads on a rifle, as it would permit the easy attachment of a flash hider. While "flash-hiders" are forbidden, "muzzle control devices" are specifically allowed. As I read the rules, you may thread the muzzle, so long as you then permanently attach the muzzle control device.
SILVER SOLDERING A MUZZLE CONTROL DEVICE Silver soldering is as much an art as a science. What is critical is that your solder, flux, and heat source are all appropriate for the temperature you will be operating at (>1100 degrees F.). Also critical is that your surface is absolutely oil free. I recommend sand blasting, then degreasing in alcohol, acetone, lacquer thinner or Methyl Ethyl Ketone (MEK). For most applications, a propane torch will not generate sufficient heat for high temperature solder.
LESSON 304: ADJUSTING THE TRIGGER (Revised 01-15-01) Giving directions on trigger adjustment is always scary. I'm waiting for somebody to disregard all cautions and render the trigger unsafe, shoot somebody and try to make it my fault. Be careful. If you are not totally confident - don't do it. FAL triggers cannot be made into Olympic-grade target triggers, but they can be improved dramatically. Metric guns require three hands (or a slave pin) for reassembly. Inch guns come with a slave-pin installed.
Light triggers are created in part by reducing the contact surface between the hammer and sear. Unsafe triggers are usually caused by too short or shallow sear/hammer engagement, rather than too narrow. You can break the outside corners of the sear, which will reduce slightly the width of sear engagement without affecting depth. Remove and polish the round tip of the trigger return plunger. Polish the round end of the hammer spring guide as well and insure the shaft is free from burrs.
LESSON 800: PARTS EVALUATION (updated 01-15-01) To comply with the various and sundry laws, some perfectly good original parts must be replaced with US made parts. Some are excellent, some are pretty pathetic. Additionally, several companies make custom parts and accessories, and armorer tools. I have made the following reviews as objective as possible, although I freely admit that if a company makes 9 parts that are crappy, I'm not going to be too optimistic about the 10th one. DSA US cocking handle.
Entre'prise "Zero Climb" muzzle brake. Very similar to the DSA with the addition of two top ports. While slightly rougher machining than the DSA, the holes are nicely chamfered and my test sample indexed perfectly. A complete review with photos is in the NOTES section of the ARS website. ($25) Smith Enterprises US muzzle brake for standard barrel. I won't use it. See text under attaching brakes for details. Smith Enterprises US muzzle brake for Israeli FALO. There are two types.
Century Arms US hammer, trigger, sear. I have installed two sets. Both were horrid – cast like the Hesse, only worse. The location in the hammer for the strut is off, which contributes to hammer-follow. They are marked with a "C" and may be made by century. I won't use them. Entre'prise Arms US hammer, trigger, sear. They worked. Hammer would not always reset when manually cocked with the lower out of the rifle – which was really odd, but assembled the set works fine.
large quantity of a previous production run selector that is slightly off dimensionally. At first glance, it may appear that the small tab which holds the selector in place is too wide, thereby making it difficult to move. Removing a tiny portion from the inside of this tab will work, however the problem is actually on the right side of the selector. The portion that passes through the right side of the receiver has too short a shoulder (dimensionally off the thickness of the pin retaining clip).
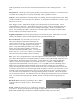
Schneider Machine "Sling Thingy." A plate that fits between the rear of the lower receiver and the stock that allows the attachment of a side mounted sling (slot on L side, eyelet on right side). Nicely made. Precludes use of tang screw, or requires re-drilling of tang screw hole. I can't remember where I found this sketch, or who drew it, but it shows nicely a South African R1 FAL Copyright 1997-2001 by T. Mark Graham. All Rights Reserved.
FAL MALFUNCTIONS (updated 09-01-99) In the years I've been building FAL rifles, I have come across two categories of malfunction that are usually correctable, which I will classify as opening malfunctions and closing malfunctions. An opening malfunction is when the bolt does not unlock, or travel rearward far enough after firing to lock open on an empty magazine or to strip a new round. Closing malfunctions are those where a new round is stripped but does not completely chamber, leaving the bolt unlocked.
6. Insure the rear part of the dust cover channel is not dented. If so, recut with a thin cutoff wheel. Otherwise, the receiver will shave metal off the dust cover during installation. RECOIL SPRING TUBE This is the culprit in many opening and closing malfunctions. They sometimes have small ripples in them – not quite a bend, but enough to raise a slight ring – similar to a bulged barrel – which can slow the spring from smooth operation.
Two points not covered in ADJUSTING THE GAS SYSTEM can cause opening malfunctions. Simply – not enough pressure. The gas block must align with the gas port and the seal must be tight. The seal of the gas adjustment ring must be as tight as possible, while still allowing rotation. The gas piston must be a tight fit inside the gas tube, the gas tube must not rotate to block the gas port, and the gas plug must be tight inside the gas block.
LESSON 850: RANDOM THOUGHTS FROM GUNPLUMBER (updated 01-15-01) Replacement Springs. Below are listed easy to find (Wolff Gunsprings) springs either for direct replacement or for altering spring strength. Commonwealth folding cocking handle spring may substitute Wolff Heavy Duty Inch #5-8, 14 coils. Commonwealth sear spring may subastitute Wolff Heavy Duty Inch #5-8, 14 coils. Commonwealth magazine catch spring: original =.825" long, .145" OD, .028" wire 15 coils, may substitute Wolff Heavy Duty Metric #5-4.
allows for rifle grenades to be attached, and a locking ring for rifle grenades (in case you had any stashed). Turn the rear of the brake down until the bayonet notch and grenade locking ring are gone. Then either turn the outer diameter down to less than 22mm (to preclude a seal with 22mm NATO grenades) or apply a bead of weld “hidden” in the 6 o’clock position to increase the diameter to where you cannot attach your stash of rifle grenade.
LESSON 901: TEXT OF RELEVANT "RULES" (Updated 01-15-01) "1994 MANUFACTURE BAN" 18 USC Chapter 44 as amended by Public Law 103-322 (enacted 09-13-94) §922(v)(1) It shall be unlawful for a person to manufacture, transfer, or possess a semiautomatic assault weapon.
GUNPLUMBER'S INTERPRETATION The FAL does not have all of the 20 listed parts. It has no mounting block, barrel extension, operating rod or disconnector. Nevertheless, Ed Owens, former director of ATF Technology Branch, decided that a cocking handle is an operating rod. The fact that the two parts are as similar as a golf club is to a tomato does not sway him, but that’s what we have to work with.
NOTE FROM GUNPLUMBER ON SHIPPING FIREARMS (Revised 01-15-00) Pursuant to 18 U.S.C. 922(a)(2)(A) and 922(e), 27 CFR 178.31, a nonlicensee [no FFL] may mail a shotgun or rifle to a resident of his own State or to a licensee in any State. Handguns are not mailable by non-licensees. A handgun may be shipped dealer to dealer by USPS simply by filling out a Postal Form 1508 at time of shipping. A common or contract carrier [UPS, Fed Ex, RPS] must be used to ship a handgun.
LESSON 999: SELECTED RESOURCES (Revised 12-05-00) ARIZONA RESPONSE SYSTEMS 5501 N 7th Avenue Phoenix, Arizona 85013-1755 623-873-1410 http://www.arizonaresponsesystems.com gunplumber@arizonaresponsesystems.com FAL assembly, Customizing, refinished parts kits, misc. L1A1 and FN FAL parts, Video: Gunplumber's Guide to FN FAL/L1A1 Home Gunsmithing, This workbook in hardcopy with graphics. Heckler and Koch authorized refinishing center. Also customizing and refinishing.
DSA, INC. 27 West 990 Industrial Ave. Lake Barrington IL 60010 (POB 370 Lake Barrington, IL 60011-0370) 847-277-7258 http://www.dsarms.com FAL parts and accessories, "SA-58" complete rifles, U.S. made receivers similar to a type I, muzzle control devices, innovative designs, excellent scope mount, US parts kits. I can't say enough nice things about the quality of these parts or guns.
SCHNEIDER MACHINE Dave Schneider 15275 Martha Street Hamburg, MN 55339 schneidermachine@hotmail.com Sling Thingy and US cocking handle SARCO 323 Union Street POB 98 Sterling, New Jersey 07980 (908) 647-3800 Military surplus FAL parts and accessories TAPCO POB 2408 Kennesaw, GA 30144 1-800-554-1445 (orders) 770-425-4441 (inquiries) htttp://www.tapco.com FAL Parts and Accessories. VOLUNTEER ORDNANCE WORKS Dan Richardson 2575 Humphrey Bridge Rd. SW Cleveland, TN.